Journey with Confidence RV GPS App RV Trip Planner RV LIFE Campground Reviews RV Maintenance Take a Speed Test Free 7 Day Trial ×


Reply
 
Thread Tools Display Modes
 
Old 06-22-2023, 01:26 PM   #1
Senior Member
 
CDACamper's Avatar
 
Join Date: Nov 2019
Location: CDA, Idaho
Posts: 201
Tightening Bolts for Fiamma Awning

I have an SMB mounted Fiamma awning, and I have not checked the mounting bolts before. I tried to tighten the bolts that hold the mounting bracket but the bolt spins without tightening up the connection. It is not so loose that I can pull the bolt out so it must still be threaded onto the nut behind it. Do I have to take the interior apart to get to the back side of these bolts? If I do are the bolts accessible from inside the van? I don't want to start taking apart the inside and find out the bolts are inside the van body and inaccessible. I did a search of the forum and found lots of info about how bad the brackets are but there is no info about accessing the bolts from the inside so you can tighten them from the outside.

Leaving for AK on Monday and this is the last thing on my list to take care of.
Attached Thumbnails
2023_06_22_12_28_00_20210411_162011.jpg_paint.net_5.0.6.jpg  

__________________
______________________________
2001 E-350 V10 EB50 Penthouse
4.56 gears w/ARB Rear Locker
4X4 Quigley
Agile RIP
CDACamper is offline   Reply With Quote
Old 06-22-2023, 01:53 PM   #2
Senior Member
 
pjpvi's Avatar
 
Join Date: Apr 2007
Location: SF Bay Area, CA
Posts: 1,289
If the original SMB mounts, mine (it was a 2005) used rubber nut inserts similar to below. Don't go pulling your interior apart. You may be able to apply some outward force to keep it from spinning? Or that may just pop it out of the hole.

Enjoy Alaska!
Attached Thumbnails
rubber nut insert.jpg  
__________________
Phil

- 2005 EB50 6.0PSD - SMB 4x4
pjpvi is offline   Reply With Quote
Old 06-22-2023, 02:36 PM   #3
Senior Member
 
1der's Avatar
 
Join Date: Apr 2013
Location: San Francisco, CA
Posts: 3,285
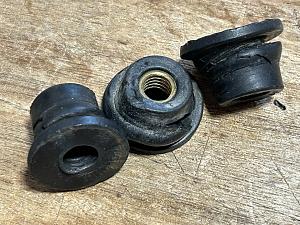
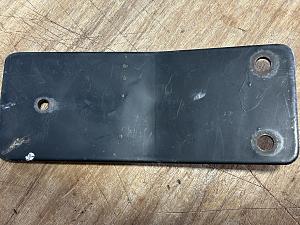
Phil is correct - SMB uses two rubber bung nuts for securing each of the rear two brackets. The front bracket is typically a nut and washer through the B Pillar.

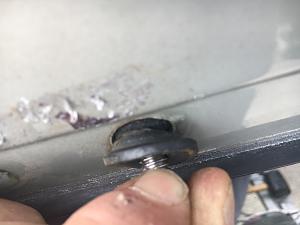
The rubber bung nut is pushed from the outside into a hole drilled in the sheet metal first , then the bracket is hooked over the gutter lip before bolts are threaded through the bracket holes into the bung nuts. There is nothing that requires interior removal for the rear brackets. The threads imbedded in the rubber bung compress as the bolt is tightened. This pushes the outer diameter of the rubber bung outward into the (sharp like a knife) edges of the hole that was drilled in the (thin) sheet metal.

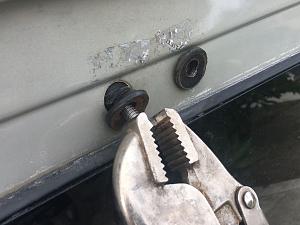
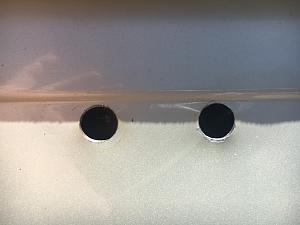
Here in the pictures is what you are likely dealing with. The aged rubber has likely been cut by the sharp edge of the sheet metal and lost its "bite". Enough movement at the holes, which is the only bracket securing location, and the body sheet metal will start to tear. Hopefully you are not at this point. I would be amazed if you could tighten any of those bung nuts to increase bite. The rubber is done.

You can remove and replace the bung nuts if the body sheet metal is intact. If the body sheet metal has started to tear I would not use bung nuts, at all.

PM me if you want more in depth info and solutions. In short, this needs to be fixed / addressed asap.

Click image for larger version

Name:	IMG_6301.jpg
Views:	4
Size:	243.0 KB
ID:	47497Click image for larger version

Name:	IMG_6302.jpg
Views:	4
Size:	277.0 KB
ID:	47498

Click image for larger version

Name:	IMG_6303.jpg
Views:	4
Size:	212.5 KB
ID:	47499Click image for larger version

Name:	IMG_2912.jpg
Views:	4
Size:	97.1 KB
ID:	47503

Click image for larger version

Name:	IMG_2916.jpg
Views:	4
Size:	61.8 KB
ID:	47504Click image for larger version

Name:	IMG_2918.jpg
Views:	4
Size:	94.0 KB
ID:	47505
__________________
Ray
Beastie 3: 2002 7.3 EB Cargo: Agile TTB, CCV High Top, Custom Walk Through, Lots of stuff added. www.BlingMyRig.com
1der is offline   Reply With Quote
Old 06-23-2023, 02:22 AM   #4
Senior Member
 
martinli's Avatar
 
Join Date: Aug 2017
Location: Berlin
Posts: 134
@Ray what a good explanation. Thank's!
I'm happy not to have those rubber nuts. I use my own roof rack square baars.


If I would have thought having the brackets fixed to the sheet metal than I would use rivet nuts. They are sturdy and available in huge sizes.


But for this particular problem I would go for Rays Z-Brackets. They do not need to be screwed to the sheet metal. At least as far as I remember.


Cheers,
Martin
Attached Thumbnails
blind-rivet-nuts-500x500.jpeg  
__________________
E350 - 2014 - 2WD
martinli is offline   Reply With Quote
Old 06-23-2023, 10:54 AM   #5
Senior Member
 
CDACamper's Avatar
 
Join Date: Nov 2019
Location: CDA, Idaho
Posts: 201
Thank you for all the replies. So glad I posted here before taking apart may interior!! Ray (1der) was kind enough to take a phone call and passed on some great information. He has brackets to solve the poorly engineered Sportsmobile mounting method for these awnings. Thanks again for all of the feedback!!
__________________
______________________________
2001 E-350 V10 EB50 Penthouse
4.56 gears w/ARB Rear Locker
4X4 Quigley
Agile RIP
CDACamper is offline   Reply With Quote
Old 06-29-2023, 10:48 AM   #6
Member
 
Timerider's Avatar
 
Join Date: Apr 2020
Location: Bishop, CA
Posts: 66
CDACamper,

Our 2002 SMB had the same problem when my wife and I became her second owners a few years ago. The (original?) well nuts on our awning mounts looked a little bit different than the images that 1Der showed, and look more like the one that pjpvi showed (above), which is what we replaced the (originals?) with.

Note: 1Der's images may show better-quality parts.

The "bung nuts" used by SMB to mount Fiamma awnings are sometimes called "well nuts" or "expansion nuts". Fortunately, these can be found under that lattermost name at your local Ace Hardware store, provided that its hardware section is stocked by the Hillman Fastener company (most are).

The expansion nuts on our awning have a 1/2" O.D. rubber body, with a 3/4" O.D. rubber flange-head, and a female-threaded 1/4"-20 brass insert. These expansion nuts can also be found at some auto parts stores (e.g. O'Reilly), supplied by Dorman, using part number: 700-923BX (this is a box of 10 expansion nuts).

I had to special-order a box of new Dorman expansion nuts from my local O'Reilly auto parts store, but this was before I accidentally found them at Ace Hardware a few weeks later - for less, no less. (Ouch!)

Checking the Auto Zone and NAPA websites today turned up no results for the 700-924BX part number, but Advance Auto Parts says that they sell them individually under part number 700-923 at some stores, although they're currently out-of-stock at several of the A.A.P. stores that I checked.

Pro Tip: Lubricate the bolt and/or brass insert with some grease to make sure that the friction between the bolt threads and the expansion nut's brass insert is less than the friction between the rubber body of the expansion nut and the holes in your awning mount and van body. This will also make your life easier when the rubber eventually fails and you have to remove the old ones to replace them (sigh, again).

Enjoy Alaska!
__________________
"Silver Kitten": 2002 E-350 7.3 RB-50 SMB Quigley 4x4, Agile RIP-kit
"My Metal Mistress": 1982 Cessna T182 - "Sleeps 0, but leaps tall mountains in a single bound."
Timerider is offline   Reply With Quote
Reply


Posting Rules
You may not post new threads
You may not post replies
You may not post attachments
You may not edit your posts

BB code is On
Smilies are On
[IMG] code is On
HTML code is Off
Trackbacks are Off
Pingbacks are Off
Refbacks are Off

» Featured Campgrounds

Reviews provided by

Powered by vBadvanced CMPS v3.2.3
Disclaimer:

This website is not affiliated with or endorsed by Sportsmobile SIP or any of its affiliates. This is an independent, unofficial site.


All times are GMT -6. The time now is 03:32 PM.


Powered by vBulletin® Version 3.8.8 Beta 4
Copyright ©2000 - 2024, vBulletin Solutions, Inc.