|
|
 01-02-2011, 10:21 PM
|
#11
|
|
Senior Member
Join Date: Jul 2009
Location: Port Angeles Wa And Jackson Hole Wy.
Posts: 1,284
|
Re: Installing Westfalia Pop-top in a Chevy Express
That came out great. I have never used fiberglass and really wasnt sure what you were doing. As for my shop it isn't mine but a good friends who does custom truck and mods Im super lucky to have a friend who has everything I need and gives me the key.
check out his website legacyclassictruck.com he does amazing things.
Ron
__________________
Going where most dont
"one day at a time"
|

|

|
|
01-03-2011, 12:36 AM
|
#12
|
|
Junior Member
Join Date: Apr 2010
Location: Laramie, Wyoming
Posts: 21
|
Re: Installing Westfalia Pop-top in a Chevy Express
Quote:
|
Originally Posted by bettyford
That came out great. I have never used fiberglass and really wasnt sure what you were doing.
|
Thanks! Fiberglass is a super material, and easy to work with once you get the hang of it. It is basically a thick liquid epoxy, and you soak woven fiberglass cloth in it. When you lay the soaked cloth in place, it will cure into a hard thin layer, and it takes the shape of whatever you lay it on. In order to make good looking fiberglass objects, you have to be creative about building moulds, because they dictate the shape of the finished product. In my case, my mould was simple: just a flexible piece of masonite clamped onto the front of my westfalia top, and bent to mimic the rounded shape of the original top.
You don't find many people who photograph the process of laying up fiberglass because it's messy, and time sensitive. The epoxy cures soon after you mix it, so you have to work fast. There's no time to stop, clean up your sticky fingers and snap photos. If you skip the step where you clean up your sticky fingers, your camera gets covered in epoxy blobs. The only way to document the process is to have a friend handy to take the photos.
Fiberglass is useful because you can create nearly any shape with it, including wildly complex curved surfaces. That's why it's used to create the wild shapes of corvette bodies: it would be difficult and expensive to create the same body panels from metal. Its drawback is that it is heavier than similar structures built from aluminum or steel sheet. I don't use fiberglass very often, but there are some jobs where it is the obvious solution, and this was one, since I needed to enlarge an existing fiberglass structure.
|
|
|
|
|
05-19-2011, 07:44 AM
|
#13
|
|
Senior Member
Join Date: Jul 2010
Location: BC Canada
Posts: 427
|
Re: Installing Westfalia Pop-top in a Chevy Express
How did this turn out?
__________________
"there is neither science nor fact prevailing here" - vlamgat
|
|
|
|
|
05-27-2011, 01:23 PM
|
#14
|
|
Junior Member
Join Date: Apr 2010
Location: Laramie, Wyoming
Posts: 21
|
Re: Installing Westfalia Pop-top in a Chevy Express
Quote:
|
Originally Posted by Silver350
How did this turn out?
|
I can't say, just yet, but I expect to update the thread with progress pictures very soon. Thankfully, I've bought a new camera since I started the project, so the next round of photos should be better than the last ones!
Once I got the fiberglass work done on the pop-top, and got the hinges mounted, the whole van was weathertight (at least I thought it was!) so I drove it that way for almost a year. I got motivated to finish the project recently when I discovered that the spring rains were getting into the interior.
I've got a trip planned for the weekend after memorial day, so I'm using the memorial day weekend to finish mounting the top. I spent yesterday evening installing the new canvas tent on the top, then priming the whole top. Tonight, I'll spray paint and clearcoat, and hopefully I can mount the pop-top Saturday night or Sunday. After that, I've got a lot of finish work to do replacing the headliner and finishing the edges of the hole I cut in the top of the van.
I've made several trips this spring to motorcycle trials, and I already love my new pop-top, even without canvas. It is so nice to be able to open the top and stand up to change into/out of my motocycle gear in relative privacy. I have to admit that it feels a bit odd to stand in the van naked, while looking out over the top of the van where the canvas tent SHOULD be! 
|
|
|
|
|
05-30-2011, 05:15 PM
|
#15
|
|
Junior Member
Join Date: Apr 2010
Location: Laramie, Wyoming
Posts: 21
|
Re: Installing Westfalia Pop-top in a Chevy Express
Finally, some major progress. I sprayed primer and paint on the pop-top last week, and spent the long weekend installing the top and the tent canvas. Here's the hole I cut in the roof of the van. Thankfully, the roof supports lined up exactly where I needed to cut the hole, so I only cut out one of the "ribs" from the roof.

Once the paint cured, I installed the weatherstrip along the bottom edge and then slid the top up onto the van. I got the hinges and rear supports mounted temporarily, and discovered (as I anticipated) that the canvas was a bit short to reach the roof of the van. I had about a two-inch gap, and the canvas wouldn't stretch enough to fit. Here, you can see the gap:

I left the front hinges attached, but pulled the rear supports out, and shortened them by about 2 inches. After re-installing them, the gap had nearly disappeared. The canvas will stretch enough to close this small gap:

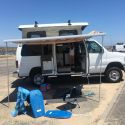
It took me all afternoon to stretch the canvas and attach the trim that holds it down to the roof. In the end, it all fit beautifully:


And it seems the van has a new identity, inspired by the reaction I get when old Volkswagen drivers recognize the Westfalia pop-top, where it doesn't naturally belong:

In the end, I left the top largely unmodified, and used standard Westfalia canvas, hinges, and trim. The only modifications involved differences in the contour of the roof. The Wesfalia tops are desigend for the pronounced radius on the roof of Volkswagen buses, while my Chevy roof is relatively flat. I had to fill in the gap between the flat van roof and the Westie top at the front of both fiberglass pop-top sections. I used fiberglass in both places, and the result was satisfactory. At the rear of the luggage rack section, I simply trimmed a bit of existing fiberglass off the Westie part to match the Chevy roof radius. I made sure to use a generous bead of sealant anywhere where the pop-top attaches to the sheetmetal roof, so I wouldn't have leakage later.
|
|
|
|
|
05-30-2011, 08:05 PM
|
#16
|
|
Junior Member
Join Date: Mar 2009
Posts: 6
|
Re: Installing Westfalia Pop-top in a Chevy Express
Great job! I am very impressed with the results.
|
|
|
|
|
05-30-2011, 09:29 PM
|
#17
|
|
Senior Member
Join Date: Jul 2009
Location: Port Angeles Wa And Jackson Hole Wy.
Posts: 1,284
|
Re: Installing Westfalia Pop-top in a Chevy Express
That came out great, very clean.
Did you cut the roof under the back piece to gain a little more head roof as well?
Ron
__________________
Going where most dont
"one day at a time"
|
|
|
|
|
05-30-2011, 09:42 PM
|
#18
|
|
Senior Member
Join Date: Apr 2007
Location: Parker, CO
Posts: 7,644
|
Re: Installing Westfalia Pop-top in a Chevy Express
Wow, the front to back size is perfect. Very cool.
__________________
it was good to be back
|
|
|
|
|
05-30-2011, 10:24 PM
|
#19
|
|
Senior Member
Join Date: May 2007
Location: North Vancouver, BC
Posts: 637
|
Re: Installing Westfalia Pop-top in a Chevy Express
Love the rebadging! The top looks great, and I'm sure you do get a few WTF moments.
On a few occasions when my '89 Westy left me stranded, I dreamt of changing the letters to "WESTFAILURE". Never got around to it.
Cheers,
Brent
__________________
2008 E350 EB, V10, GTRV Conversion
|
|
|
|
|
05-31-2011, 12:06 AM
|
#20
|
|
Junior Member
Join Date: Apr 2010
Location: Laramie, Wyoming
Posts: 21
|
Re: Installing Westfalia Pop-top in a Chevy Express
Quote:
|
Originally Posted by bettyford
That came out great, very clean.
Did you cut the roof under the back piece to gain a little more head roof as well?
Ron
|
No, the rear section is a big luggage rack, basically just a fiberglass frame around the perimeter, with a big hole in the middle, so it wouldn't cover a hole in the roof. No need for a hole there anyway, as the bed fills the whole back section of the van. I'll snap a pic of the luggage rack in action next weekend when I take it for its inaugural camping trip, so you can see how the rack functions with luggage in it. I found an unexpected bonus when I installed the new tent canvas: unlike my old Westie tent, the rear window flap AND the screen zip open on this tent, so I can stand inside and reach all the stuff on the luggage rack out back. I expect I'll grow to love that feature! One of the things I loved about my old pop-top was the shelf space it provides in the front part of the tent. It's only about a foot wide, but that one by four foot shelf holds a lot of food and gear and keeps it off the floor. Now the luggage rack will work as a shelf too, for stuff that doesn't need to stay in out of the weather. 
|
|
|
|
|
|
 Posting Rules
|
You may not post new threads
You may not post replies
You may not post attachments
You may not edit your posts
HTML code is Off
|
|
|
|
 » Recent Threads
 |
|
|
|
|
|
|
|
|
|
|
|
|
|
|
|
|
|
|
|
|
|
|
|
|
|
|
|
|
|
|
|
|
|


 Linear Mode