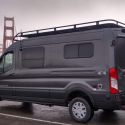
Journey with Confidence RV GPS App RV Trip Planner RV LIFE Campground Reviews RV Maintenance Take a Speed Test Free 7 Day Trial ×


Reply
 
Thread Tools Display Modes
 
Old 06-10-2022, 06:47 PM   #1
Senior Member
 
Join Date: Nov 2020
Posts: 436
Fiamma to Extruded Aluminum Profile ( 80/20 ) - what I did

Hey guys

After my wife was pushing for an awning I took my chances and „explained“ her we‘d need a roof rack. She agreed and that‘s what followed!

I started ordering my Fiamma via 1der/ Ray and knowing there may (!) be some lead time, I started to think about my rack.

25kg/ 50lbs per crossbar, as low as possible, as flexible / versatile as possible,…
—> I decided for extruded aluminum profiles.

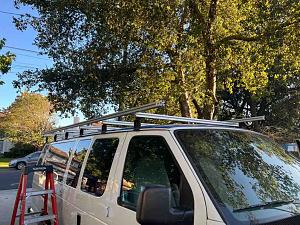
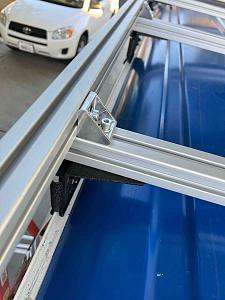
I went for 4545 profiles, got 5x 13ft from Grainger and all bolts/ nuts are M8!

Gutter clamps are the 90 degree Smittybilt HDS. 12 in total, 6 crossbars.
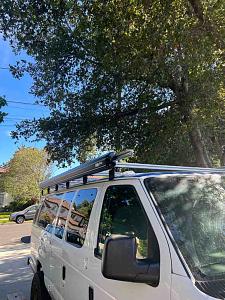
I aligned them and only had to shim a single one (all bars are ~2‘ apart), the 4th from the front.

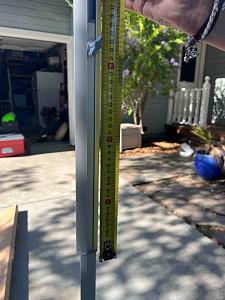
Ray gave me instructions about how high it should sit above the rain gutter, so I decided to put the long side bar on top of the crossbars to achieve the relevant height.

To connect it I used regular connectors, 1x M8 each side.

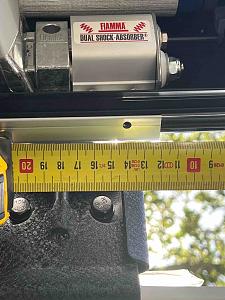
Seeing the Fiamma brackets I decided to go for an additional M12 in the crossbars. That‘s just what thebinner hole of the 4545 provided.
In general it‘s adding to avoid momentum; not really needed, but hey: 20$ atop of the other 2K…
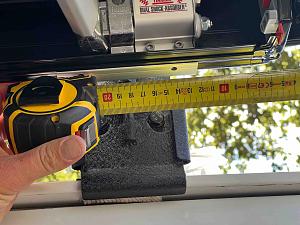
Ray was a bit concerned about 35‘s + 6“ lift anf the length of the legs, but it‘s easy going: I got 30cm left!

Clearance between the Fiamma and rain gutter is ~2.5“, so easy going.

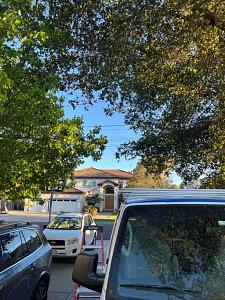
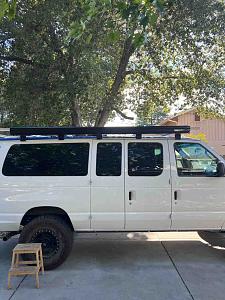
Here are some pics, let me know when you have more questions.
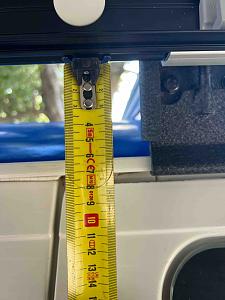
Click image for larger version

Name:	IMG_1640.jpg
Views:	35
Size:	97.0 KB
ID:	44175

Click image for larger version

Name:	IMG_1641.jpg
Views:	28
Size:	68.5 KB
ID:	44176

Click image for larger version

Name:	IMG_1642.jpg
Views:	21
Size:	67.5 KB
ID:	44177

Click image for larger version

Name:	IMG_1643.jpg
Views:	26
Size:	99.2 KB
ID:	44178

Click image for larger version

Name:	IMG_1724.jpg
Views:	30
Size:	76.9 KB
ID:	44179

Click image for larger version

Name:	IMG_1725.jpg
Views:	26
Size:	176.9 KB
ID:	44180

Click image for larger version

Name:	IMG_1730.jpg
Views:	21
Size:	114.9 KB
ID:	44181

Click image for larger version

Name:	IMG_1732.jpg
Views:	20
Size:	103.5 KB
ID:	44182
(Rear 40 door)

Click image for larger version

Name:	IMG_1733.jpg
Views:	18
Size:	87.0 KB
ID:	44183
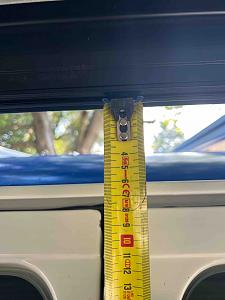
(Gap between 40 and 60 door)

Click image for larger version

Name:	IMG_1735.jpg
Views:	18
Size:	149.2 KB
ID:	44184
(From the front corner of awning)

Click image for larger version

Name:	IMG_1736.jpg
Views:	20
Size:	142.5 KB
ID:	44185
(Front awning)

E-350 is offline   Reply With Quote
Old 06-10-2022, 06:50 PM   #2
Senior Member
 
Join Date: Nov 2020
Posts: 436
Click image for larger version

Name:	IMG_1740.jpg
Views:	11
Size:	175.7 KB
ID:	44186

Click image for larger version

Name:	IMG_1741.jpg
Views:	18
Size:	187.4 KB
ID:	44187

Click image for larger version

Name:	IMG_1742.jpg
Views:	12
Size:	167.9 KB
ID:	44188

Click image for larger version

Name:	IMG_1743.jpg
Views:	15
Size:	158.7 KB
ID:	44189

Click image for larger version

Name:	IMG_1744.jpg
Views:	13
Size:	72.6 KB
ID:	44190
(Height from ground to the knee above the door handle)
E-350 is offline   Reply With Quote
Old 06-10-2022, 10:42 PM   #3
Senior Member
 
bigriver's Avatar
 
Join Date: Feb 2014
Location: Columbia River Gorge
Posts: 651
Nice work... you're gonna love that Fiamma.
__________________
Joe
2003 EB50 7.3L PSD Q4X4
2000 Chevy Express 3500 High Top EB37 - Sold
2003 EB30 - Sold
bigriver is offline   Reply With Quote
Old 06-11-2022, 01:36 PM   #4
Senior Member
 
Join Date: Sep 2013
Location: Georgia
Posts: 746
Sorry - what was the tubing and 90 degree parts called from Granger ? I'm thinking of trying to add a small roof rack over my front roof area - located in front of my Yakima roof rack. Any link to the tubing would be great !
doublevan2 is offline   Reply With Quote
Old 06-11-2022, 03:52 PM   #5
Senior Member
 
Join Date: Nov 2020
Posts: 436
Fiamma to Extruded Aluminum Profile ( 80/20 ) - what I did

Here are the part number for Grainger:
Click image for larger version

Name:	IMG_1756.jpg
Views:	8
Size:	35.5 KB
ID:	44210

Click image for larger version

Name:	IMG_1757.jpg
Views:	9
Size:	184.6 KB
ID:	44211

The profile are also available in other sizes. Just depending on how much weight you want to carry.
With ~55kg (+x :-D) of my wife and 1.7m width the 4545 (45mmx45mm) is bending down 1cm. So we can sit on the roof.

I used so called hammer nuts for the 10mm slot width the 4545 has, I took M8 nuts and bolts for everything:
Profiles to gutter clamps, for the angles, to attach my shovel via quick fists, for the hi jack lift,…

Alternative to the nut would be a slot bolt: so you‘d have the bolt sticking out and add a nut from the top.

Generally you can also check tnutz. They also have extruded profiles and accessories. Just ordered more of the corner brackets and end caps as they‘re currently discounted.

Hope that helps!
E-350 is offline   Reply With Quote
Old 06-12-2022, 08:59 AM   #6
Member
 
Join Date: Jun 2022
Location: Bellingham, WA
Posts: 34
Love the use of the metric tape measure!
bhamBaker is offline   Reply With Quote
Old 07-04-2022, 01:23 AM   #7
Senior Member
 
martinli's Avatar
 
Join Date: Aug 2017
Location: Berlin
Posts: 134
@E-350 I'm currently building it similar to you.
Did you secure the awning through the Fiamma brackets fromm the lower side where you already have some wholes? Or did you drill though the case like Ray does with the Z brackets?
__________________
E350 - 2014 - 2WD
martinli is offline   Reply With Quote
Old 07-04-2022, 07:57 AM   #8
Senior Member
 
1der's Avatar
 
Join Date: Apr 2013
Location: San Francisco, CA
Posts: 3,285
Quote:
Originally Posted by martinli View Post
@E-350 I'm currently building it similar to you.
Did you secure the awning through the Fiamma brackets fromm the lower side where you already have some wholes? Or did you drill though the case like Ray does with the Z brackets?
E-350 used the mounting brackets that come with the Fiamma awning. The two holes in the bottom of the bracket are used with small screws that secure the bracket and awning together.
__________________
Ray
Beastie 3: 2002 7.3 EB Cargo: Agile TTB, CCV High Top, Custom Walk Through, Lots of stuff added. www.BlingMyRig.com
1der is offline   Reply With Quote
Old 07-04-2022, 08:04 AM   #9
Senior Member
 
martinli's Avatar
 
Join Date: Aug 2017
Location: Berlin
Posts: 134
@1der yes Ray I know that. I also use this brackets together with with heavy L brackets. My question is whether he drilled through the awning casing as you usually do or just just that small M5 screws.

My feeling is that M5 srews should do their job as well.
__________________
E350 - 2014 - 2WD
martinli is offline   Reply With Quote
Old 07-04-2022, 08:36 AM   #10
Senior Member
 
1der's Avatar
 
Join Date: Apr 2013
Location: San Francisco, CA
Posts: 3,285
Ah, no worries.

He just used the M5 screws, no through bolting. Of note is the bracket placement towards the outer ends of the case. The arm mechanisms preclude any through drilling in those areas.
__________________
Ray
Beastie 3: 2002 7.3 EB Cargo: Agile TTB, CCV High Top, Custom Walk Through, Lots of stuff added. www.BlingMyRig.com
1der is offline   Reply With Quote
Reply


Posting Rules
You may not post new threads
You may not post replies
You may not post attachments
You may not edit your posts

BB code is On
Smilies are On
[IMG] code is On
HTML code is Off
Trackbacks are Off
Pingbacks are Off
Refbacks are Off

» Featured Campgrounds

Reviews provided by

Powered by vBadvanced CMPS v3.2.3
Disclaimer:

This website is not affiliated with or endorsed by Sportsmobile SIP or any of its affiliates. This is an independent, unofficial site.


All times are GMT -6. The time now is 09:09 PM.


Powered by vBulletin® Version 3.8.8 Beta 4
Copyright ©2000 - 2024, vBulletin Solutions, Inc.