Hey guys
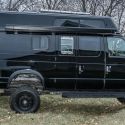
After taking care for the exterior with my big repaint project, it is now time to work on my interior of my 2006 5.4 E350 EB.
When I initially bought the van early Covid I took out 10 of the 14 seats and replaced the carpet style floor with a sandwich of Styrofoam, ¾ plywood and a rubber diamond floormat up to the driver/ passenger seat.
I also added a quick and cheap podest where we could put our air pads and sleep.
Now all that cheapo wood studs I used for the podest started to squeak more and more and the regular wood screws (taking them in and out) didnt make it better. I was also annoyed by the space the regular plastic trims take up space, that would reduces the bed width and head space.
Another issues I had was all stuff loaded under the podest jumped up and smashed down on bumpy trails.
Means:
I had to rethink the interior!
My general plan:
I need a simple build that fullfills 2 main purposes:
1. 2 people need to sleep in the van and my camping stuff needs to fit
2. I need to be able to easily remove the interior whenever I haul stuff (rounds of wood, wood sheets in 4x8 size, put bikes into the van,
)
I dont need a kitchen, dont need shelves or anything around bathrooms: a) were here in sunny California and b) were always cooking outside, dont spend time in the van beside driving.
So all that said the basic idea came up quick:
- Remove all plastic trim and the stock headliner
Provides ~4 in width + 4 head space due to the rear A/C ducting integrated in the headliner
- semi permanent boxes over the wheel wells, so wide spaced, that a 4x8 sheet fits in
- Access point to the boxes so I can store recovery rope, jumper cables, spare parts in one box and can store dirty cloths, jackets or whatever we might perhaps need during the trip in the other box
- Easy to remove bed panel in between
- Tracks everywhere to tie down anything we carry: L-Tracks on the floor & bed frame out of 1 80/20 extruded aluminum profiles
- Lower the floor:
Before:
Van floor + 1 tall brackets for the single seats
¾ Styrofoam on top
¾ plywood on top
After:
Van floor without brackets
No Styrofoam anymore (as we dont do winter camping)
½ plywood
Savings: 1 ½
- sliding 2nd row seats
Use L-Tracks and an adapter to move seats back- and forward
At the day of this post Im far from being done. But I have a basic idea where I want to go and will improvise along the way :-) The latest picture is still showing the mock up phase and I will provide more details to most of the steps when I finally install everything. But I was motivated by motovans UJOR 4x4 MTB camper update that I wanted to share my status.
As an example: I havent figured it out yet, but will for sure add a small storage on the head liner at the driver/ passenger seat. I also plan on integrating my compressor/ locker buttons and eventually I need some lights (interior/ exterior) that will also find their switches up in the headliner.
I also need to figure out exactly how to route the rear A/C and heater further to the front, whereas this will be a simple setup. Routing of the A/C will just go up where it used to be, but then most probably being ducted in the driver top corner forwards the end of the bed/ second row.
As you can see: Im not CADing it, but more start walking and plan along the way :-D
So lets get to work and have fun reading!
Step 1: Everything out!
I took out all trims, headliner from front to back. The insulation left on the ceiling was my first job years back and it will stay.


 Threaded Mode