Tinted windows are great for privacy during the daytime but you know what happens when it gets dark and the lights go on. I needed shades for my many windows and wanted to insulate them against the cold and heat. I have a set of the rigid reflectix-type shades with suction cups but found them to be a pain to install when needed and too unwieldy to store when not. I also wanted something more versatile that would stay out of the way in daytime but just drop down for privacy at night.
For lots of bucks, you can buy this type of shade for Sprinters, Promasters, and Transits, but you have to go custom for the E350. It looks from recent posts that the Overland Gear Guy will make you a set using Havelock wool.
Because Ive got more time than money, I set about making a full set of shades using an insulation product called Warm Window. Its expensive, but my local fabric store had it on clearance so I scooped up a bunch. You could use any similar insulation product. I wanted something lightweight and easy to roll but a good insulator.
I thought Id share my process with you in case youre interested in trying it yourself. Im really pleased with how they turned out. I will say that this this took a ton of hours and made me realize why the folks who do this for a living charge what they do. But we are a persistent bunch here and thats the most important ingredient.
Heres the Warm Window product. Two layers of insulation with an aluminum layer in between and a fabric layer on the outside:

I chose a gray Ripstop for the interior side and a black waterproof Ripstop for the exterior. I used the Reflectix as templates.


I used 1 wide binding to sew it all together.

It makes it look like this. This is my test piece.

My setup. The windows that open are the hardest to do. Binding doesnt like to go around inside corners very much. I reinforced the curve for wear. I sewed in webbing tabs for snaps all around, as well as webbing to keep them rolled up. Lucky non-window-trim folks have it easy: they just use magnets. Sewing those tabs took hours upon hours.

Finally got to the fun installation part. These are the snap parts purchased from Sailrite. Ive bought lots of supplies from them over the years, including my sewing machine, the LSZ, which I love. It can go through a dozen layers of fabric, no problem.

I would never consider doing this job without the Pres-n-Snap tool from Sailrite. You dont want to install dozens of snaps by hand using a hammer. And, as an added bonus, this tool really builds up your hand muscles... whew.

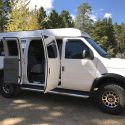
Heres the rear passenger side window installed.

And the rear driver side rolled up. The trim snaps are 3/8 screw-in.

Closed/open

Here are the barn doors, rolled up.

The rear side windows were a beast because theres no plastic trim, just fabric-covered foam. I put five screw snaps in the top and three web straps that attach to the CCV wood frame. Well see how that holds. It was too dark to get a photo. Ill add one later. The front windows are easy: I roll the window down and flip the webbing tabs to the outside then close the window. Fits perfectly and my rain deflectors will keep the tabs dry. Ill likely add a snap on the forward edge only.
So there you have it. Its amazing how much difference the insulation makes in the cold. Im really looking forward to trying it out on the road.
.


 PhoTo
PhoTo


 Linear Mode