 |
|
 08-10-2023, 04:45 AM
|
#51
|
|
Senior Member
Join Date: Jan 2011
Location: Reynoldsburg, Ohio
Posts: 3,774
|
Quote:
Originally Posted by ScottFree

Does anyone have any ideas on how to fix this leak? Or a source for buying a strip of new rubber seal? Looks like it would slide or press in easily. Searches so far have not turned up any specs on the size or shape of the seal. Any help will be appreciated, thanks.
|
Over time the rubber bulb seal will compress and eventually lose its pliability and by extension its ability to seal out water. I'd check out Trim-Lok ( https://www.trimlok.com/ and see if they have something suitable. They might be persuaded to send a few sample pieces of your choosing.
Most likely you'll find what's needed under the D-Shaped Rubber Seals & Weather Strips
HTH
|

|

|
|
11-09-2023, 05:51 PM
|
#52
|
|
Senior Member
Join Date: Aug 2017
Posts: 229
|
Quote:
Originally Posted by carringb
A note on the window trim....
The trim pictured is not factory trim. It is very common conversion van trim however. The factory trim doesn't have that squared-off profile to hold blinds. The factory trim different for pop-out and non-pop-out windows. So anyone with factory trim will need to either swap trim panels, or notch the non-pop-out trim and add than plastic shim below the latch. Just an FYI so somebody doesn't find this out the hard way while doing the swap.
|
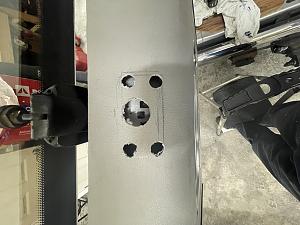
@carringb and others familiar with the pictured window trim: My 2013 E350 XLT passenger van had the non-pop-out window trim, but I was able to source this squared-off trim piece like the OP used with the embossed latch plate. The downside is there appears to be no way to retain the trim to the door (besides the bolts thru the plate at the bottom).
I'll try to attach an image. I circled the tabs in my OEM trim that fit into the 4 clips (2 on each side). Anyone know how these "pop-out-compatible" trim pieces are secured to the door?
(PS Disregard that the pop-out compatible trim in the picture is actually a barn door, but the read door is also blank (no tabs))
|
|
|
|
|
11-09-2023, 07:49 PM
|
#53
|
|
Senior Member
Join Date: Apr 2013
Location: San Francisco, CA
Posts: 3,285
|
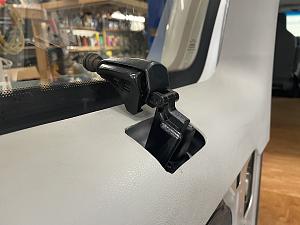
Hi scuba, yes, those trims you have are attached with four self tapping metal screws. On the front side of the trim there maybe some dimples indicating where the screws go. I am a long ways away from our van to post pics but maybe someone else can.
If you decide you do not want to use those I will buy them from you.
__________________
Ray
Beastie 3: 2002 7.3 EB Cargo: Agile TTB, CCV High Top, Custom Walk Through, Lots of stuff added. www.BlingMyRig.com
|
|
|
|
|
11-10-2023, 06:52 AM
|
#54
|
|
Senior Member
Join Date: Aug 2017
Posts: 229
|
Thank you Ray. It turns out my door won't close with the pop-out version of the trim because the outboard protrusion that gives it its squared-off profile overlaps by an inch or two with the box I had built into the driver-side wall, so I'm thinking of just cannibalizing the lower portion of the pop-out version and combining it with my OEM version, similar to the work Eric D did here.
https://www.sportsmobileforum.com/fo...tml#post211786
I know that's cringe-worthy b/c these are hard to find, but it's either that or a deeper rabbit hole elsewhere.
|
|
|
|
|
11-10-2023, 03:34 PM
|
#55
|
|
Senior Member
Join Date: Apr 2013
Location: San Francisco, CA
Posts: 3,285
|
Got it, that is too bad. I recently installed a set of pop outs and did the mod to the factory rear trims. JoefrmSF has the exact measurements for the cut out, we measured where the holes should be precisely. 86scotty did a great job on his, the corner radius cuts were done with a 3/4" spade bit. The pics are his effort. Then using a Multi Master / Fein tool with a new blade, the connection straight cuts are actually very precise and easy to do.
__________________
Ray
Beastie 3: 2002 7.3 EB Cargo: Agile TTB, CCV High Top, Custom Walk Through, Lots of stuff added. www.BlingMyRig.com
|
|
|
|
|
11-10-2023, 05:05 PM
|
#56
|
|
Senior Member
Join Date: Aug 2017
Posts: 229
|
Thanks for the inspiration. I'm halfway through the second one, and grade myself a B-minus on the 1st one compared to 86scotty's. Ray- let me know how much it's worth to you for me to avoid using this driver-side pop-out compatible trim. I think I could do a workaround and keep it pristine for you.
|
|
|
|
|
11-10-2023, 05:43 PM
|
#57
|
|
Senior Member
Join Date: Apr 2013
Location: San Francisco, CA
Posts: 3,285
|
Thxs scuba. Are you using the passenger side aftermarket? Interested if there is a pass and driver set.
On my 40 door I had an interference between the aftermarket trim and cabinet. I created a small pocket in the cabinet to allow the protrusion of the trim to have clearance.
__________________
Ray
Beastie 3: 2002 7.3 EB Cargo: Agile TTB, CCV High Top, Custom Walk Through, Lots of stuff added. www.BlingMyRig.com
|
|
|
|
|
11-11-2023, 01:04 PM
|
#58
|
|
Senior Member
Join Date: Aug 2017
Posts: 229
|
@1der, I only have the driver's side, not the passenger's. Turns out I didn't actually have a passenger's side (erroneously was sent a driver's side + one barn door, which I butchered for the spacer pieces I ended-up using, combining with the OEM trim-- see pics).
So long story short, I have one and only one driver's-side aftermarket pop-out compatible window trim.
PS Thanks again for the pics: yall's paddle-bit tip helped for the second one-- much cleaner.
PPS Having a gap bothered me, so I used black kydex to create a profile between the 2 pieces. Not sure it will do much besides keep something from being dropped in the crack.
|
|
|
|
|
|
 Posting Rules
|
You may not post new threads
You may not post replies
You may not post attachments
You may not edit your posts
HTML code is Off
|
|
|
|
 » Recent Threads
 |
|
|
|
|
|
|
|
|
|
|
|
|
|
|
|
|
|
|
|
|
|
|
|
|
|
|
|
|
|
|
|
|
|


 Linear Mode


