|
|
 04-22-2008, 08:10 AM
|
#71
|
|
Senior Member
Join Date: Apr 2007
Posts: 439
|
Well, FINALLY got that stubborn pin out of the rear door hinge.
When in doubt get a bigger hammer!
Now i need to pull the Reunel bumper off and mount the swingarm behind it, hopefully have time tonight after work
cheers,
-d
__________________
2002 EB51 7.3L w/ Stage 2- UJoint 6" 4x4 Conversion
2001 RB50 V10 Quigley- SOLD
|

|

|
|
04-22-2008, 05:31 PM
|
#72
|
|
Senior Member
Join Date: Apr 2007
Location: Parker, CO
Posts: 7,644
|
I put in a "Blue Sea" separator (the smaller gray one on the left) and the isolation switch which has ON•AUTO•OFF
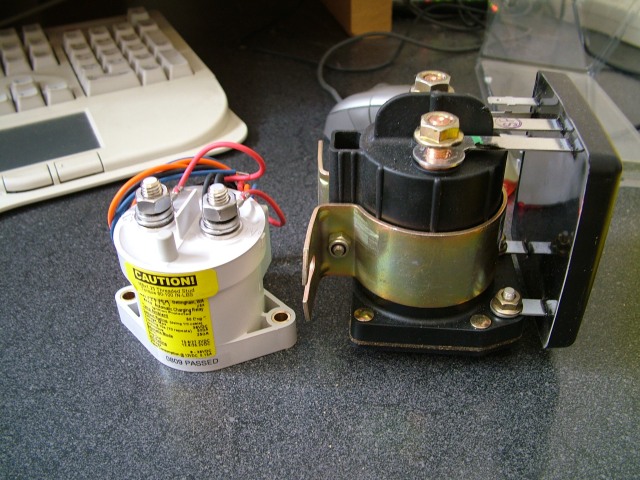
Haven't hooked up the starter power side and the light hasn't come one yet, which I thought it would when "ON" was selected. Have to wait for house battery testing before I hook up the starter side.
Also looked at my PEX tubing in the water system and thought, "Do I really want to redo all this? Really?"
__________________
it was good to be back
|
|
|
|
|
04-22-2008, 10:45 PM
|
#73
|
|
Senior Member
Join Date: Oct 2007
Location: Azusa, California
Posts: 1,092
|
Air Scoop
Approved final design for the Air Intake Under Aluminess Bumper , now out for Powder Coating . I had Solo Motor Sports in Azusa Ca. fabricate for me after the great information I got from the Forum about the need for additional air flow on the Aluminess Bumper with the useless Warn HD Winch.
I have asked the Boys to save the template for any of you that might have a need for this add on and will post photograph's when completed .
Greggde
|
|
|
|
|
04-23-2008, 12:11 AM
|
#74
|
|
Site Team
Join Date: May 2007
Location: Turlock Ca
Posts: 10,409
|
Re: Air Scoop
Quote:
|
Originally Posted by Greggde
Approved final design for the Air Intake Under Aluminess Bumper , now out for Powder Coating . I had Solo Motor Sports in Azusa Ca. fabricate for me after the great information I got from the Forum about the need for additional air flow on the Aluminess Bumper with the useless Warn HD Winch.
I have asked the Boys to save the template for any of you that might have a need for this add on and will post photograph's when completed .
Greggde
|
Please post some pictures as I'm very interested.
BTW, useless Warn winch??? Are you having some problems with it?
Thanks.
Dave
__________________
2006 Ford 6.0PSD EB-50/E-PH SMB 4X4 Rock Crawler Trailer
Sportsmobile 4X4 Adventures.......... On and off road adventures
|
|
|
|
|
04-23-2008, 09:13 AM
|
#75
|
|
Senior Member
Join Date: Oct 2007
Location: Azusa, California
Posts: 1,092
|
Winch
The winch seems to work fine but the air compressor is useless ! I based my decision to add this option on here say and the Warn promotional material ,it will barely air up the tires and forget the use of any of my impact wrenches , wont even break a lug nut loose . I torque all of my lug nuts manually at 85 foot pounds with a Snap On Digital Torque Wrench .
I have have had Vivair , Extreme , ARB and Toisor compressors on my previous Vans with the necessary air tanks that allow for the constant air pressure needed to run my various air tools and thought that this Warn product would save weight and space . I have opted to purchase and carry the new 18 volt DeWalt DWO59 Impact Wrench in lieu of the various air wrenches that I used to carry . Most of the big off road teams are now using the portable electrics and it works great !
Greggde
|
|
|
|
|
04-23-2008, 09:38 AM
|
#76
|
|
Senior Member
Join Date: Oct 2007
Location: Newark, CA
Posts: 795
|
Re: Winch
"I torque all of my lug nuts manually at 85 foot pounds with a Snap On Digital Torque Wrench."
Are you sure that is tight enough? Our owner's manual says to tighten the lug nuts to 150 foot pounds, at least with the wheels that we have...
__________________
Jack
'01 Ford EB50p Quigley 4WD
|
|
|
|
|
04-25-2008, 09:56 AM
|
#77
|
|
Senior Member
Join Date: Jan 2008
Location: Baja Whenever Possible
Posts: 1,012
|
Got the cam position sensor switched out yesterday. Asked about the cruise recall as my cruise quit working all of a sudden. Can't find a fuse or link, so I don't know what's going on with it. Anyway, the Ford guy said the recall only pretains to gas models. Huh? I saw no such distinction in the recall notice on the Net. Never did get a letter. Still looking into that one.
Picked up new front wheel bearings yesterday from McQuire Bearing in Portland. New top radiator hose (a small fortune from Ford, but Ford lists two different hoses for 2003 and the one that eveyone sends to me (Napa, Baxter, etc.) is not the correct one as they only show one hose). Ford couldn't tell me which was correct, so they had to order up both hoses and I got to pick the right one. Silly. Back to the water pump, hoses and coolant R&R tonight. Hopefully I'll be able to R&R front bearings and rear U-joints this weekend as well. Time to get greasy.
__________________
It takes a village to raise an idiot.
|
|
|
|
|
04-27-2008, 12:47 AM
|
#78
|
|
Senior Member
Join Date: Jan 2008
Location: Baja Whenever Possible
Posts: 1,012
|
Wow, the past two days has been a comedy of errors.
Back to my water pump R&R. Got the radiator out, then the shroud. Got the pump loose and began to remove it (as a complete assembly including fan). As I was lifting it out, it caught on some AC hoses. Lost it. Banged the ac condensor and chipped some of the blades on the fan. Once out, I still couldn't get the fan clutch nut loosened. Today, after dropping my wife off at work with her car at 6:30 because I need a car to drive, I picked up a fan nut tool from Napa. Got home. Locked the old water pump in a vise and started banging away. Tried forever. Some people say the nut is left hand and some say right. Even the local Ford dealership could only tell me they "thought" is had right hand threads, but not positive. Decided the fan nut was going to be right hand or I'd die trying to make it so. So, here's the scenerio, I've got the water pump clamped into a vise, I've got this fairly long water pump wrench on the 1 7/8" nut, my radiator is safety stored out of the way against a wall in my shop, I'm wacking the wrench with a 3# mallet over and over. Guess where this is going? Finally broke the nut loose, the wrench went flying off the nut and landed smack into the center of my radiator several feet away. Moe, Curly and Larry ain't got nothing on me. Well, I make some calls, grab the kids, and make a 220 mile round trip to the big city to get my radiator fixed and pick up a new condensor. Fan is on order and won't have it until Tuesday. However, need my wheels. So, tomorrow I'll finished the water pump install and in a couple of days, I'll get to do some of it all over again when I R&R the fan blade. Made a tool so I can get the crused fan nut off without having to pull the water pump again (I hope). Now, on to the little bit of good news:
Had an AC leak somewhere. Found it. Seems Ford doesn't understand that the ends of the wire hose clamp that fastens the oil fill extention tube should not be rubbing against an AC line. It actually wore a hole in the steel section of line. Pulled the line(s), and cleaned up the hole. Got out the welder all the while knowing, given my recent string of good luck, that I'll likely just blast a bigger hole in the line when I try and weld it up. Well, much to my surprise it welded up perfectly. So, at least I did something right today. Here's a tip: With my SMB, it seems Ford didn't give a rip if lines are rubbing against hard parts. I discovered several compromised hoses and lines due to rubbing (upper radiator hose was nearly worn through, AC line (the hole in the metal part and a worn spot (but not so bad as I have to replace it) on a rubber part from the air cleaner housing), the lower radiator line rubbing against the sway bar and a power streering line rubbing against other hard parts. All of these could have been avoided, so next time you take your air cleaner assembly off, I'd recommend you check you various lines and hoses for rubbing damage. Zip ties and pieces of extra hose to use as shields will go a long way.
I'm tired, sore, and broke.
__________________
It takes a village to raise an idiot.
|
|
|
|
|
04-27-2008, 09:19 AM
|
#79
|
|
Senior Member
Join Date: Apr 2007
Location: Santa Barbara, CA
Posts: 1,841
|
I finally drilled a .250" dia hole in one corner of the bottom of my baja box to drain water after I wash out tons of dust because the box is not sealed.
|
|
|
|
|
04-27-2008, 09:27 AM
|
#80
|
|
Senior Member
Join Date: Apr 2007
Location: Blairsden, CA (when not on the road)
Posts: 1,109
|
Wow deminimis, I didn't think anyone else did things the way I do.
And just when you thot things couldn't get worse.... Hang in there, it'll all be worth it!!
__________________
Scatter
You can be anything you want on the Internet,
it amazes me that so many choose stupid....
2007 RB50, 6.0
K1WGB
|
|
|
|
|
|
 Posting Rules
|
You may not post new threads
You may not post replies
You may not post attachments
You may not edit your posts
HTML code is Off
|
|
|
|
 » Recent Threads
 |
|
|
|
|
|
|
|
|
|
|
|
|
|
|
|
|
|
|
|
|
|
|
|
|
|
|
|
|
|
|
|
|
|


 Agnes
Agnes Sportsmobile (AKA Money Pit)

 The Delta Flyer
 Linear Mode