|
|
 10-05-2022, 02:43 PM
|
#171
|
|
Senior Member
Join Date: Feb 2020
Location: Bend, OR
Posts: 311
|
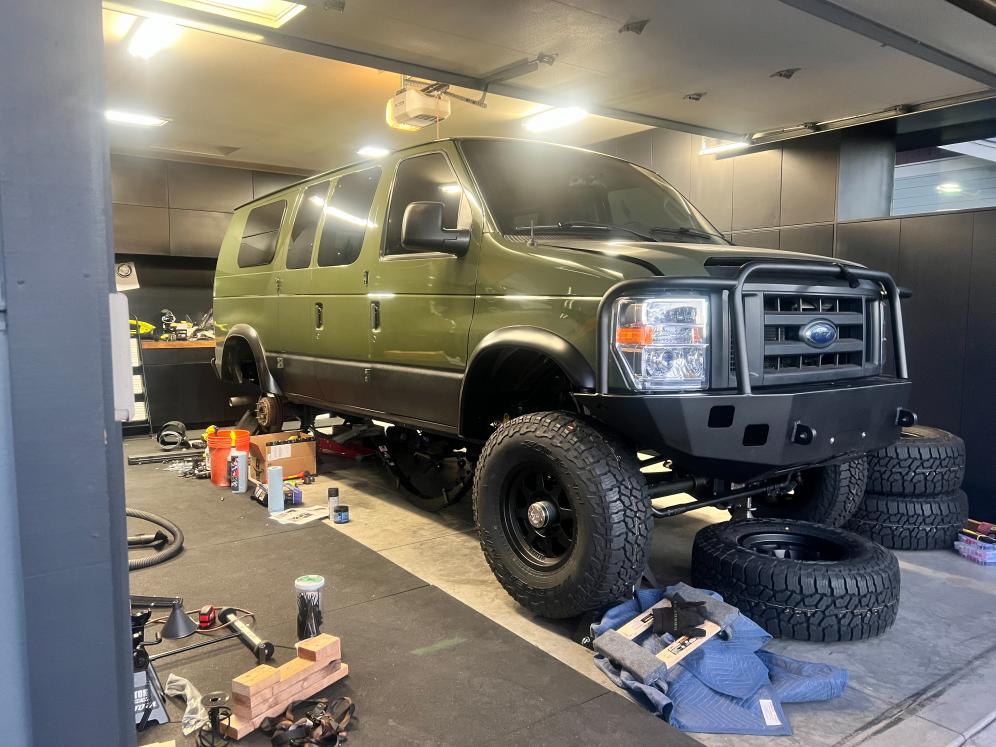
DIY 4x4 Conversion continued:-At this point, the front end is essentially done and it was time to start on the rear end. Since I wasn't sure when I was going to get my rear axle back from the shop from getting the locker and gears installed I figured I would start on the frame paint prep. First thing was to start to remove things that I didn't need under the van like the stock leafs.I know I went further than what was needed, but there was quite a bit of overspray from what I think was either the factory coating in the wheel wells or from the Bedliner when the lower body panels were painted. So to get it to be a clean surface for paint I ended up sanding it down to basically bare metal.
-To my surprise the next day the shop that had my axle called and said the axle was ready for pick up. So the following day I grabbed it and got it back to my house. Again every time I move one of these axles I am shocked at how heavy they are especially when you're working by yourself.
-We had some friends coming into town for a night so I tried to get things cleaned up some in the garage just so it wasn't as bad as I had let it become over the last couple of weeks. Since the front end was done I figured I might as well get the front bumper back on just so it was out of the way. It still needs to be adjusted, but at least I got to see a little more of what it was going to look like.
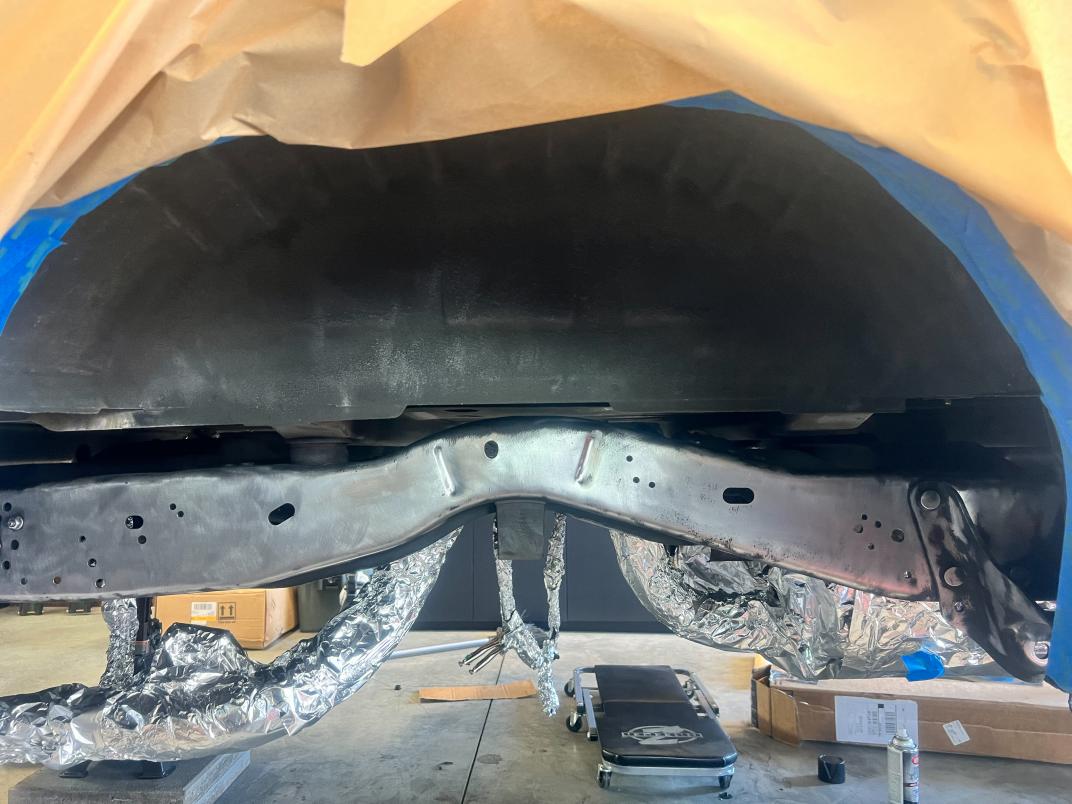
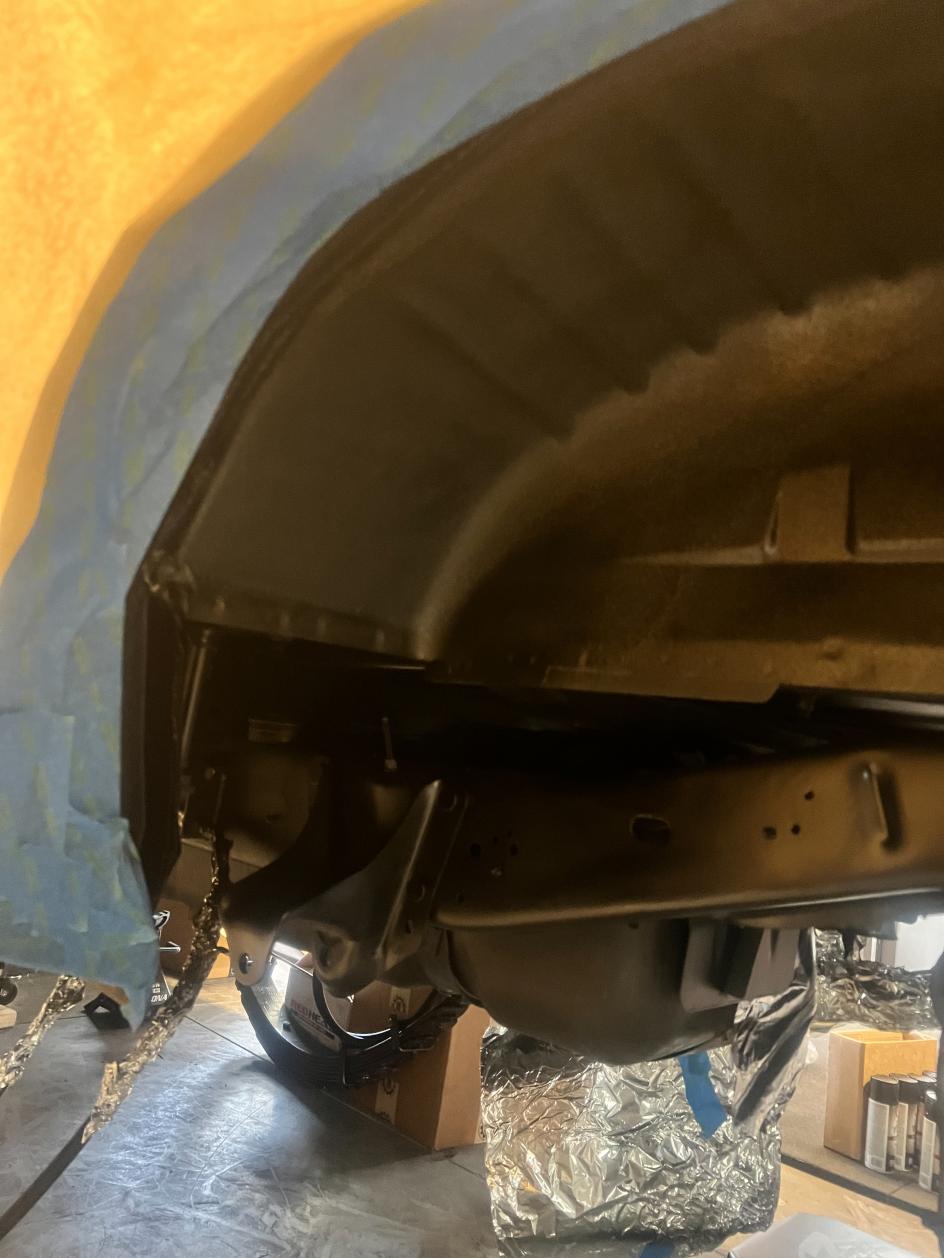
-After two days off it was time to get back into it. I started by continuing the paint prep for the rear end of the van. I figured it would be easiest if the rear axle was out of the way so I started by removing the stock axle and shocks. Then I taped, papered, and wrapped everything I could in foil and started on the painting process. I have underestimated every time just how much paint everything is going to take, but after a few additional trips to the store, I got everything under the van painted. It's not perfect, but it's better than what it was and not too bad for it being done on jack stands in my garage.
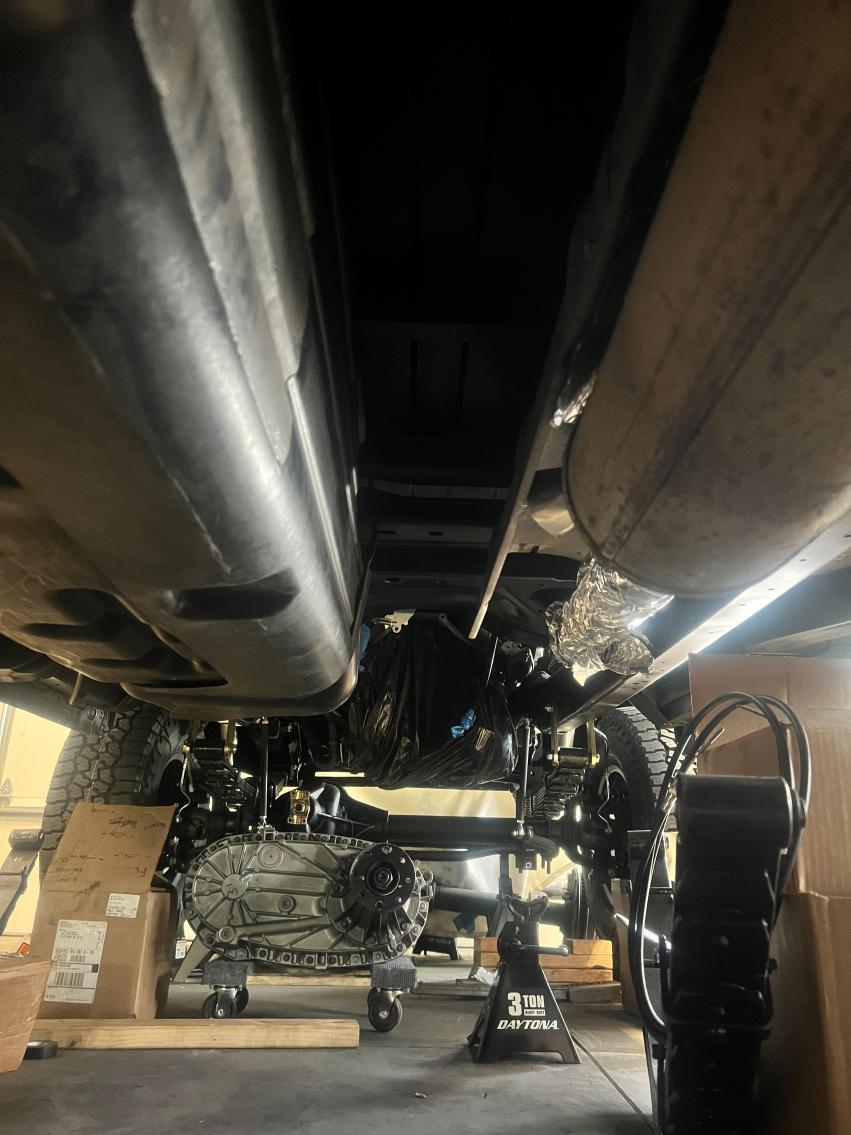
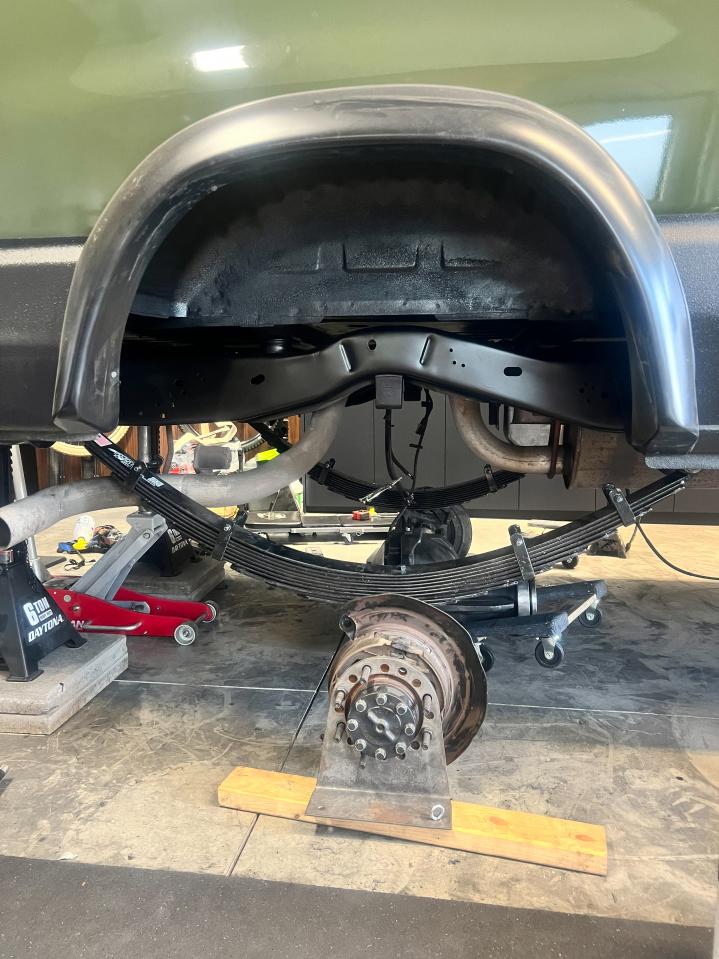
-Then it was time to start cutting off the stock leaf spring perches and shock mounts from the axle. Using a grinder I was able to slowly cut away these things. Obviously, it would have been more ideal to do this before dropping it off for regearing and locker install, but due to the shop's timing, this was the best way to do it. After getting everything cut off the rear axle I went through and cleaned up the rest of the axle. Using wire wheels, flap disk, and grinder wheels I was able to get top mostly bare metal.
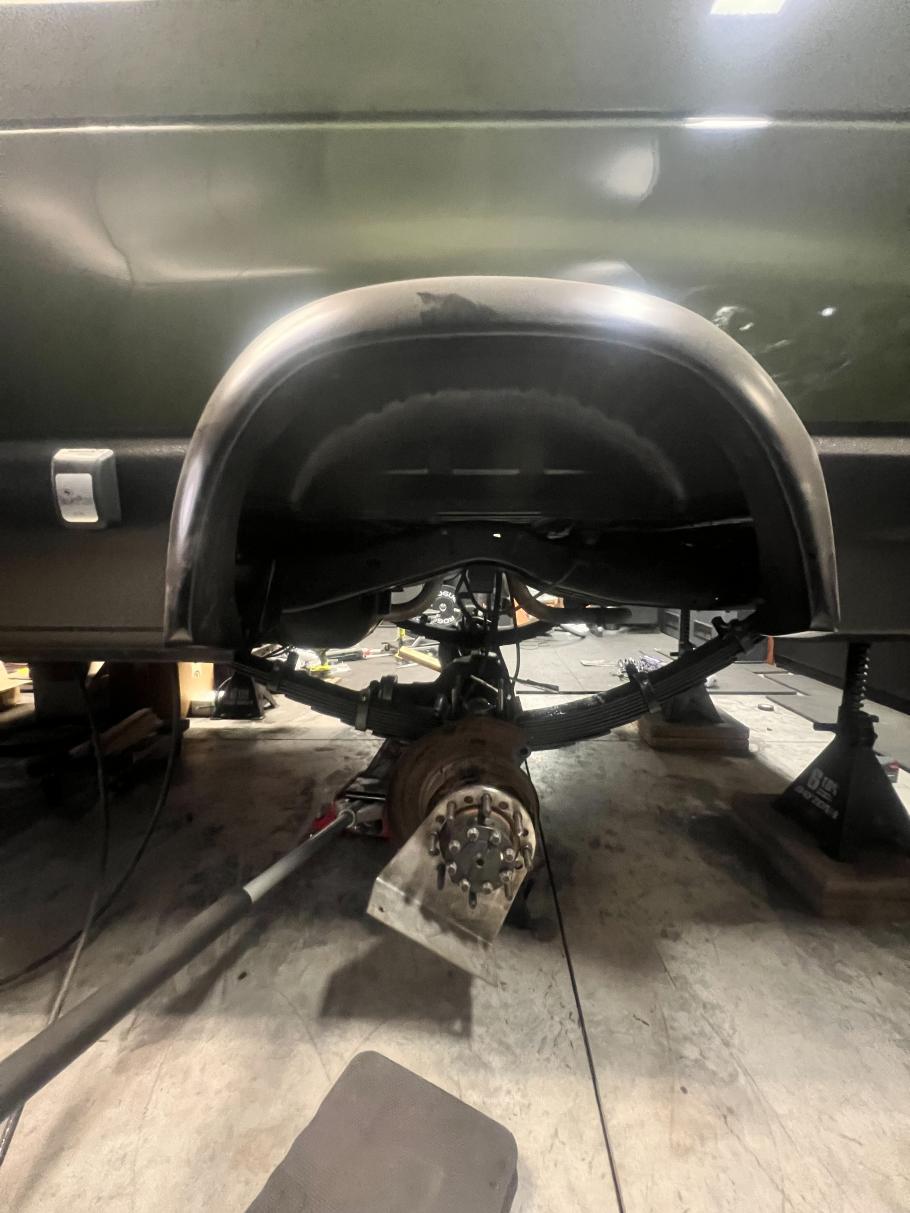
-Then I started on getting the rear leafs bolted up to the van now that the paint was all dry. This was actually way more challenging than I thought it would be. Chris mentions in his install video that the springs can close up some and might need to be opened up some with a prybar. This was definitely the case for mine. Trying to jack the spring up, pry it apart, get the holes lined up and hammer in the shackle by myself was quite challenging. Might have been easier if I had some more weight on my side, but at only about 150LBS those springs did not want to budge with my long prybar. I ended up having to use a 4 piece of pipe and basically rest all my weight on it while simultaneously doing all other tasks. After some fighting with it, I finally was able to get both sides in.
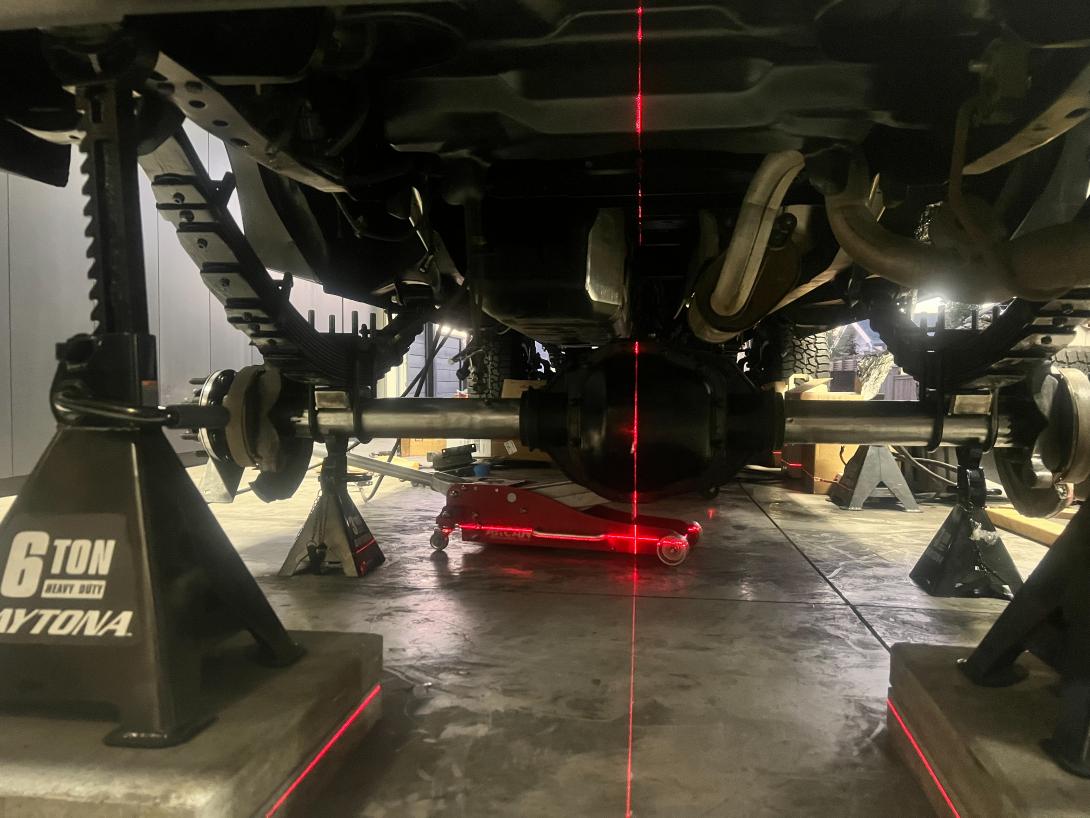
-As you can see in the last picture the van was now not high enough to get the rear axle under the leafs. I was in a bit of a pickle as now there was no good low point that my jack could reach to get the jack stands up higher. Fortunately for me, I was able to do a quick google search and found out that 911 motorsports is local to me in Bend. I swung by their shop and picked up a Floor Jack extension so I could get the van up higher. Once that was done I was able to get started on the axle install. Using a line laser I found the center of the axle and van and started on the process of getting everything lined up and the initial setup of the pinion angle. Later today I will double-check my measurements and fitment before moving on to the shocks.
__________________
Vandit - 2013 E250 Ground Up Build- Full Custom DIY Interior Build
- DIY U-Joint Off Road 6" 4x4 Conversion
|

|

|
|
10-05-2022, 03:05 PM
|
#172
|
|
Senior Member
Join Date: Feb 2020
Location: Bend, OR
Posts: 311
|
Quote:
Originally Posted by marret

Nice. Looks great.
|
Thanks! It's starting to come together. Super excited to get it back on the ground.
Quote:
Originally Posted by Twoxentrix
Good call on the SSC Brake upgrade. From your pic's it already looks very close...Once everything's installed, will you be fortunate enough where the Van still fits in the garage?
|
Yeah, I think the brake upgrade is going to be a great addition! It's going to be tight, but from what I have measured and gathered from a few other people's build it should fit once it's all said and done. Luckily I have an 8' door so it should fit, at least till we do a rack or a pop top.
__________________
Vandit - 2013 E250 Ground Up Build- Full Custom DIY Interior Build
- DIY U-Joint Off Road 6" 4x4 Conversion
|
|
|
|
|
10-05-2022, 05:12 PM
|
#173
|
|
Senior Member
Join Date: Nov 2020
Posts: 436
|
Absolutely thankful for this description. Saved for the future for whenever I move from 2WD to 4x4 (brain says not needed, body says LETS GOOOO [emoji23])
|
|
|
|
|
10-06-2022, 08:00 AM
|
#174
|
|
Senior Member
Join Date: Feb 2020
Location: Bend, OR
Posts: 311
|
E-350:
I know the feeling! We went back and forth a lot on whether we needed 4x4 but eventually decided at a minimum it will be nice for winters and give us that extra security when we are getting off the beaten path. I hope that when you do make the jump to 4x4 this thread might help you out some.
__________________
Vandit - 2013 E250 Ground Up Build- Full Custom DIY Interior Build
- DIY U-Joint Off Road 6" 4x4 Conversion
|
|
|
|
|
10-06-2022, 12:34 PM
|
#175
|
|
Senior Member
Join Date: Mar 2019
Location: Croydon, PA
Posts: 308
|
Looks awesome! I'm also in the "do I really need 4WD?" camp, but then I watched some videos about doing backcountry trail trips in Alaska - where you definitely want 4WD. So...
One silly question: when you get the van back on tires (even the small OE ones), will it fit under the open garage door?
|
|
|
|
|
10-06-2022, 02:33 PM
|
#176
|
|
Senior Member
Join Date: Feb 2020
Location: Bend, OR
Posts: 311
|
IanF:
Yeah, I get that! After having the van through two winters in Bend (one of which it was actually usable) we found ourselves avoiding driving it much due to snow and ice. We also realized that on our trips we were avoiding a lot more of the spontaneous drive down dirt roads to see where it goes because it always came back to what if we get stuck or it gets too rough. So in the end the work and the cost of 4x4 seemed worth it to us, though most would probably see the cost of it all and think we are insane!
Based on what I can tell from the measurements I have gathered online and the measurements I took of the van when it was on the front tires it should fit. I think the camera angles make it look worse than it really is. It's an 8' garage door so I'm hoping once it's done I can drive it out of the garage otherwise I am going to have to get creative since the bolt pattern does not match the stock wheels.
__________________
Vandit - 2013 E250 Ground Up Build- Full Custom DIY Interior Build
- DIY U-Joint Off Road 6" 4x4 Conversion
|
|
|
|
|
10-06-2022, 03:23 PM
|
#177
|
|
Senior Member
Join Date: May 2014
Location: Scottsdale, AZ
Posts: 225
|
Quote:
Originally Posted by aarcaris
IanF:
Yeah, I get that! After having the van through two winters in Bend (one of which it was actually usable) we found ourselves avoiding driving it much due to snow and ice. We also realized that on our trips we were avoiding a lot more of the spontaneous drive down dirt roads to see where it goes because it always came back to what if we get stuck or it gets too rough. So in the end the work and the cost of 4x4 seemed worth it to us, though most would probably see the cost of it all and think we are insane!
Based on what I can tell from the measurements I have gathered online and the measurements I took of the van when it was on the front tires it should fit. I think the camera angles make it look worse than it really is. It's an 8' garage door so I'm hoping once it's done I can drive it out of the garage otherwise I am going to have to get creative since the bolt pattern does not match the stock wheels.
|
If its too tall air down the tires. Progress looks awesome. Was there a specific Sterling year range you looked for ? Was considering that for my van vs re-gearing factory axle and wheel spacers. Might only be a few bucks more to get a beefier full float.
|
|
|
|
|
10-06-2022, 03:24 PM
|
#178
|
|
Senior Member
Join Date: Sep 2013
Location: Georgia
Posts: 746
|
I'm hoping for you the van would fit under the garage doors !? If not - guess it would help by airing down the tires about 40-50 pounds each ? IF you've gotta good air compressor ?
|
|
|
|
|
10-06-2022, 04:50 PM
|
#179
|
|
Senior Member
Join Date: Feb 2020
Location: Bend, OR
Posts: 311
|
ibike:
That is my Plan A if it's too tall! I had to go with a later model year to make sure that it would still work with the RSC system that is on my van since it's 2013. From the info that mgmetalworks (Michael from ExpoVans) passed to me, I needed a 2011-2016 sterling to make it work. During my search, I found a good deal on a 2016 sterling with relatively low miles. From what I gathered the only other big difference (besides ABS/brake stuff) from the earlier axles is that the pinion spline count on the 2011-present axles jumped to 37 splines while the 1999-2010 axles have 31 splines. From what I understand the spline count doesn't change much other than it being harder to find parts like lockers and gears in comparison to the earlier models. When I was trying to decide if I should go to a sterling I priced out both options and came to the conclusion that it would only be a little more expensive to upgrade and then I shouldn't need to worry about overloading the axle. Plus it would be full float and full width!
This is a good link for some basic info about the different axles. ( Drivetrainshop)
doublevan2:
Thanks! I think I should be good, but If I need to like you said I can always air down the tires and get a few more inches down if need be.
__________________
Vandit - 2013 E250 Ground Up Build- Full Custom DIY Interior Build
- DIY U-Joint Off Road 6" 4x4 Conversion
|
|
|
|
|
10-07-2022, 08:19 AM
|
#180
|
|
Senior Member
Join Date: Mar 2019
Location: Croydon, PA
Posts: 308
|
Airing down the tires should give a lot more clearance. As long as you are only moving it out of the garage it should be ok.
I'd be screwed... bone stock my van is 8' 6" tall. My WAG is a 4x4 lift and corresponding tires would raise it well over 9'. Something I will have to consider if I ever want to do a 4x4 conversion. My "dream" renovation to my house involves raising my garage doors from 7' to 9', but I'm not sure that will be enough. Width is an issue as well. As is, my Dodge minivan just barely fits through the door and going wider isn't possible unless I buy my neighbor's house and knock it down to make my garage wider (Ok... so that is the true "dream" renovation). But I like my neighbors... and realistically, if I could afford to do that, I could afford to move to a new house with more land for a huge shop and garage.
|
|
|
|
|
|
 Posting Rules
|
You may not post new threads
You may not post replies
You may not post attachments
You may not edit your posts
HTML code is Off
|
|
|
|
 » Recent Threads
 |
|
|
|
|
|
|
|
|
|
|
|
|
|
|
|
|
|
|
|
|
|
|
|
|
|
|
|
|
|
|
|
|
|


 Vandit


 Linear Mode