Journey with Confidence RV GPS App RV Trip Planner RV LIFE Campground Reviews RV Maintenance Take a Speed Test Free 7 Day Trial ×


Reply
 
Thread Tools Display Modes
 
Old 04-19-2015, 09:56 PM   #161
Senior Member
 
boywonder's Avatar
 
Join Date: Jul 2013
Location: So Cal
Posts: 4,072
Re: Popping my top

Here is a picture of the camp lights plugged in (and the solar panel is now back on the roof).

The solar wire exits the rear of the bulkhead toward the center of the roof and the camp light connectors are facing outboard on the passenger side. The idea is that when I set up camp, I mount the lights to the rails and plug them into the bulkhead connectors before I raise the roof. The lights are LuxWorks 16W flood LEDs (around $30/made in China). They come with a bracket that I just use with the Yakima carriage bolt, plastic clamp and lever nut thingy.

The lights come with an unterminated cable about 15" long. I have two of these; I replaced the cable on one with an 8' length. This allows me to mount this light on any of corner of the Yakima crossbars.


I'll be camping in the van this weekend so I'll see how these lights work out.......

__________________
2008 E350 RB passenger 4WD SMB penthouse
2013 KTM 350 EXC
2008 KTM 250 XCF-W
2003 Honda Element
boywonder is offline   Reply With Quote
Old 05-04-2015, 09:59 AM   #162
Senior Member
 
boywonder's Avatar
 
Join Date: Jul 2013
Location: So Cal
Posts: 4,072
Re: Popping my top

More interior progress.......I needed to pick up the pace a bit since we are headed to Moab/Sedona this coming weekend for a week with Nick.

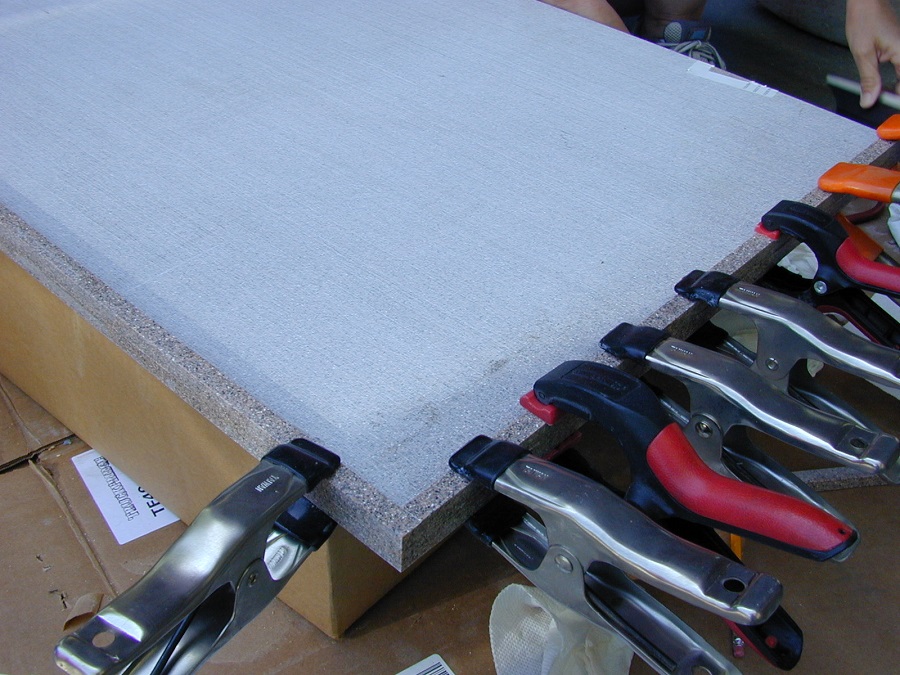
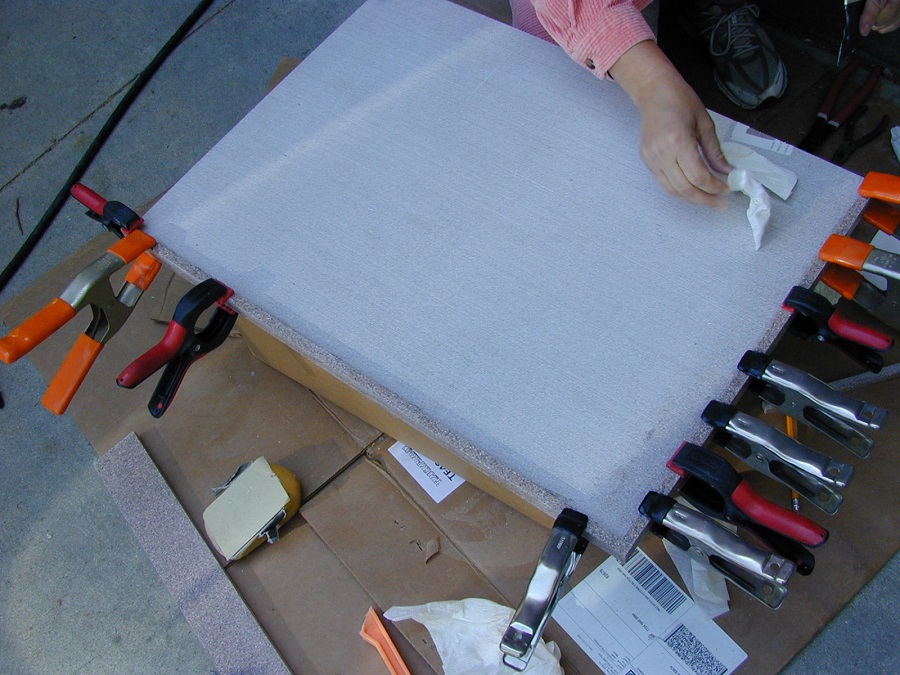
I obtained a small solid surface leftover and made the counter top. It machines like a very hard wood...really hard... The material is 1/2" thick; I cut it on the tablesaw with my non-ferrous blade, although pretty much any blade will cut this stuff. The finer the blade finish the less sanding later......

The edges were doubled over using the fancy epoxy that is used to bond this stuff. It appears that regular 15 minute clear epoxy would also work fine. I used spring clamps to hold the edges while it set up and then sanded the edges with sandpaper starting with 80 grit and ending with 600 grit (wet sanded starting at about 320 grit). The cabinetmaker that gave me the stock and the adhesive also gave me a few sheets of "Mica" sandpaper from 320 to 1500 grit (and lots of pointers for working with the material)

Going beyond about 600 grit will result in a shiny finish; I'm OK with a semi-matte look. I can always keep going. TIP: It's way easier to remove the excess epoxy when it's gummy with a razor or scraper than sanding it after it hardens.

Next up was drilling the hole for the sink and building a small pedestal for the faucet since I'm using a vessel sink. The counter top is fastened to the cabinet with velcro, allowing easy access to the cabinet if required.


Next up was (finally!!) getting the cabinet mounted in the van. It's been installed for various fit-checks about 35 times, so it's nice to have it finally mounted permanently. Also got the fridge installed and the microwave. I have a blue sea fuse panel and a 110V outlet in the inside of the cabinet where the door is.


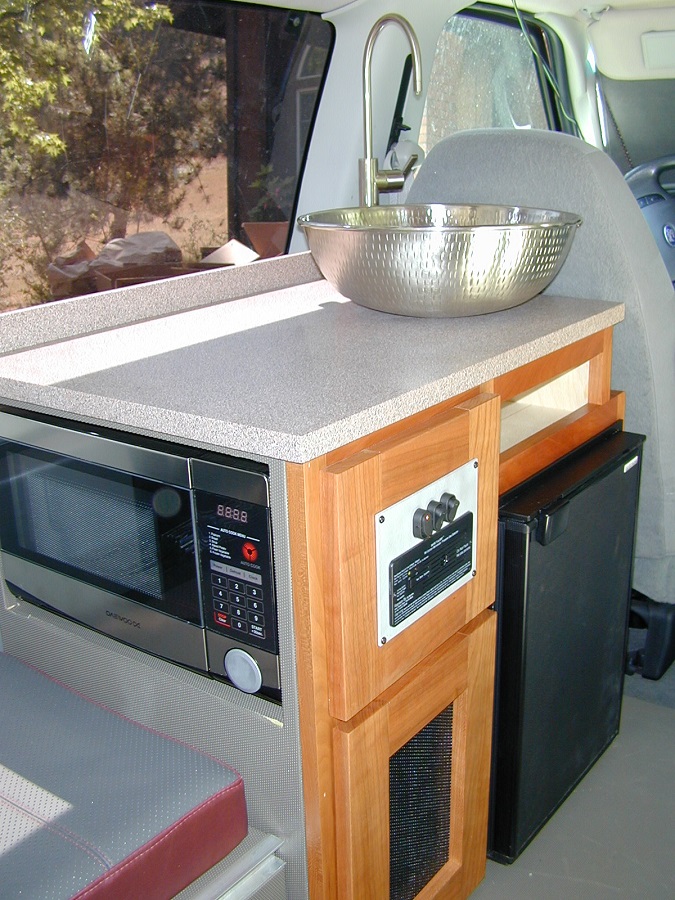
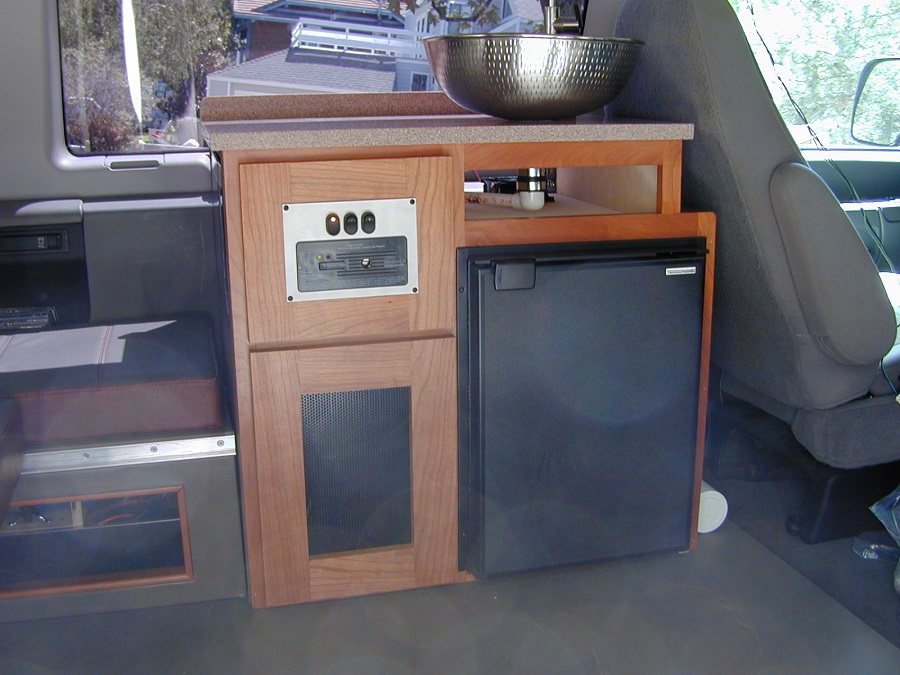
I still need to make either a drawer, face plate or something else in the cabinet below the sink.

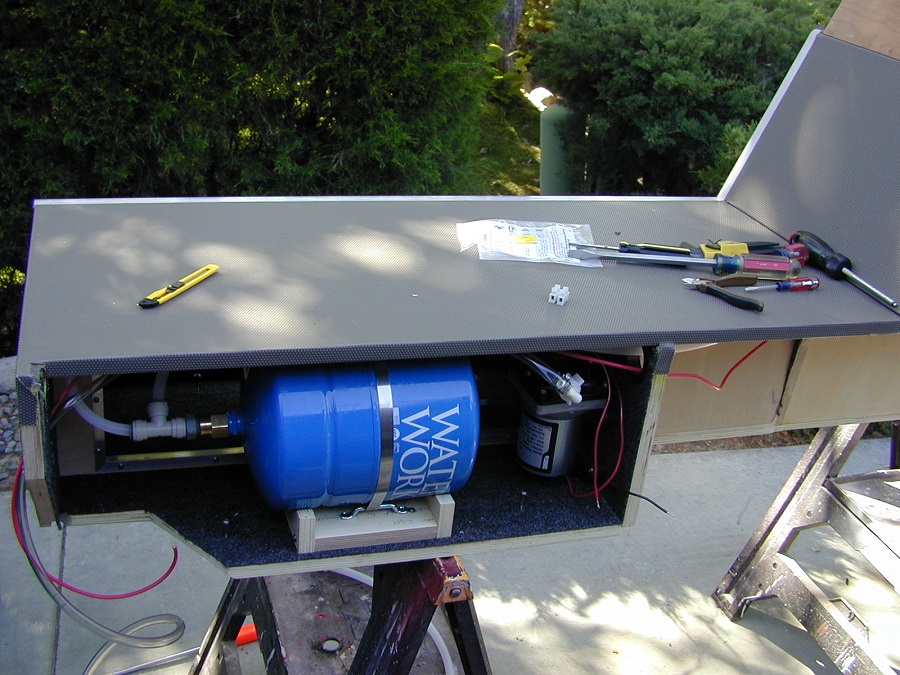
The water accumulator tank and water pump are installed under the "chaise" part of the rear seat. This required removal of the driver's side rear cabinet. I'm thinking that adding an access hatch on top of the chaise section would be a great idea for serviceability.

For now, the water supply will be 2 1/2 gallon water jugs in the cabinet under the microwave until I figure out where to install a fresh water tank.

__________________
2008 E350 RB passenger 4WD SMB penthouse
2013 KTM 350 EXC
2008 KTM 250 XCF-W
2003 Honda Element
boywonder is offline   Reply With Quote
Old 05-04-2015, 08:15 PM   #163
Senior Member
 
TexGX's Avatar
 
Join Date: Dec 2009
Location: Phoenix, AZ
Posts: 468
Garage
Re: Popping my top

Looks great. How about the pull down facing you see in front of sinks that would give you a place to store some small items?

http://www.lowes.com/pd_318385-1214-657 ... Id=3319716

TexGX
__________________
TexGX
2003 7.3PSD RB50 Quigley (The Yeti)
viewtopic.php?f=10&t=13220
2006 Casita (Makes it a three bedroom 1 and 1/2 bath)
TexGX is offline   Reply With Quote
Old 05-04-2015, 10:04 PM   #164
Senior Member
 
boywonder's Avatar
 
Join Date: Jul 2013
Location: So Cal
Posts: 4,072
Re: Popping my top

Quote:
Originally Posted by TexGX
Looks great. How about the pull down facing you see in front of sinks that would give you a place to store some small items?

http://www.lowes.com/pd_318385-1214-657 ... Id=3319716

TexGX

haha! that's exactly what my GF suggested as well.....or a short drawer.
__________________
2008 E350 RB passenger 4WD SMB penthouse
2013 KTM 350 EXC
2008 KTM 250 XCF-W
2003 Honda Element
boywonder is offline   Reply With Quote
Old 05-05-2015, 08:08 AM   #165
Senior Member
 
86Scotty's Avatar
 
Join Date: Jul 2011
Location: TN
Posts: 10,250
Re: Popping my top

I vote for that too. One thing my van definitely lacks is drawer space. It just can't be replaced for storing the small items needed for camping. I have one big drawer which I worked in to my sink cabinet but it's always overflowing. Looks really nice man!

86Scotty is offline   Reply With Quote
Old 05-05-2015, 08:14 AM   #166
Site Team
 
BroncoHauler's Avatar
 
Join Date: May 2007
Location: Southern New Mexico
Posts: 10,179
Re: Popping my top

I don't know, I installed one of those drawer-front tilt things on a bathroom cabinet at home, and yeah it was probably my less-than-expert installation, but I don't really care for the fit of drawer-front on the cabinet, and those trays don't really hold much.

With that much room under the sink, and given there's no back to the cabinet, I'd put some small bins under the sink, and maybe mount a false front drawer with Velcro that could easily be removed to access the bins.


Herb
__________________
SMB-less as of 02/04/2012. Our savings account is richer, but our adventures are poorer.
BroncoHauler is offline   Reply With Quote
Old 05-05-2015, 08:31 AM   #167
Senior Member
 
boywonder's Avatar
 
Join Date: Jul 2013
Location: So Cal
Posts: 4,072
Re: Popping my top

I've been contemplating fabricating another aluminum panel and mounting the controller/thermostat for the propex below the sink, but I'm trying to locate the controller where it's reachable from both the lower bed and the PH bed.......e.g. turrn on the heat without getting out of bed...still thinking...
__________________
2008 E350 RB passenger 4WD SMB penthouse
2013 KTM 350 EXC
2008 KTM 250 XCF-W
2003 Honda Element
boywonder is offline   Reply With Quote
Old 05-05-2015, 09:59 AM   #168
Senior Member
 
rockbender's Avatar
 
Join Date: Sep 2010
Location: Bend, OR
Posts: 800
Re: Popping my top

Love the final push before a trip! As always, your execution looks great. I'm glad to hear some feedback on doing the solid surface counter - I always thought that was a nice clean way to go.

On your space below the sink, it looks like the drain pipe goes pretty much straight back? If that is the case, how about making a drawer that is closer to full depth with a center cutout section (think U-shaped)? You would essentially get two 'trays' that would be plenty deep for utensils and such.

Everything is looking great - it will be fun to hear how everything works after your trip!
__________________
Josh
2009 Express AWD, CCV Top & 50-ish home build. Daily driver/camper/kid hauler
rockbender is offline   Reply With Quote
Old 05-05-2015, 11:06 AM   #169
Senior Member
 
boywonder's Avatar
 
Join Date: Jul 2013
Location: So Cal
Posts: 4,072
Re: Popping my top

Quote:
Originally Posted by rockbender
Love the final push before a trip! As always, your execution looks great. I'm glad to hear some feedback on doing the solid surface counter - I always thought that was a nice clean way to go.

On your space below the sink, it looks like the drain pipe goes pretty much straight back? If that is the case, how about making a drawer that is closer to full depth with a center cutout section (think U-shaped)? You would essentially get two 'trays' that would be plenty deep for utensils and such.

Everything is looking great - it will be fun to hear how everything works after your trip!
Thanks for the comments everyone!

One downside to the solid surface material is that it's heavy......not as heavy a granite....but it's heavy.

The drawer with a cut-out is an interesting idea....the drain actually is diagonal from the sink to the rear cabinet corner, so the drawer would be somewhat pie-shaped.........I could move the drain to go straight back, but that would require puncturing the floor for another drain pass-through....or zig-zag the drain.

That's one of the downsides of a free-form sort of design approach......you think of better ways after the design is built..........still beats agonizing over things when planning, at least for me.

My neighbor (Lawyer) keeps stopping by and checking on the progress; he thinks I've bought some sort of interior camper kit.......I tell him it's completely free-form, but I'm not sure he gets that.
__________________
2008 E350 RB passenger 4WD SMB penthouse
2013 KTM 350 EXC
2008 KTM 250 XCF-W
2003 Honda Element
boywonder is offline   Reply With Quote
Old 05-05-2015, 11:21 AM   #170
Site Team
 
BroncoHauler's Avatar
 
Join Date: May 2007
Location: Southern New Mexico
Posts: 10,179
Re: Popping my top

Quote:
Originally Posted by boywonder
My neighbor (Lawyer) keeps stopping by and checking on the progress; he thinks I've bought some sort of interior camper kit.......I tell him it's completely free-form, but I'm not sure he gets that.
He can't figure out who to sue if it goes wrong, so that's probably utterly incomprehensible to him.
__________________
SMB-less as of 02/04/2012. Our savings account is richer, but our adventures are poorer.
BroncoHauler is offline   Reply With Quote
Reply


Posting Rules
You may not post new threads
You may not post replies
You may not post attachments
You may not edit your posts

BB code is On
Smilies are On
[IMG] code is On
HTML code is Off
Trackbacks are Off
Pingbacks are Off
Refbacks are Off

» Featured Campgrounds

Reviews provided by

Powered by vBadvanced CMPS v3.2.3
Disclaimer:

This website is not affiliated with or endorsed by Sportsmobile SIP or any of its affiliates. This is an independent, unofficial site.


All times are GMT -6. The time now is 09:57 PM.


Powered by vBulletin® Version 3.8.8 Beta 4
Copyright ©2000 - 2024, vBulletin Solutions, Inc.