|
|
 03-24-2021, 09:30 AM
|
#61
|
|
Senior Member
Join Date: Mar 2015
Location: Maryland
Posts: 3,384
|
Quote:
Originally Posted by boywonder

Twoxentrix.... Can you post a picture or two and supplier info for your Molle stuff?... [/B]
|
I'll post this in aarcaris thread since it may provide some ideas, and relevant to options for his build.
You can locate the Molle stuff everywhere, I did a lot of searching to see what all my options were. What I found pretty quickly is the prices don't vary that much between suppliers, BUT also that many of the bags/accessories seem to be made by one or two manufacturers...the different suppliers either sell it under their brand or add a logo to designate it as theirs.
Best (and most abundant) is if you use amazon or E-bay, just type in "Tactical Molle" and then whatever you are searching for like "bags", "attachments", "hooks", "Tool bag", "First aid", "utility", "multi purpose", "kinife bag", etc.
Many Sporting goods stores, Firearm retailers, Hunting retailers, as well as Walmart offer them also...they're everywhere.
The one variable you should watch for is the weight of the fabric they use. The better bags seem to be out of 600D Nylon or 1000D Nylon (I prefer the 600D since its sturdy, the 1000D gets to be stiff - especially for smaller bags). If you're not careful you can end out ordering something made with cheap material (400D or 200D).
***Couple Pic's on the first page of my Album of how its mounted (very quick to remove and put back - that way I still had easy access to the storage and shelf that sits directly behind the board)
https://www.sportsmobileforum.com/fo...lbums1121.html
It took me a while to locate the right size Molle board to use, but i attached several links of the options available (I purchased mine from a Firearm shop on the East Coast and then cut it down to fit my requirements):
This outfit has several styles and sizes available (scroll 1/2 down the page to locate more selections): https://shop.opticsplanet.com/grey-m...t=opticsplanet
https://www.amazon.com/Grey-Man-Tact...29150&sr=8-101
https://www.amazon.com/Vianyer-Organ...6CPZSRSQR615TS
https://www.amazon.com/PETAC-GEAR-Ve...NsaWNrPXRydWU=

__________________
TwoXentrix
"AWOL"
|

|

|
|
03-24-2021, 02:15 PM
|
#62
|
|
Senior Member
Join Date: Feb 2020
Location: Bend, OR
Posts: 312
|
Quote:
Originally Posted by Twoxentrix
I'll post this in aarcaris thread since it may provide some ideas, and relevant to options for his build.
You can locate the Molle stuff everywhere, I did a lot of searching to see what all my options were. What I found pretty quickly is the prices don't vary that much between suppliers, BUT also that many of the bags/accessories seem to be made by one or two manufacturers...the different suppliers either sell it under their brand or add a logo to designate it as theirs.
Best (and most abundant) is if you use amazon or E-bay, just type in "Tactical Molle" and then whatever you are searching for like "bags", "attachments", "hooks", "Tool bag", "First aid", "utility", "multi purpose", "kinife bag", etc.
Many Sporting goods stores, Firearm retailers, Hunting retailers, as well as Walmart offer them also...they're everywhere.
The one variable you should watch for is the weight of the fabric they use. The better bags seem to be out of 600D Nylon or 1000D Nylon (I prefer the 600D since its sturdy, the 1000D gets to be stiff - especially for smaller bags). If you're not careful you can end out ordering something made with cheap material (400D or 200D).
***Couple Pic's on the first page of my Album of how its mounted (very quick to remove and put back - that way I still had easy access to the storage and shelf that sits directly behind the board)
https://www.sportsmobileforum.com/fo...lbums1121.html
It took me a while to locate the right size Molle board to use, but i attached several links of the options available (I purchased mine from a Firearm shop on the East Coast and then cut it down to fit my requirements):
This outfit has several styles and sizes available (scroll 1/2 down the page to locate more selections): https://shop.opticsplanet.com/grey-m...t=opticsplanet
https://www.amazon.com/Grey-Man-Tact...29150&sr=8-101
https://www.amazon.com/Vianyer-Organ...6CPZSRSQR615TS
https://www.amazon.com/PETAC-GEAR-Ve...NsaWNrPXRydWU= |
Thanks for the links and recommendations! Once I get the doors done I'll have to play around with this idea some. I like the idea of a quick access first aid kit!
__________________
Vandit - 2013 E250 Ground Up Build- Full Custom DIY Interior Build
- DIY U-Joint Off Road 6" 4x4 Conversion
|

|
|
|
03-24-2021, 02:45 PM
|
#63
|
|
Senior Member
Join Date: Mar 2015
Location: Maryland
Posts: 3,384
|
In the event you follow an installation somewhat similar;
**The molle holders that hold my Power Tank cylinders also hold wine & liquor bottles (just good to know).
**When the door is closed, The bag on the bottom fits perfectly across the top of the step (sits about 1" off the step).
**In retrospect, I'm thinking I could/should have made the hard Molle panel a little wider - at the time I thought it might make the setup too obtrusive when getting in & out through the doorway, but that's proven not to be an issue at all.
**I initially had many variations I was considering for mounting (can send some links on the ones I narrowed it down to if interested)...the one I settled on holds securely, and affords a very quick & easy install/removal (also turned out to be the simplest to put together)
Interested to see what you come up with now.
__________________
TwoXentrix
"AWOL"
|
|
|
|
|
03-24-2021, 06:26 PM
|
#64
|
|
Senior Member
Join Date: Apr 2017
Location: Huntington Beach
Posts: 153
|
There are fairly inexpensive Molle fold down tables on eBay that fit the 60 door nicely. It makes for easy access storage spot when folded up and nice work area folded down. I do a lot of cooking there and have contemplated mounting a single burner stove to the Molle table and having it fold up into door cavity when not in use. Might not be safe, but it looks like the stove and a propane bottle or two would fit in the side door cavity.
__________________
2008 E350 RB 6.0 - Bullet Proofed, MG 4x4 Conversion
2009 E350 RB 5.4 - Camburg Kit (Sold)
|
|
|
|
|
03-26-2021, 12:41 PM
|
#65
|
|
Senior Member
Join Date: Feb 2020
Location: Bend, OR
Posts: 312
|
Thanks for the breakdown Twonextrix! I am still trying to think through some ideas. I am thinking of putting a small molle panel where the speaker normally is for a First aid kit and then maybe another panel as you did. I need to get some other things knocked off my list first though. This will for sure be something I will be coming back to.
Fork-N-Road That seems like a neat idea! I for sure will be doing some kind of table on the 40 door since it swings 180º. Once I get more done on the inside I'll have to come back to these ideas and do some more research.
__________________
Vandit - 2013 E250 Ground Up Build- Full Custom DIY Interior Build
- DIY U-Joint Off Road 6" 4x4 Conversion
|
|
|
|
|
05-12-2021, 11:18 AM
|
#66
|
|
Senior Member
Join Date: Feb 2020
Location: Bend, OR
Posts: 312
|
I guess it's already been over a month since I last updated the build thread! It's been slow going, but I feel like I am making some good headway now with more to come soon!
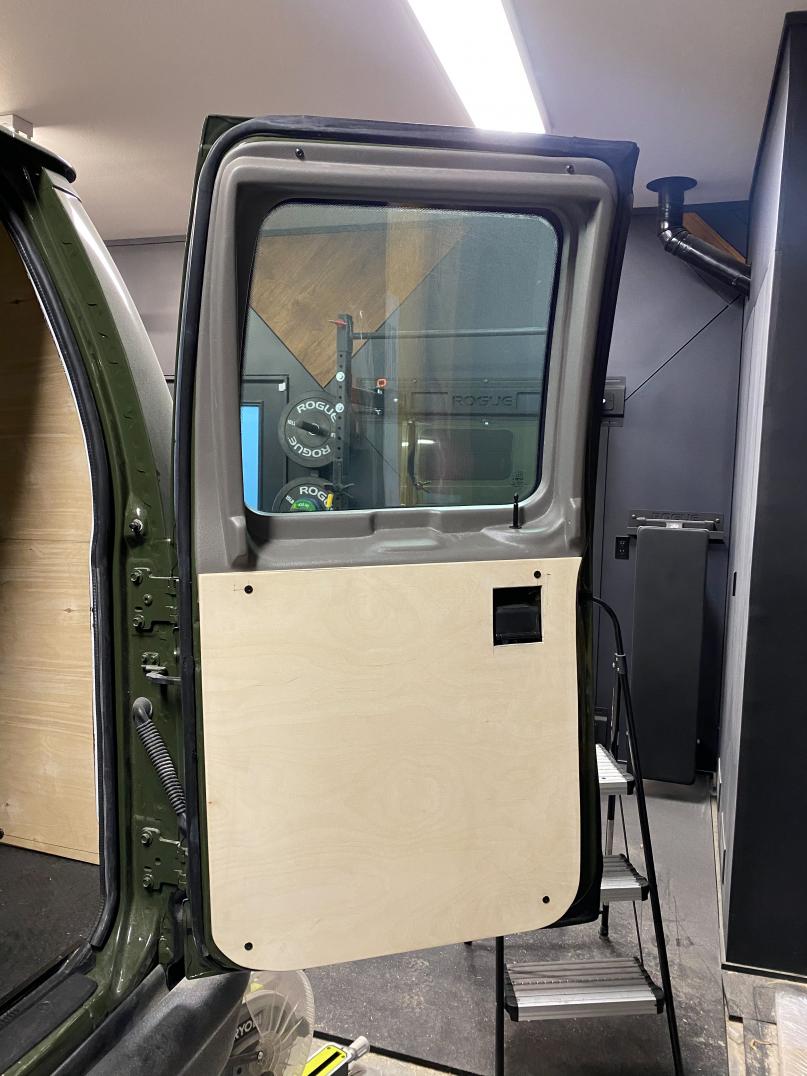
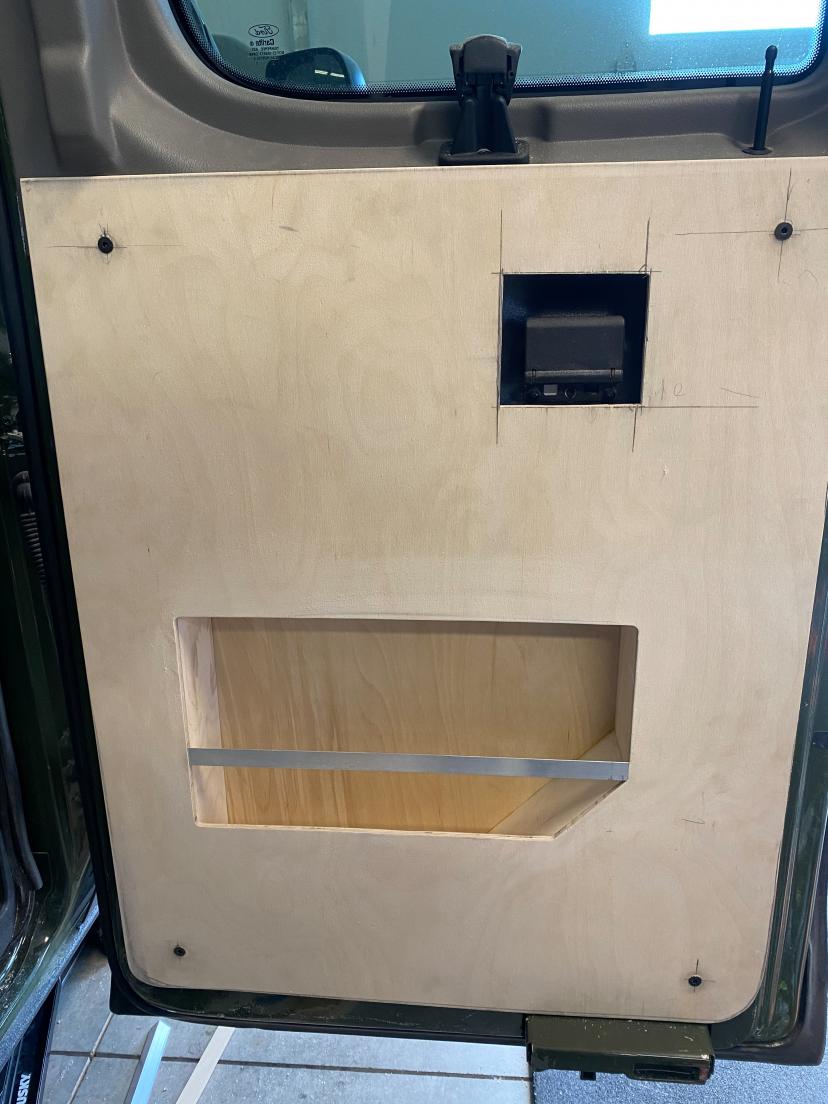
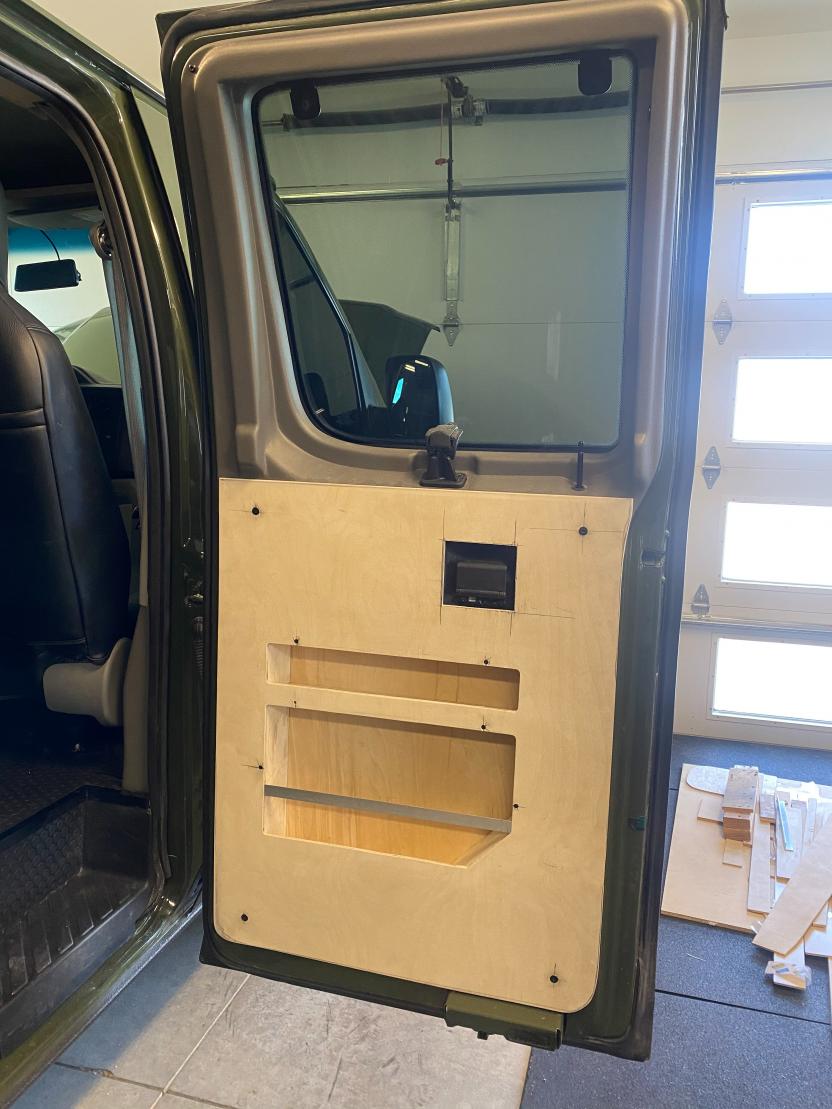
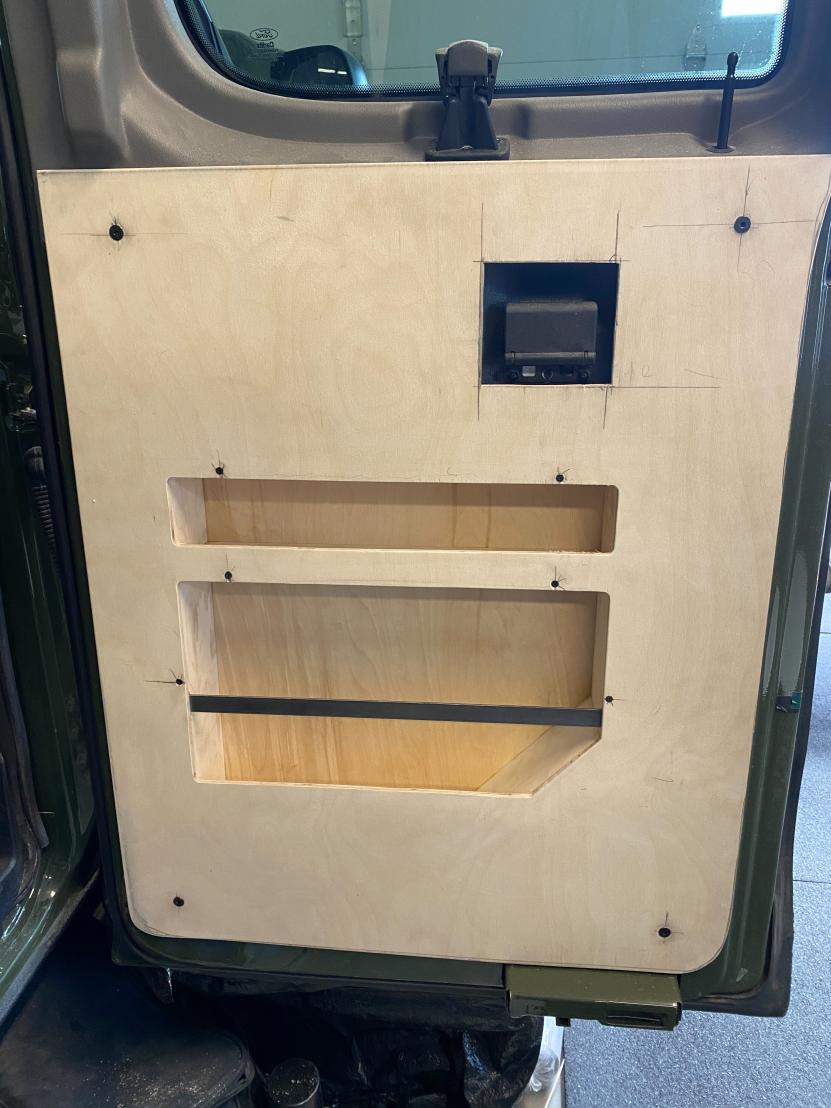
Door Panel:
-After looking through my last post I realized that I labeled the last post as door panels, when in reality they should have been labeled door boxes. Anyways here is how I did my door panels.
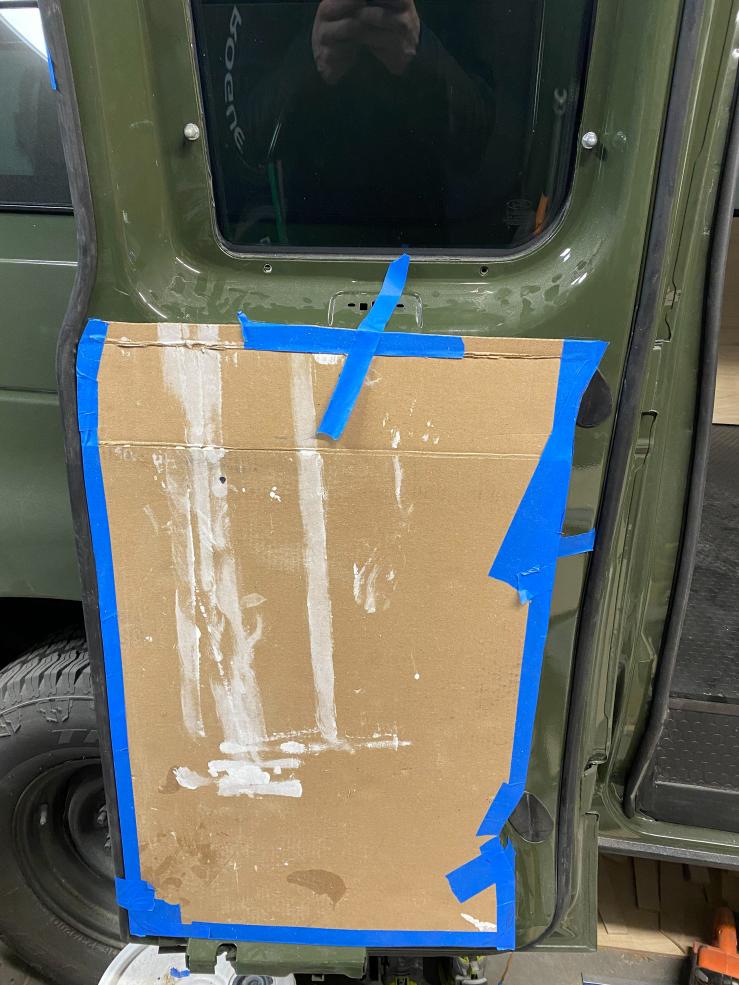
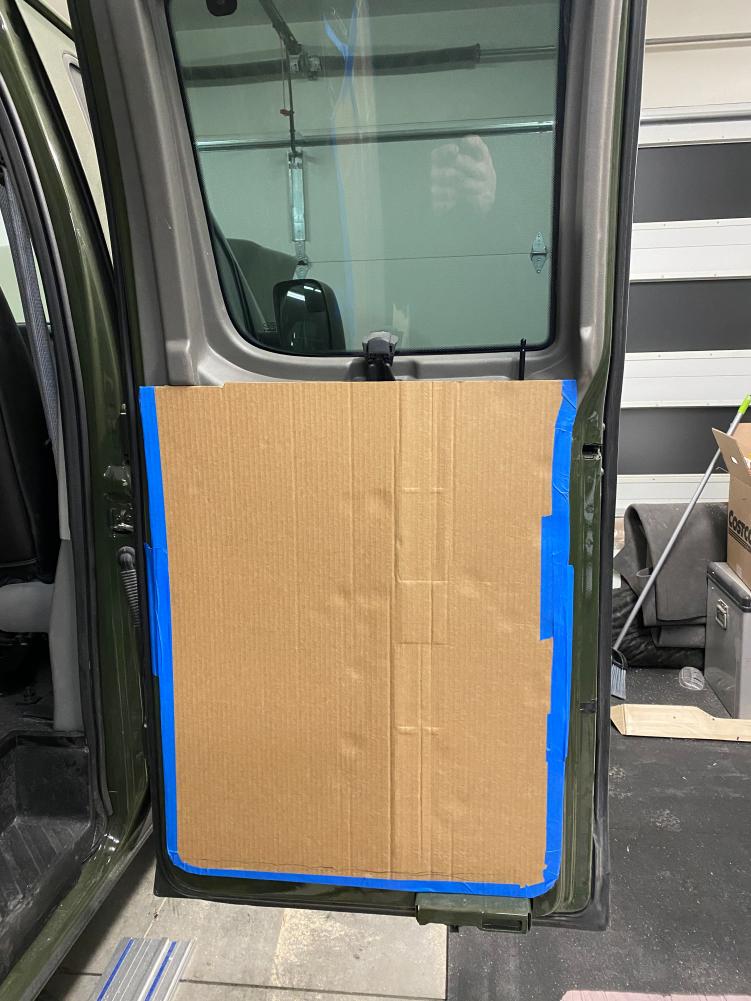
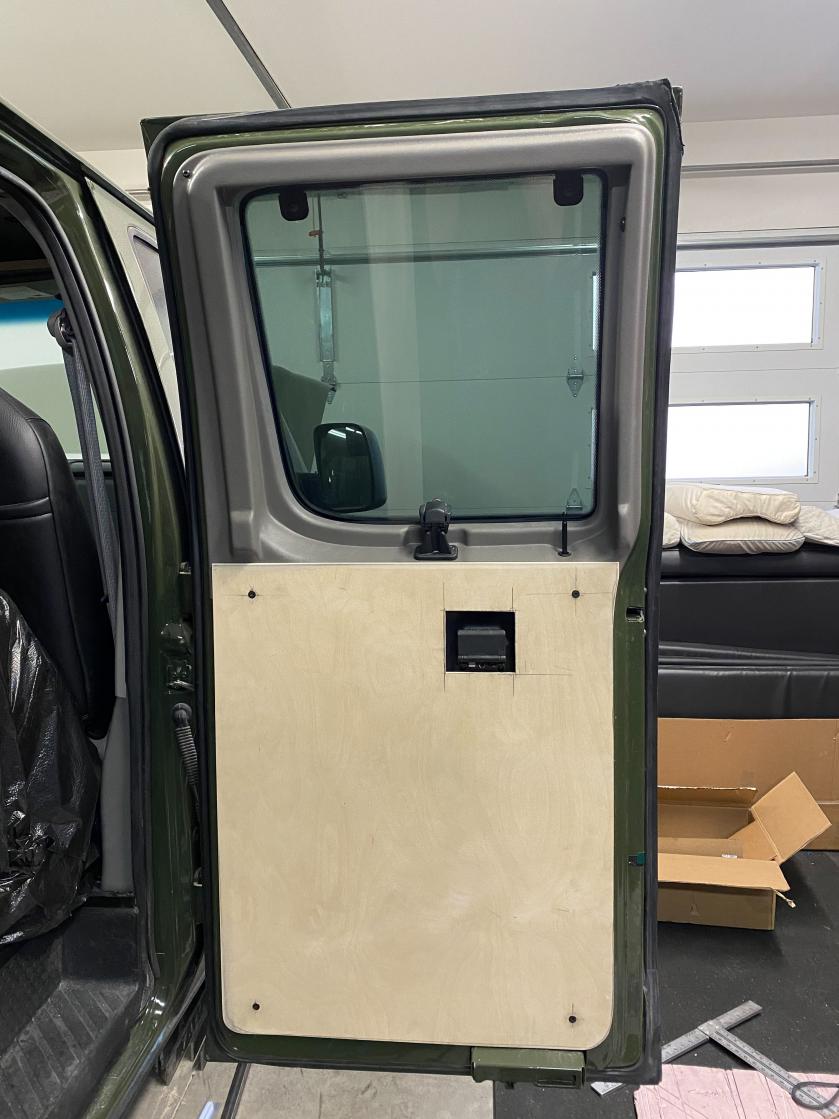
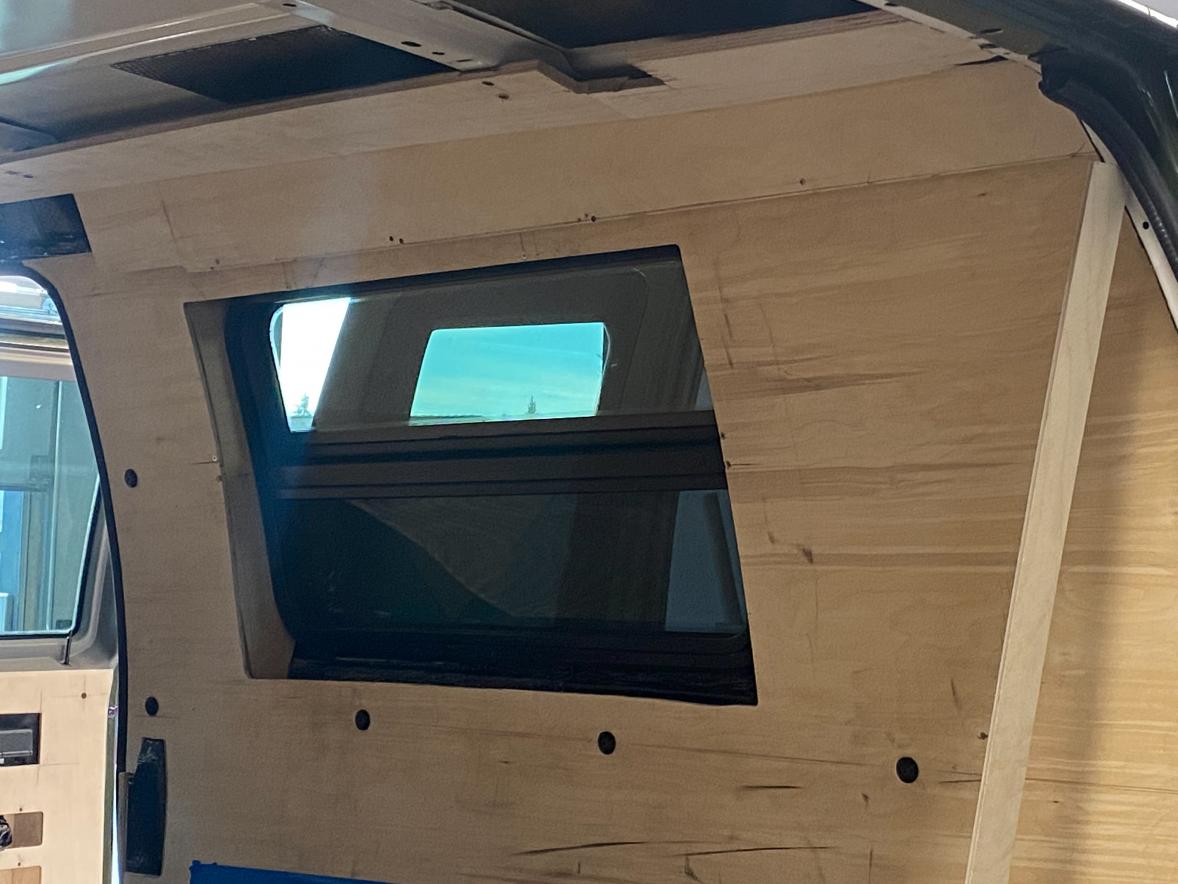
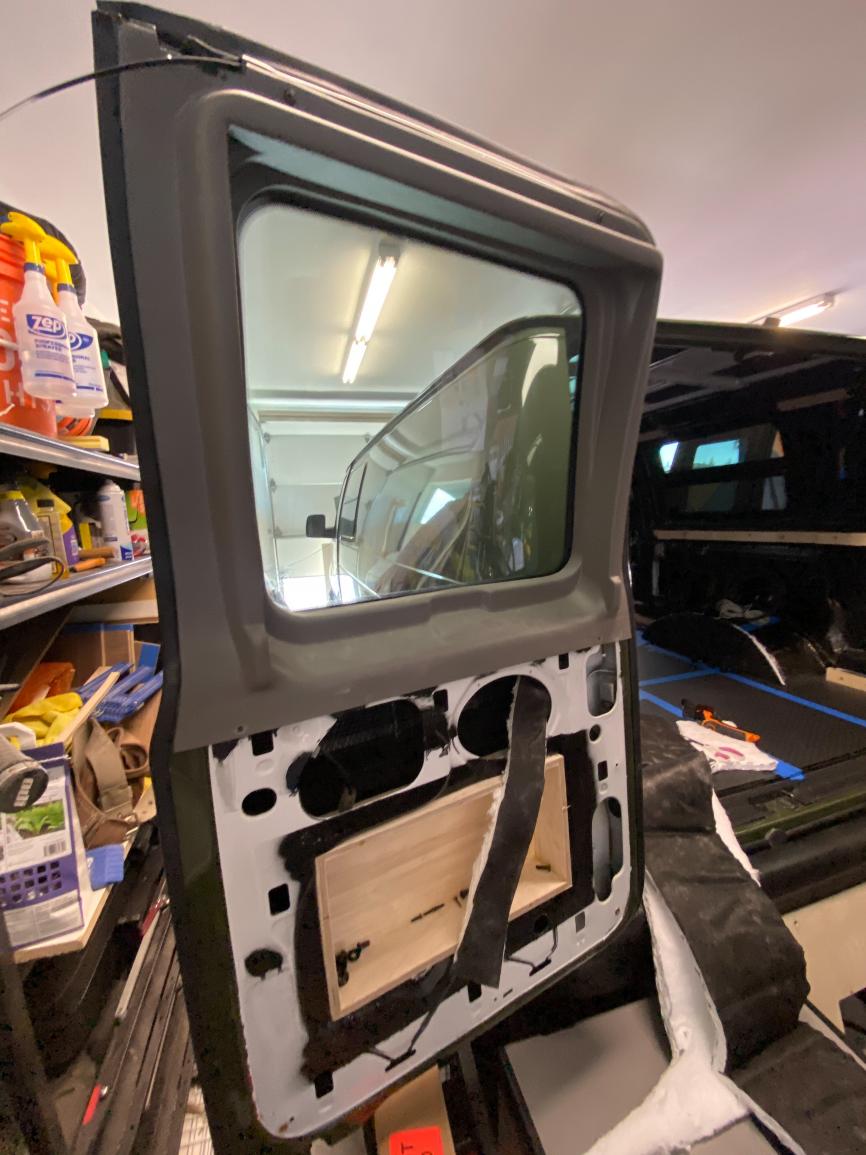
-I started on the rear passenger side door as it seemed to be the most basic door panel without any interior box. As with everything I started off with cardboard templates. I tried to make sure they followed the lines of the doors, while still making sure they closed fine.
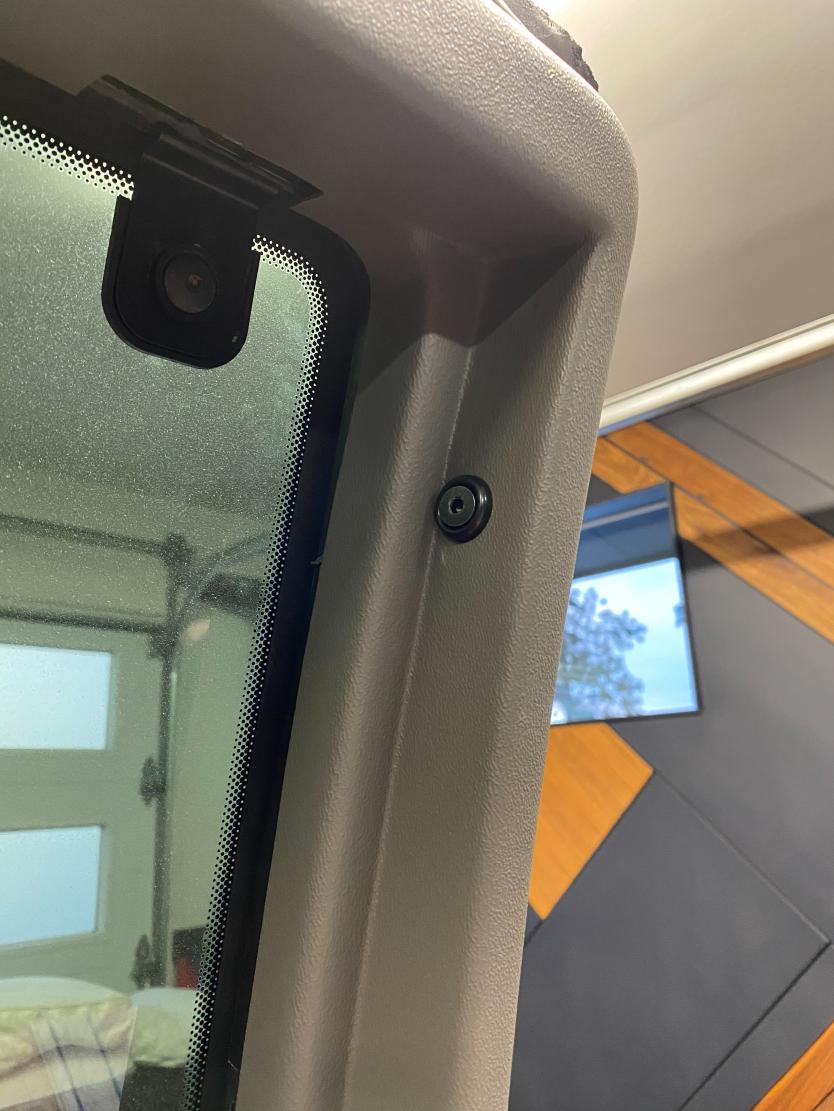
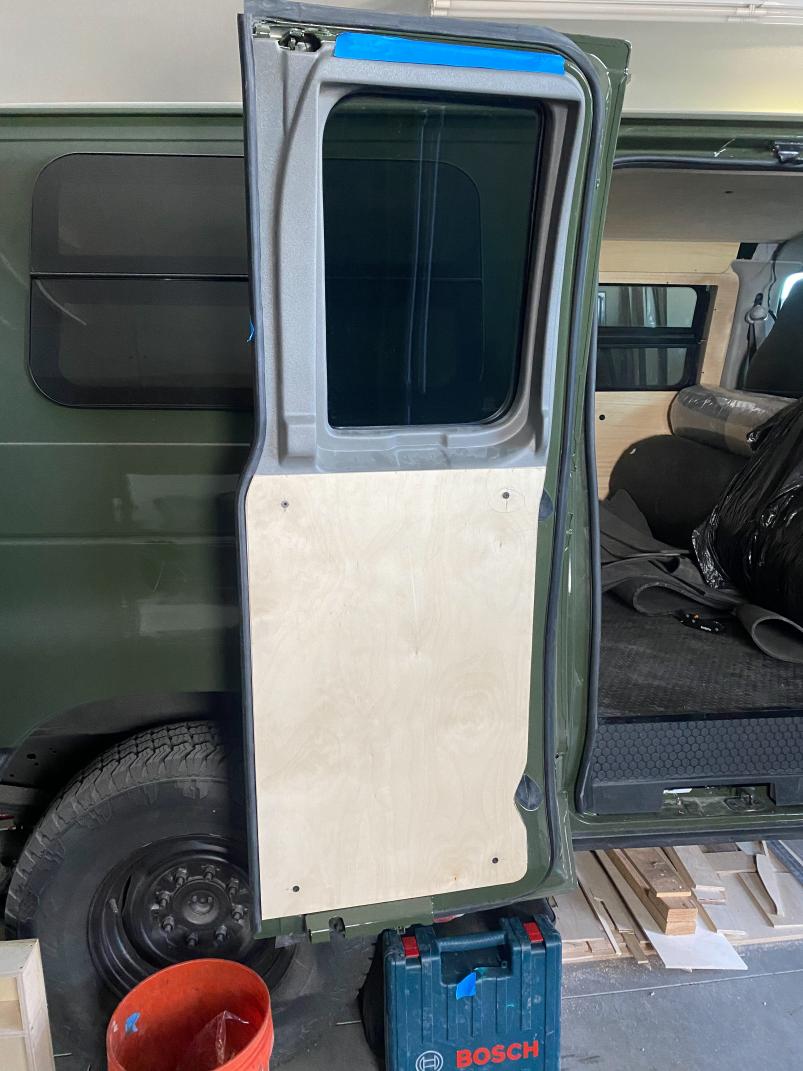
-After getting my templated squared away I traced it out onto ¼ Baltic Birch and cut my outline. After I had my shape established and checked I drilled out holes in the panel for where my attachment points would be going. Once the panel was held up in place I was able to mark all the holes on the van door for the threaded inserts. Once those were marked I drilled, painted, and installed the inserts. Then the door panels went back on for a fitment check. The first door had to be trimmed multiple times to account for the added thickness of the door panel on the door seal which made it take a few attempts.
-Once I got the panel all installed I went ahead and did a final attachment of the window shrouds that I got. I used the same process as everything else using threaded inserts getting them nice and secure.
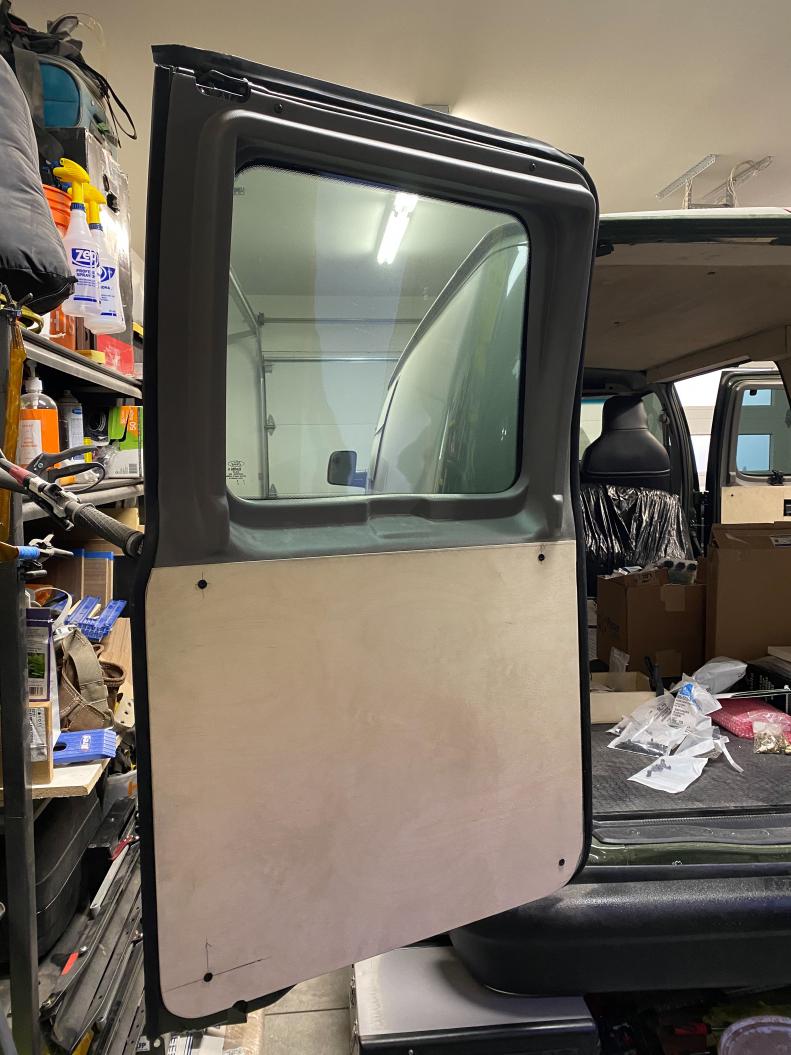
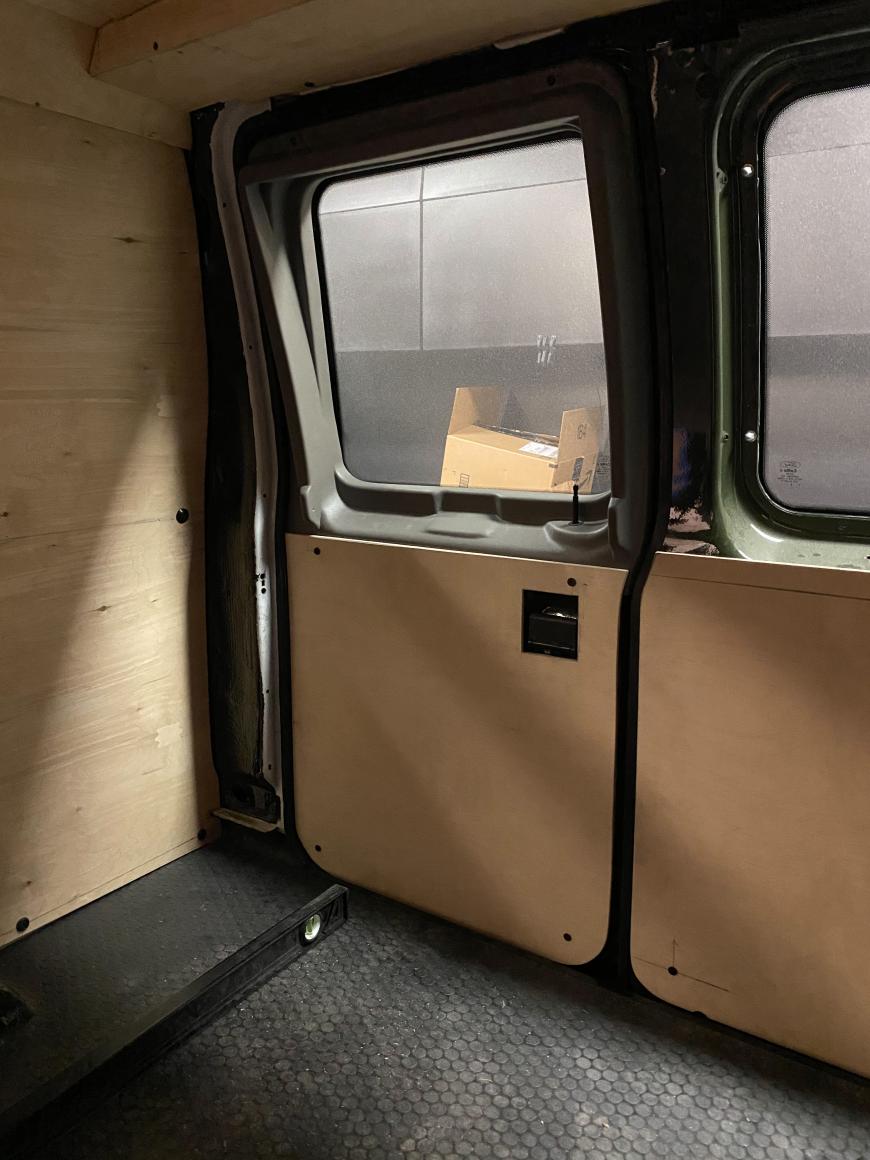
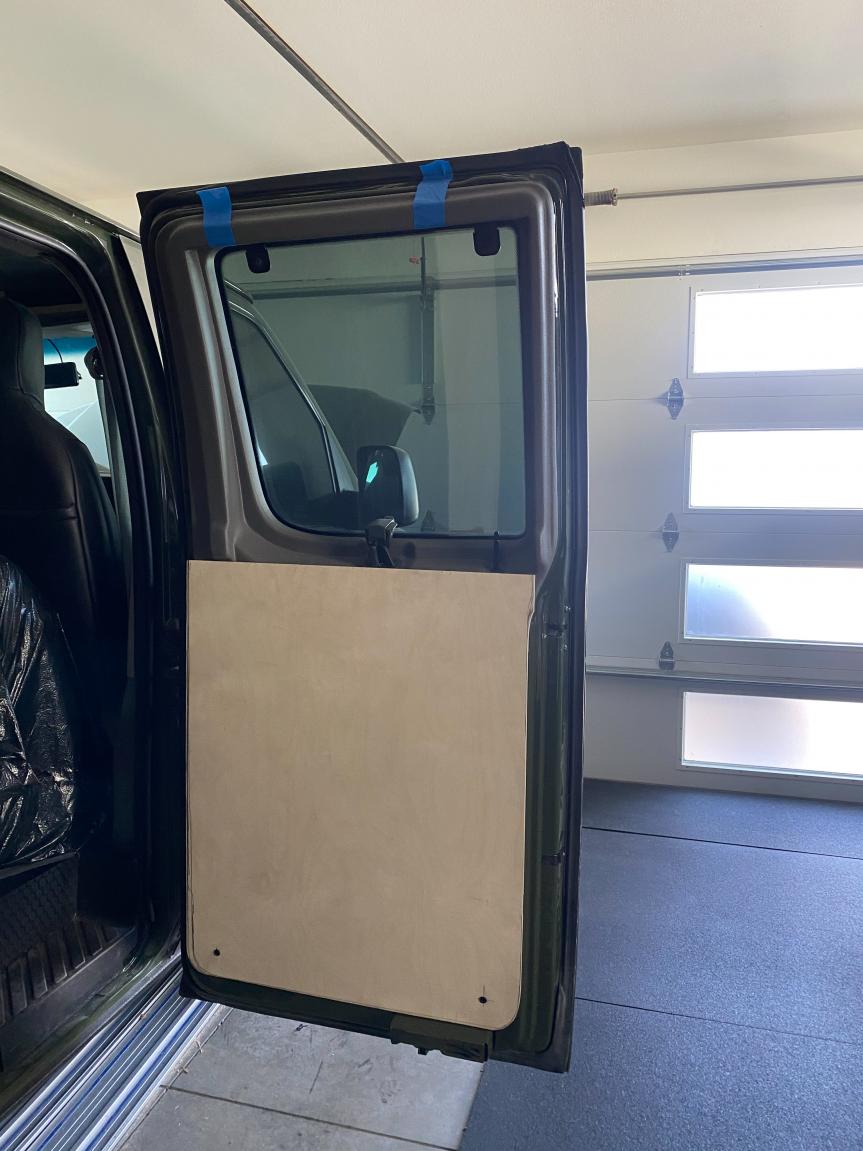
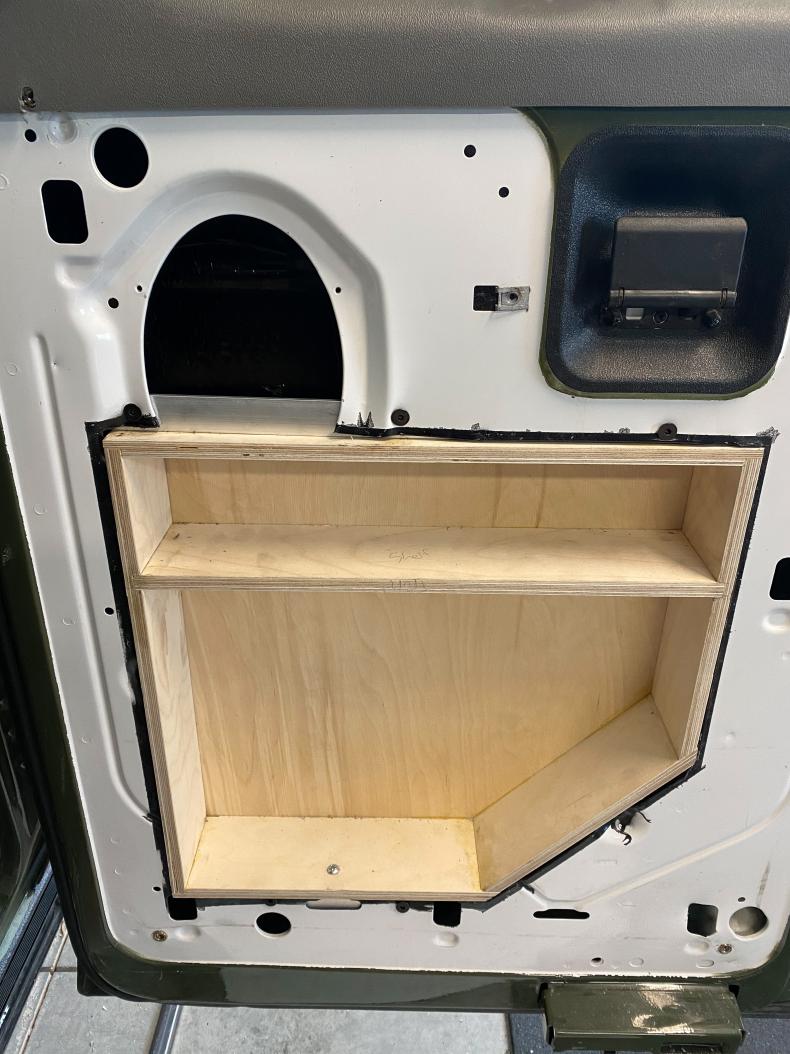
-I then moved on to the second rear door following the same steps as the first, but leaving some more room around the door seal areas, and leaving the top edge long so I could pull a level line off the floor and get it lined up with the door panel next to it. I decided to leave the cut-out for the door boxes till last just to keep me moving in the same direction for the door panels.
-I continued this same process for the other two side doors until I had all the door panels fitting nicely.
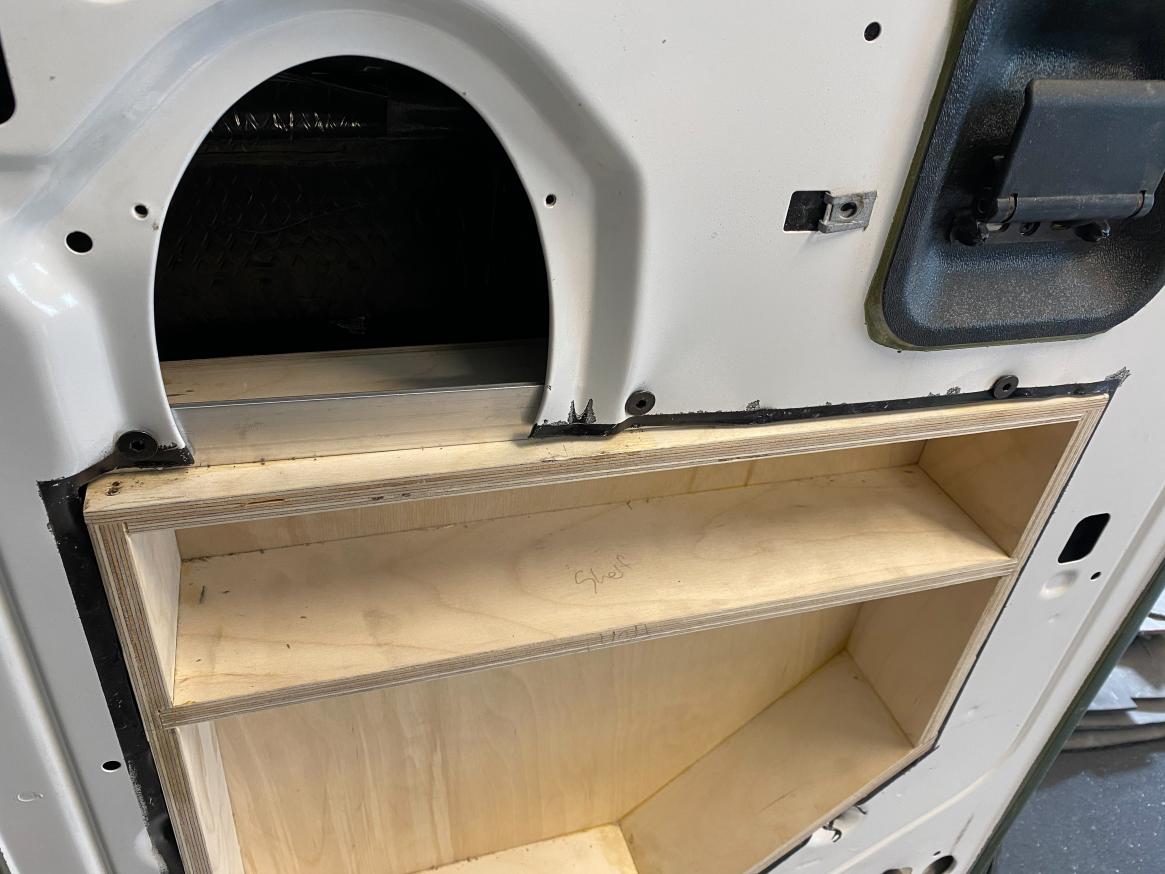
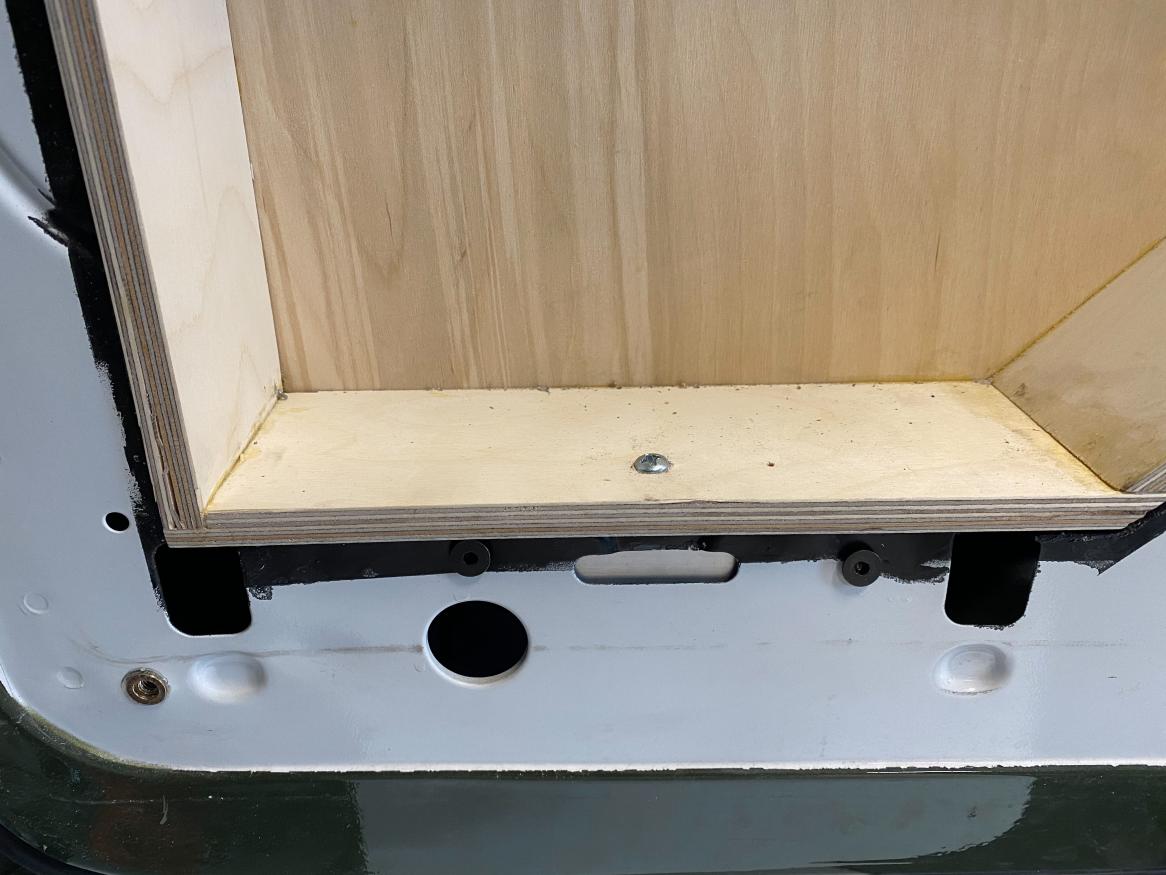
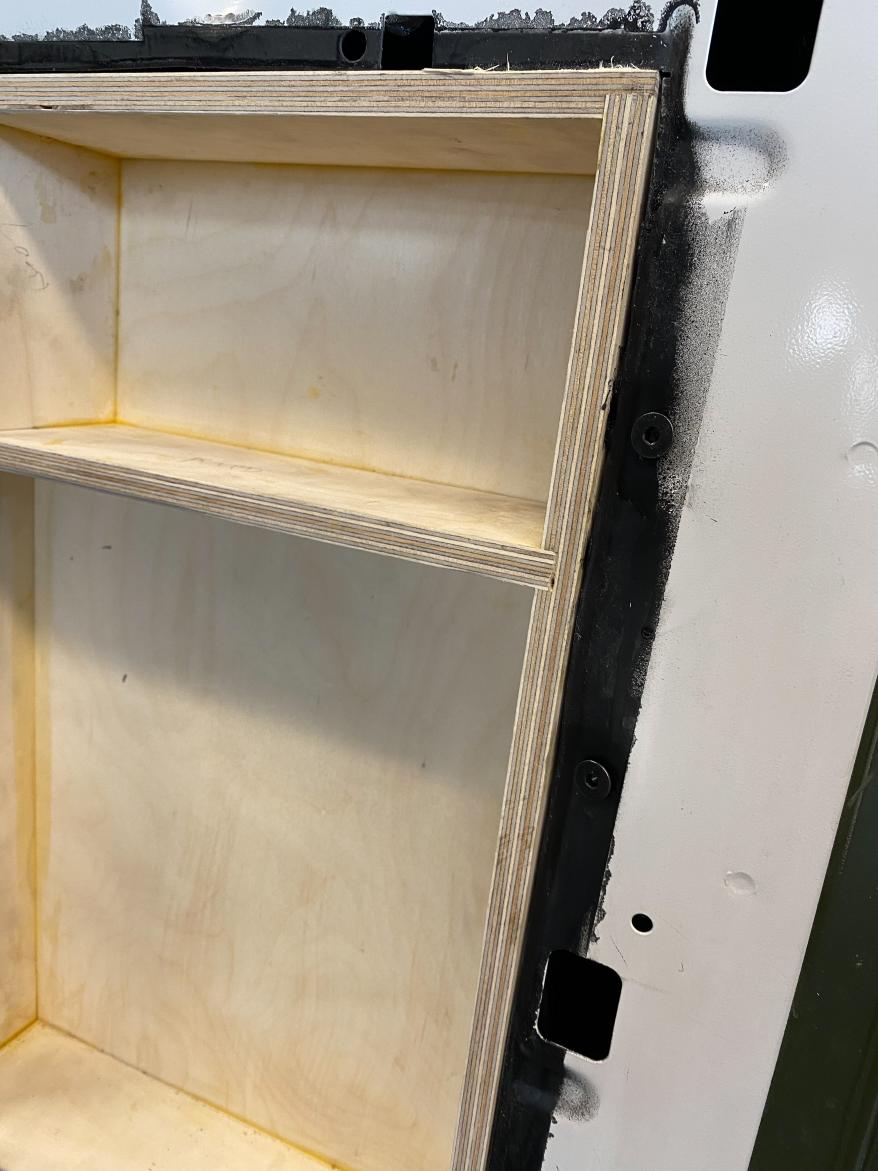
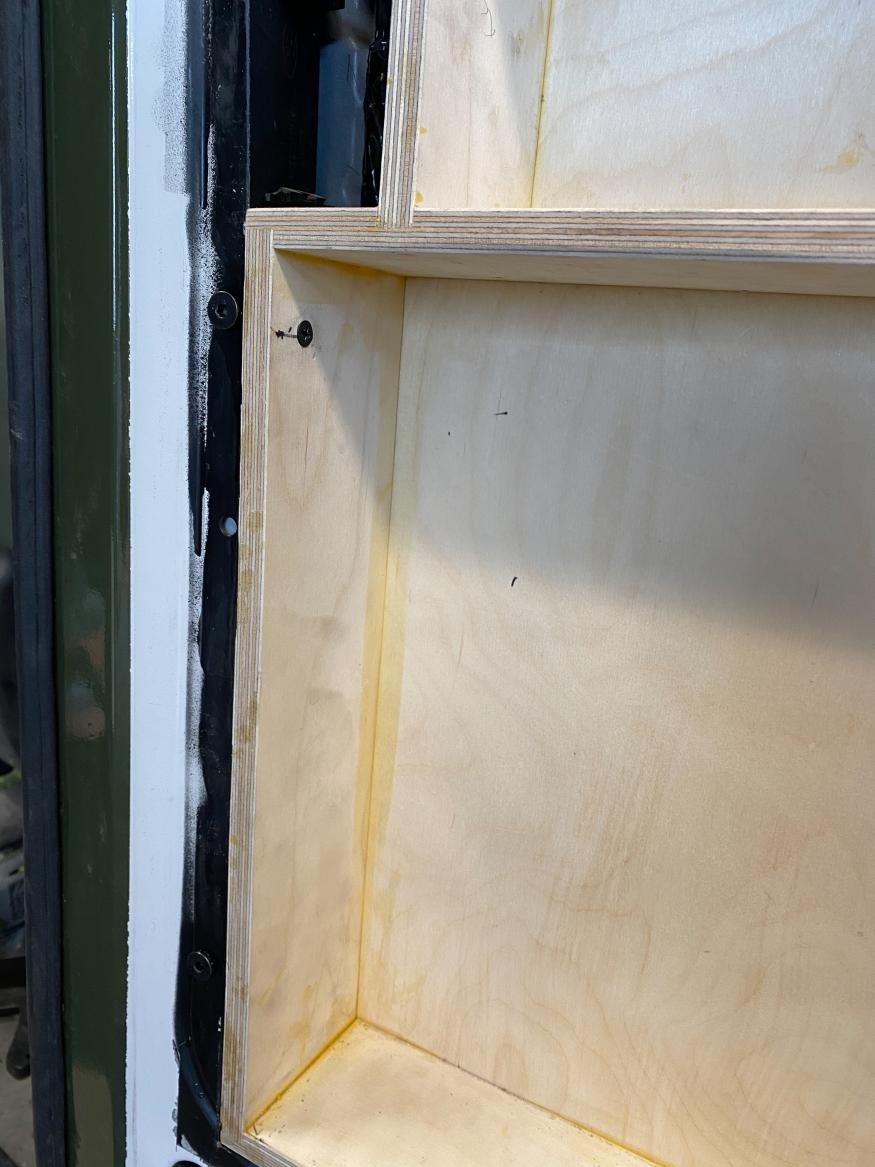
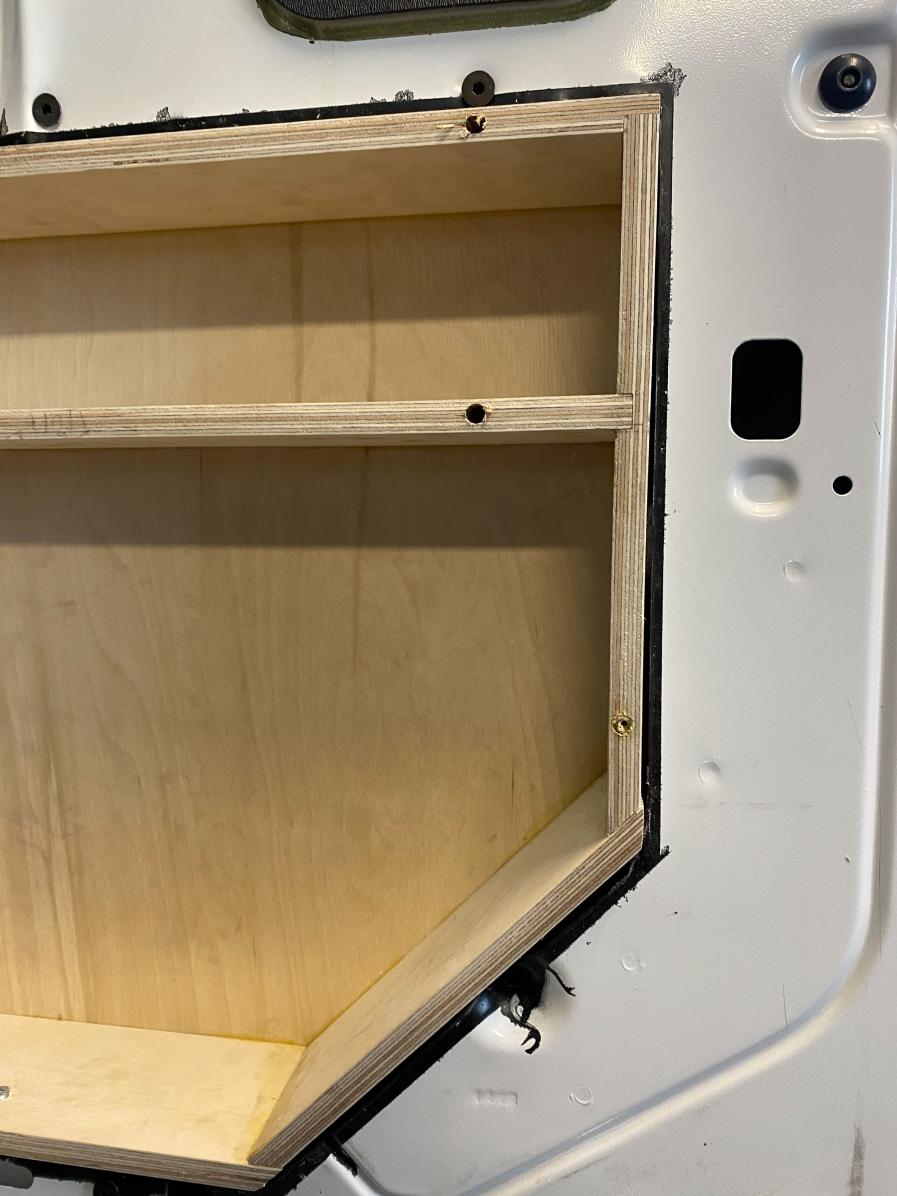
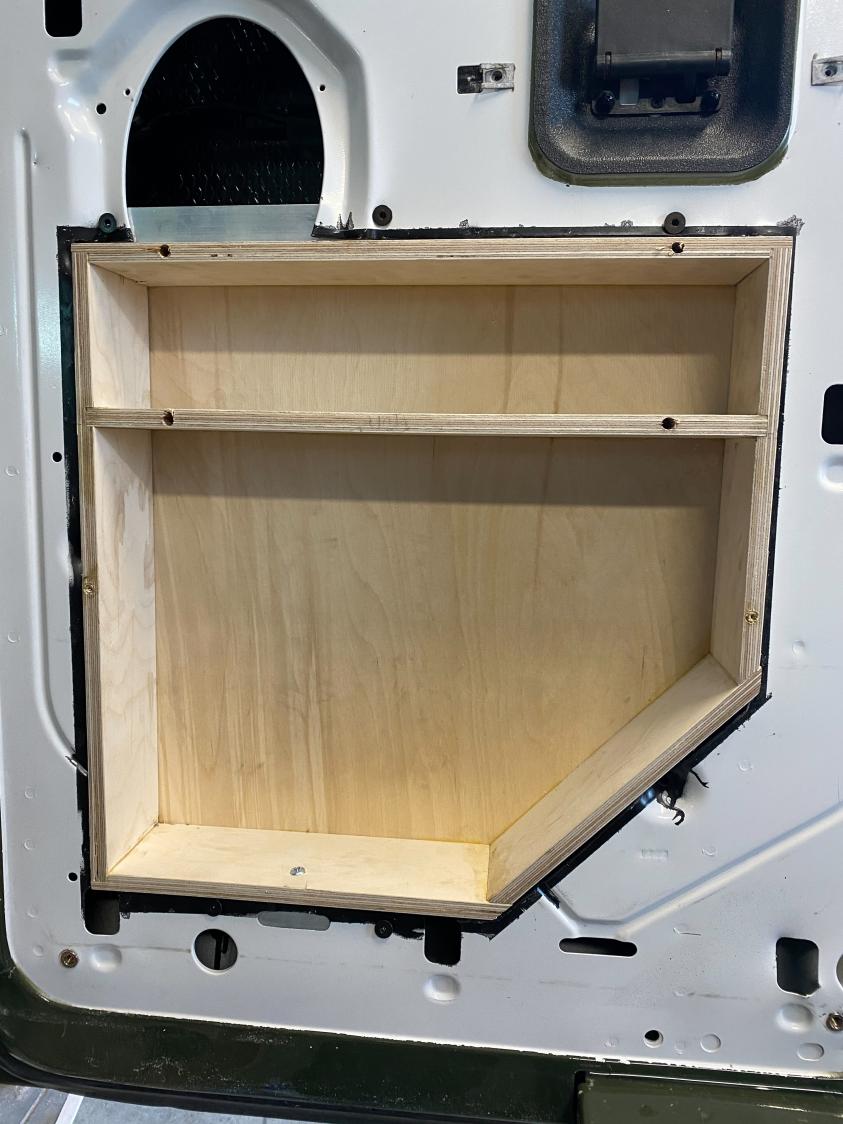
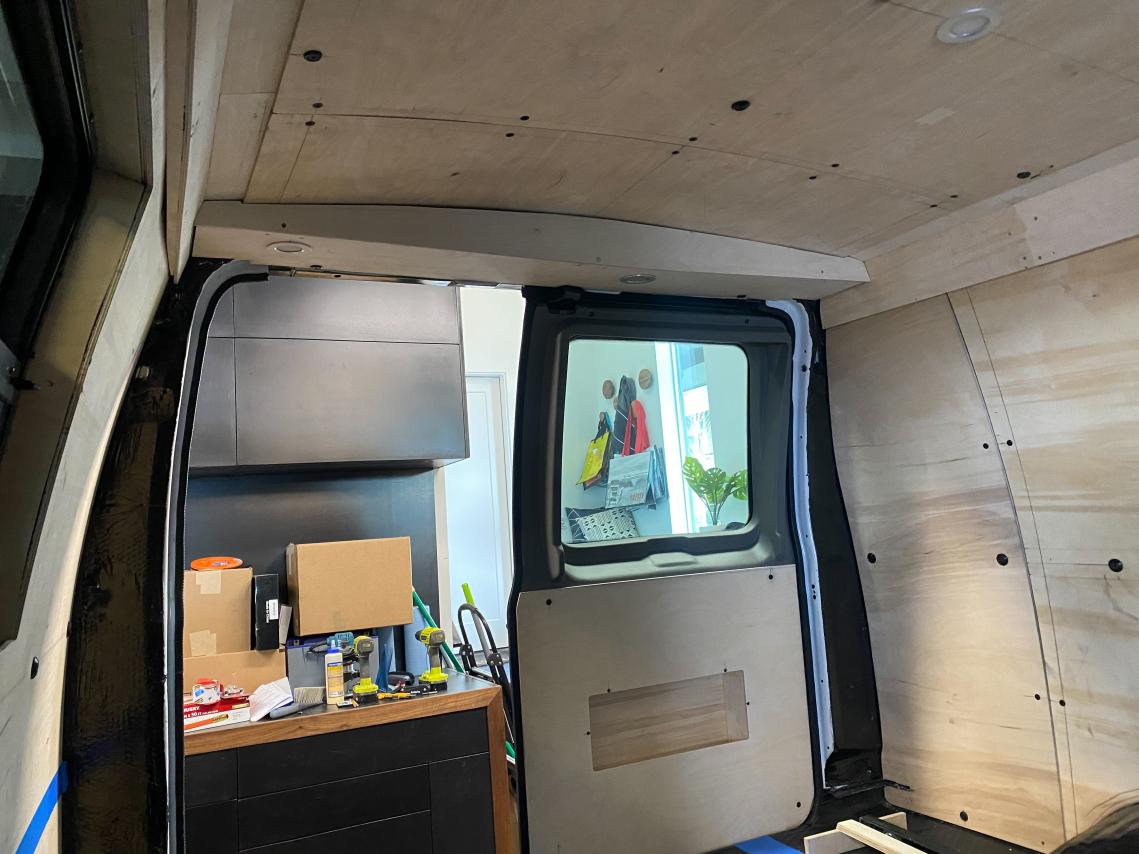
-Up until now I had the door boxes just pressure fit into the doors, but decided they need some more structure so I got some 1 aluminum angle added threaded inserts, and added them to the door boxes to give me some structure to bolt through the boxes to the door panels. Now they are rock solid.
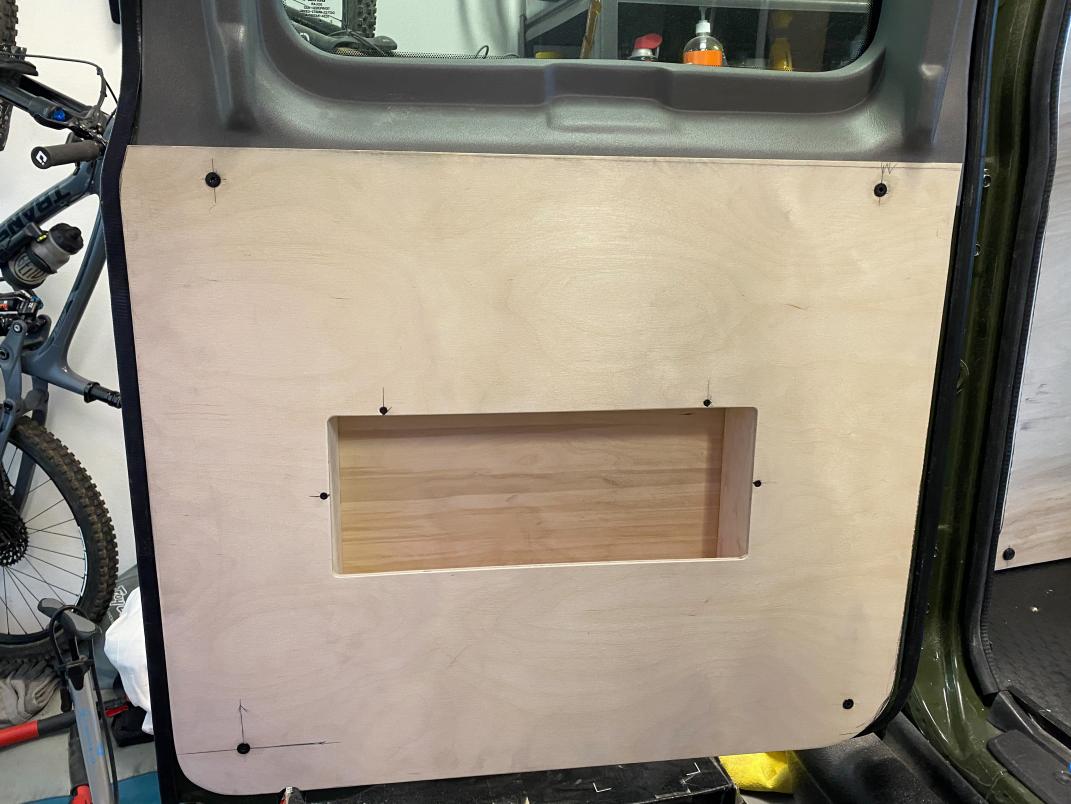
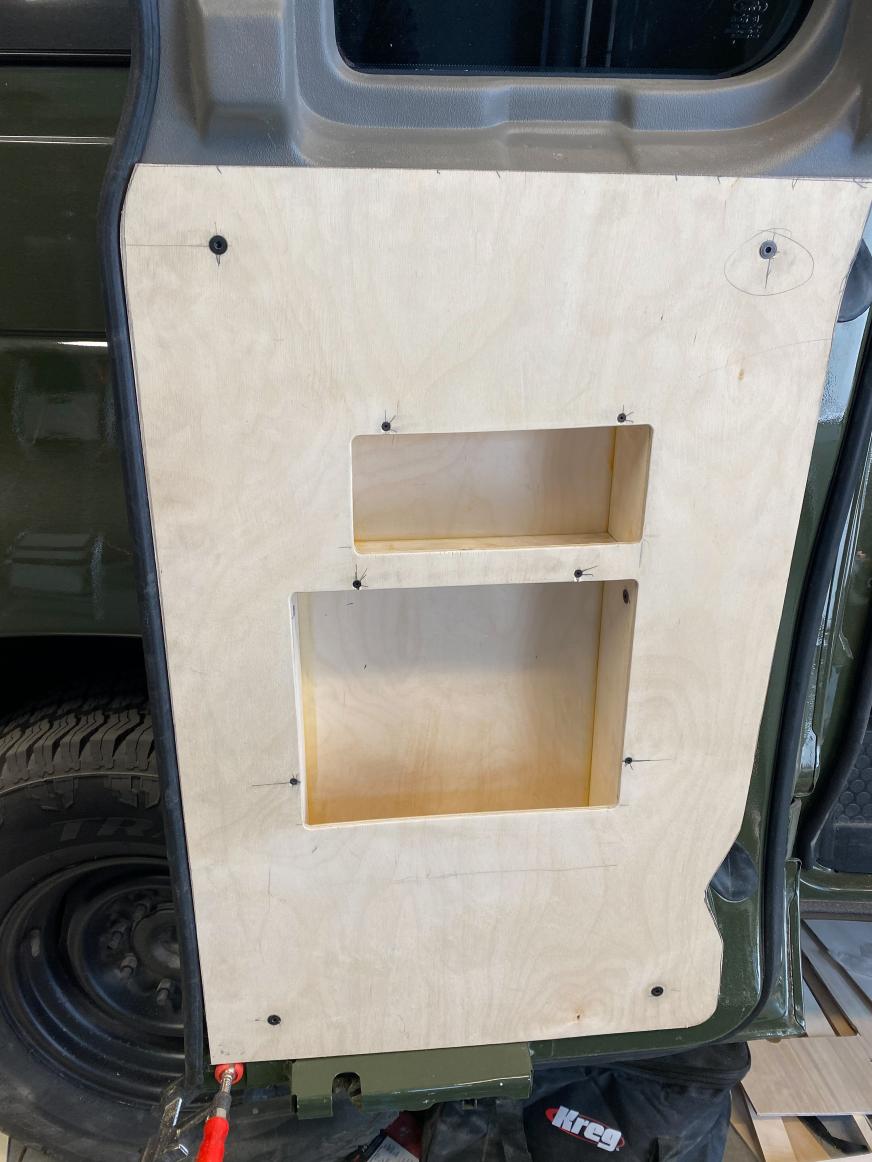
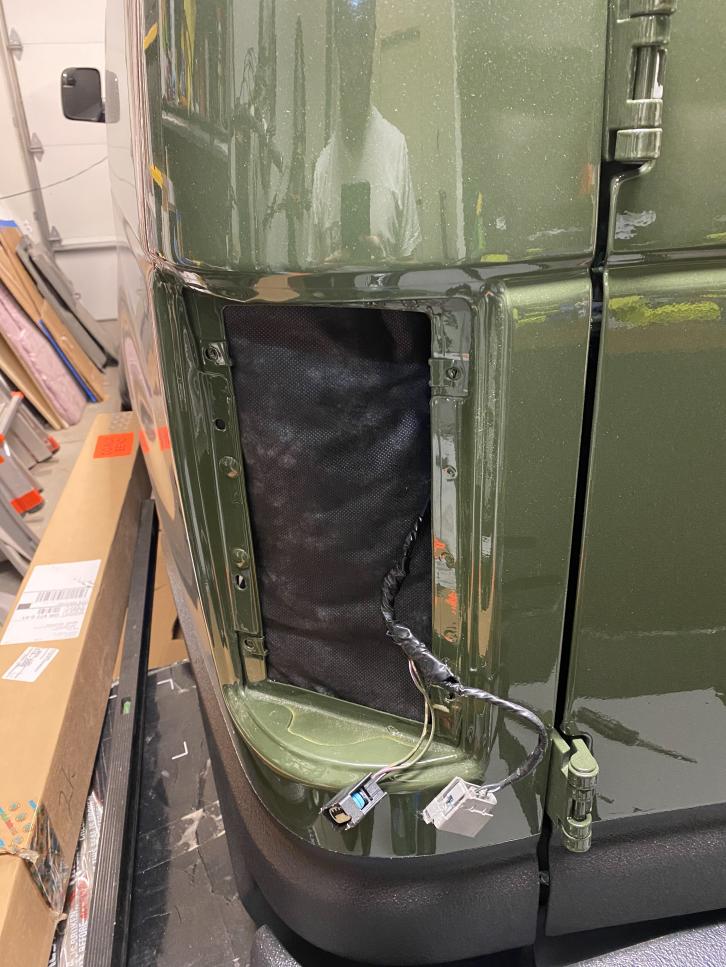
-After getting the boxes secured I went back out a trim bit router and punched through the outer panel and routed out my openings for the door box access. I left a lip of varying amounts (depending on the box) on the bottom edge to act as a catch for the contents on the box. After getting the opening all cut I located and drilled out holes for the small 6-32 inserts to connect the panel to the boxes.
-On the largest box I wanted to have a bigger opening, but still have some restraint for the content, so I added a 1 x ⅛ steel crossbar in addition to the larger lip on the bottom side of the box. I used a straight cut router bit to rout out a notch for the bar to sit in flush with the face of the box and just used the pressure of the panel to hold it in place.
-And like that the door structures were basically done.
__________________
Vandit - 2013 E250 Ground Up Build- Full Custom DIY Interior Build
- DIY U-Joint Off Road 6" 4x4 Conversion
|
|
|
|
|
05-12-2021, 11:26 AM
|
#67
|
|
Senior Member
Join Date: Feb 2020
Location: Bend, OR
Posts: 312
|
Miscellaneous Updates:
-We have been placing orders like crazy lately and have started to get stuff showing up which has been exciting for the most part. We have had a few headaches, but I won't go into too much detail here. Around the same time I was finishing up door panels, we started getting a bunch of boxes.
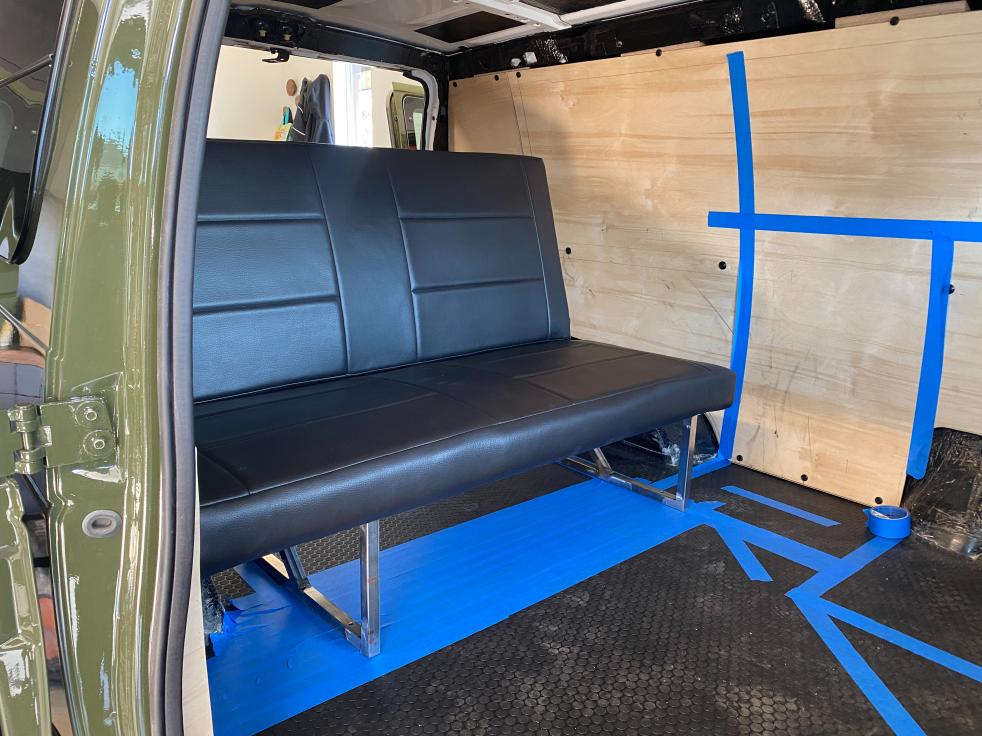
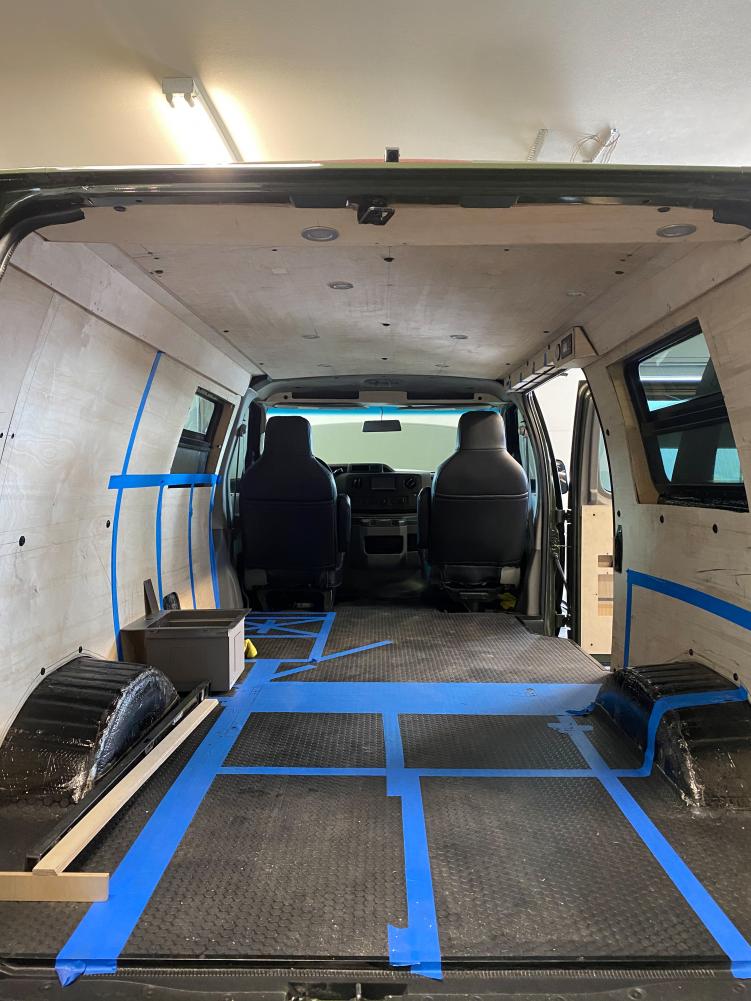
-We ordered a seat back in November, and finally received it. Although it did not match almost any of the dimensions it was supposed to it did match the most critical dimension of the width. After getting the base re-made and the pads modified by a local upholstery I think we are back in business. Also, you can see we started taping out our rough layout in the van!
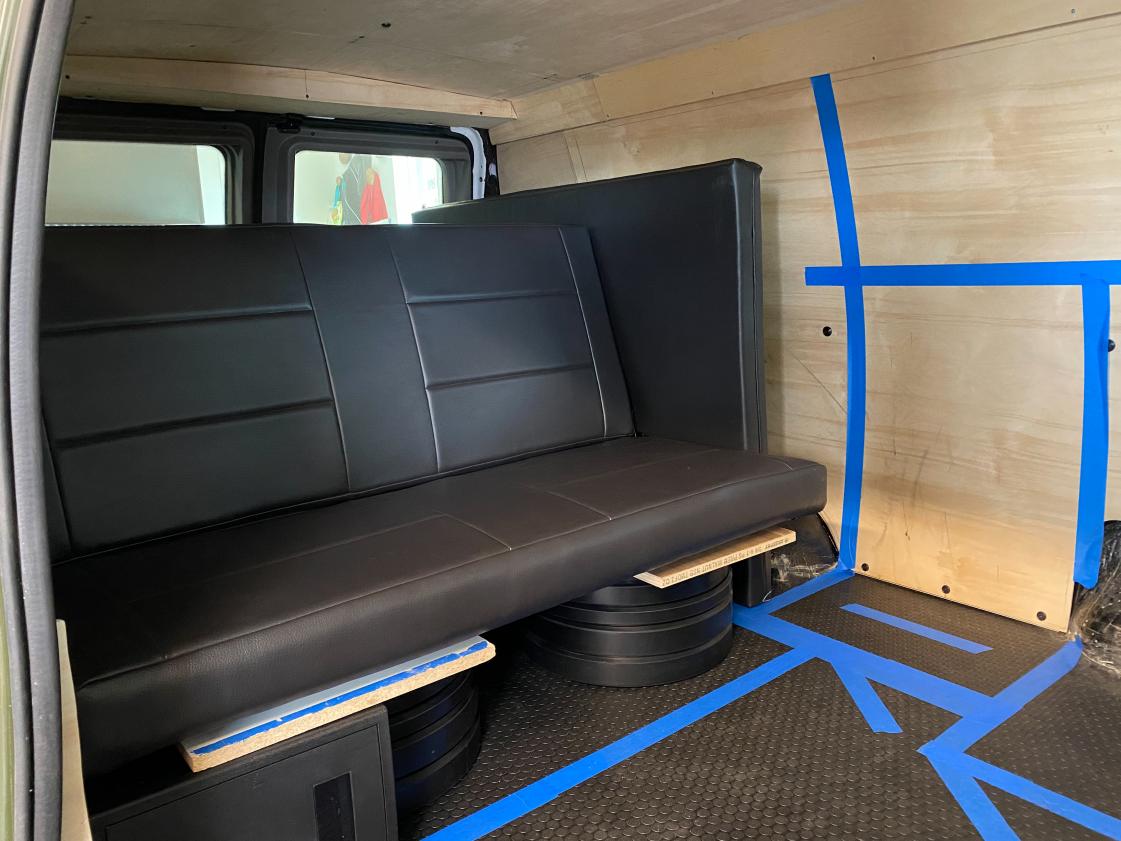
Mockup Before Seat Base Adjustment
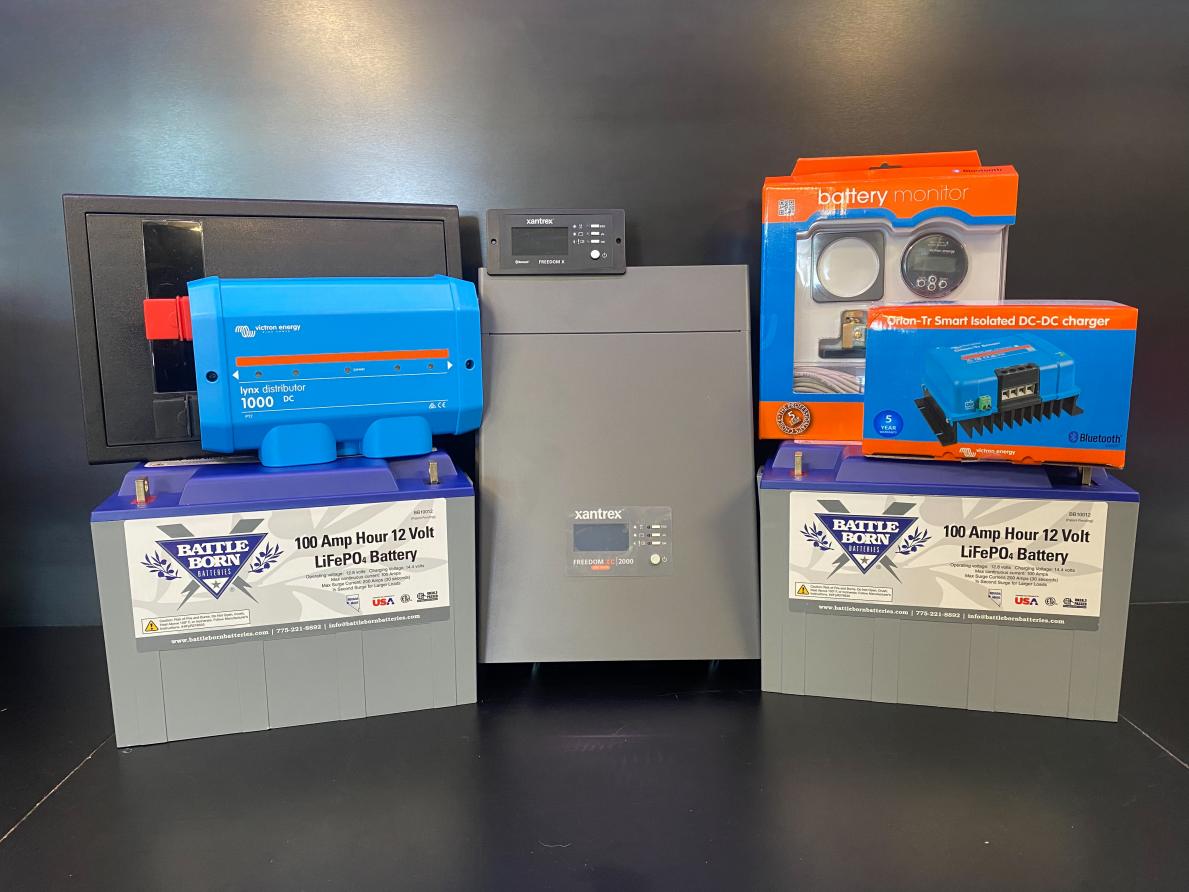
-We got our main electrical components.
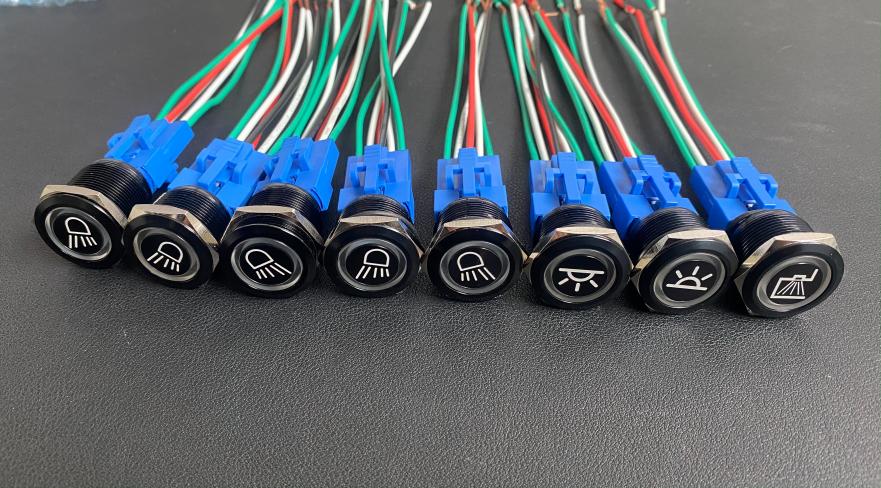
-We also received our first batch of switches from Billet Automotive Buttons which are super nice and very high quality. Super excited to get those all installed hopefully soon.
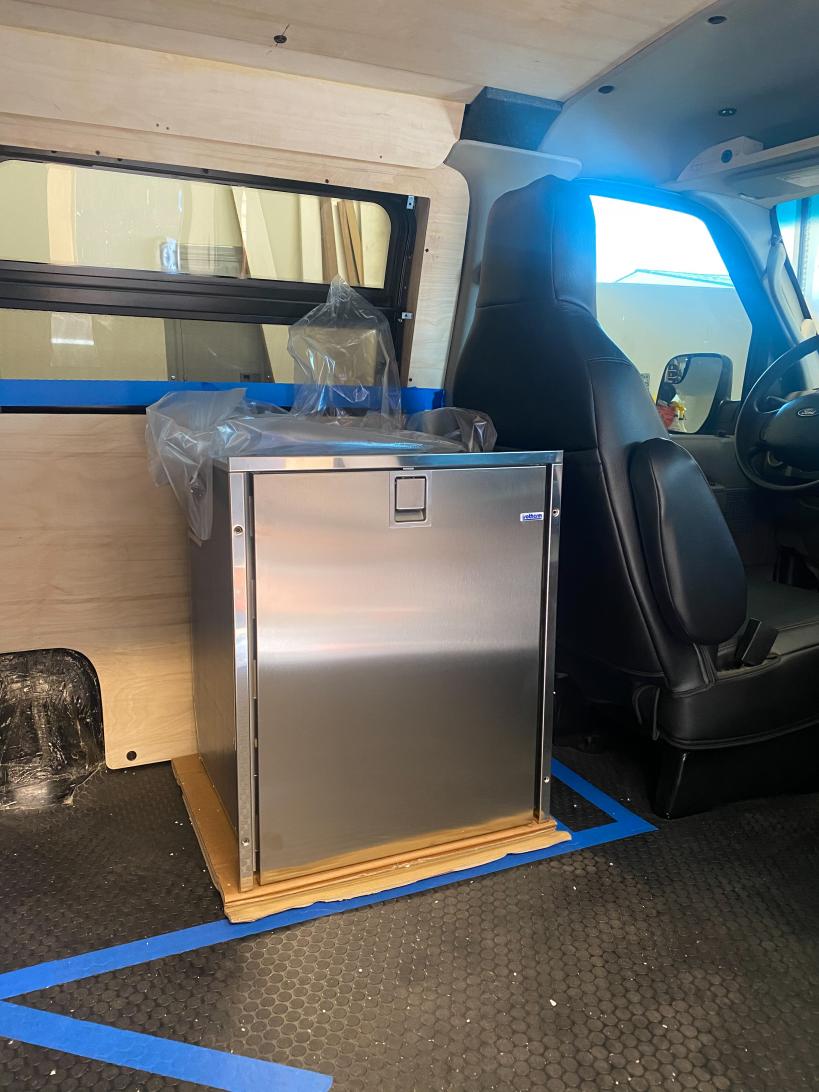
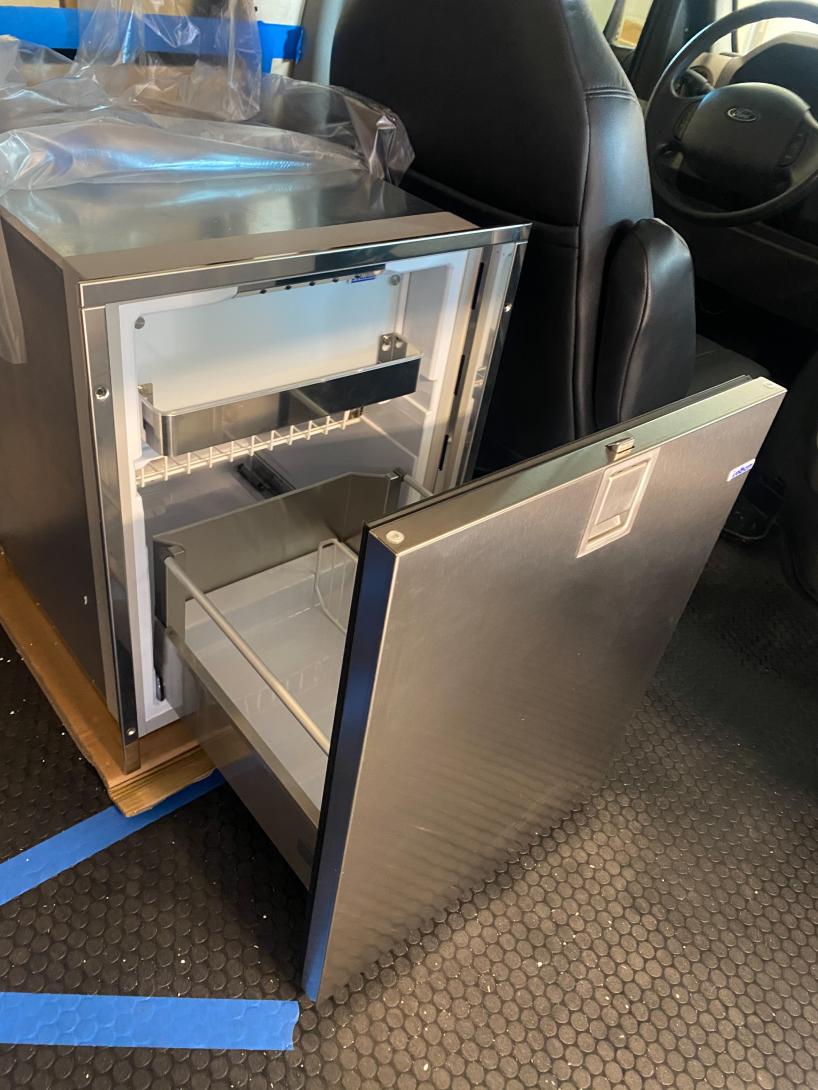
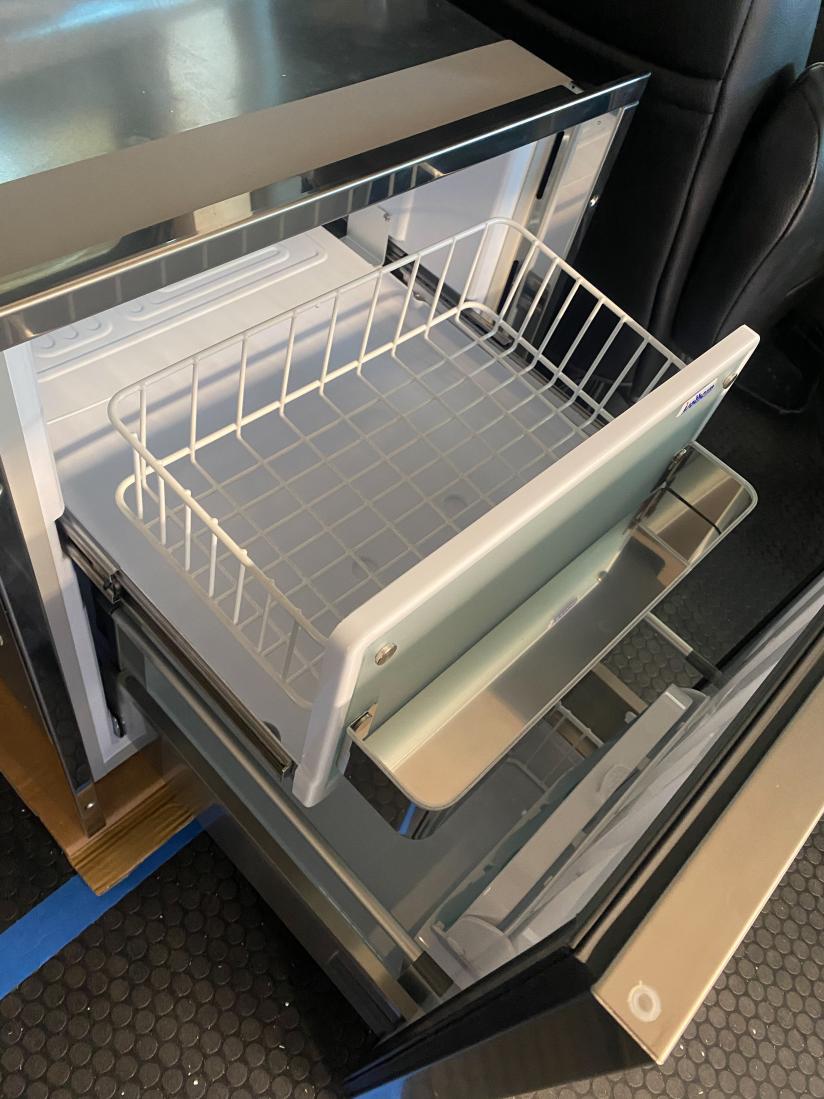
-And the last big thing we got was our fridge! We decided to go with the Isotherm 85 Inox drawer. It wasn't cheap at all (even though we got a pretty good deal), but it does give us a good freezer space and was actually in stock which was one of the biggest problems we were having.
__________________
Vandit - 2013 E250 Ground Up Build- Full Custom DIY Interior Build
- DIY U-Joint Off Road 6" 4x4 Conversion
|
|
|
|
|
05-12-2021, 11:35 AM
|
#68
|
|
Senior Member
Join Date: Feb 2020
Location: Bend, OR
Posts: 312
|
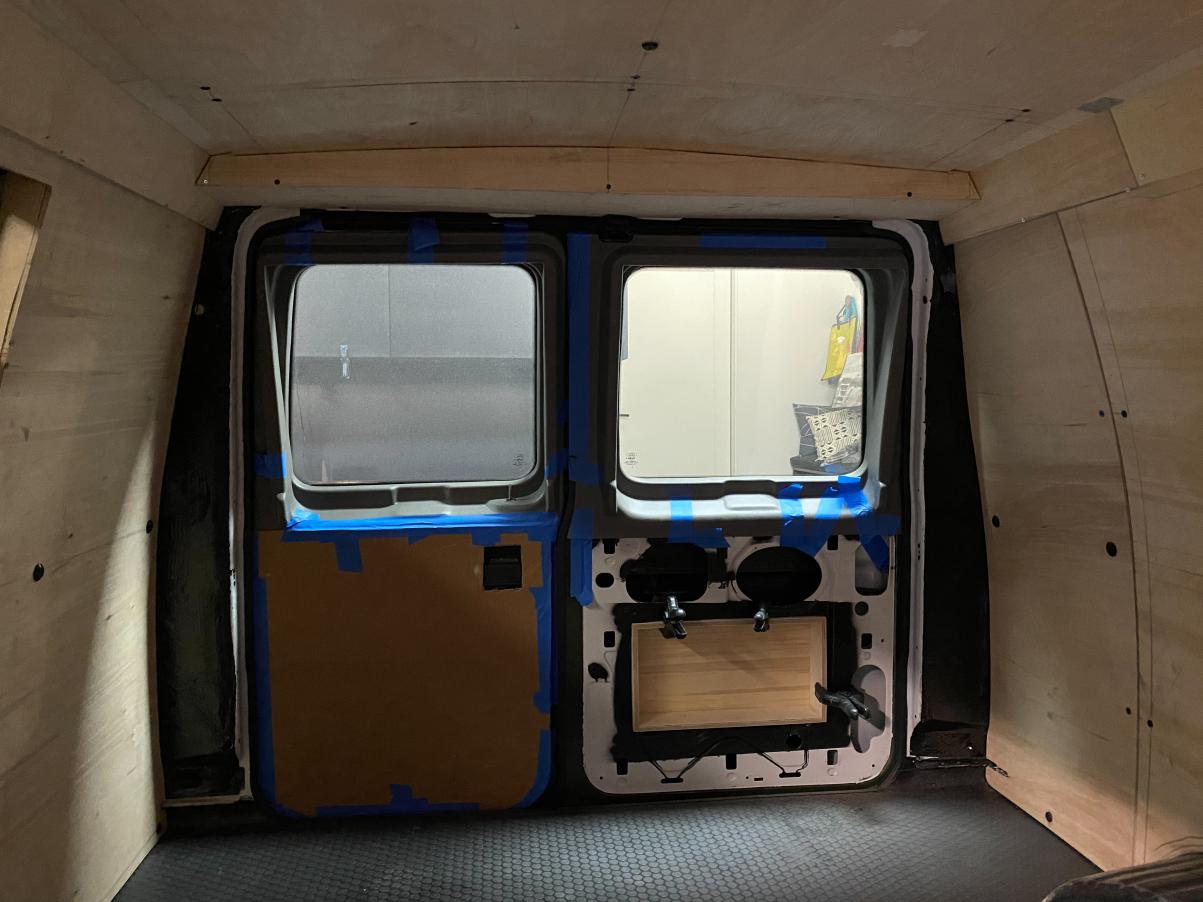
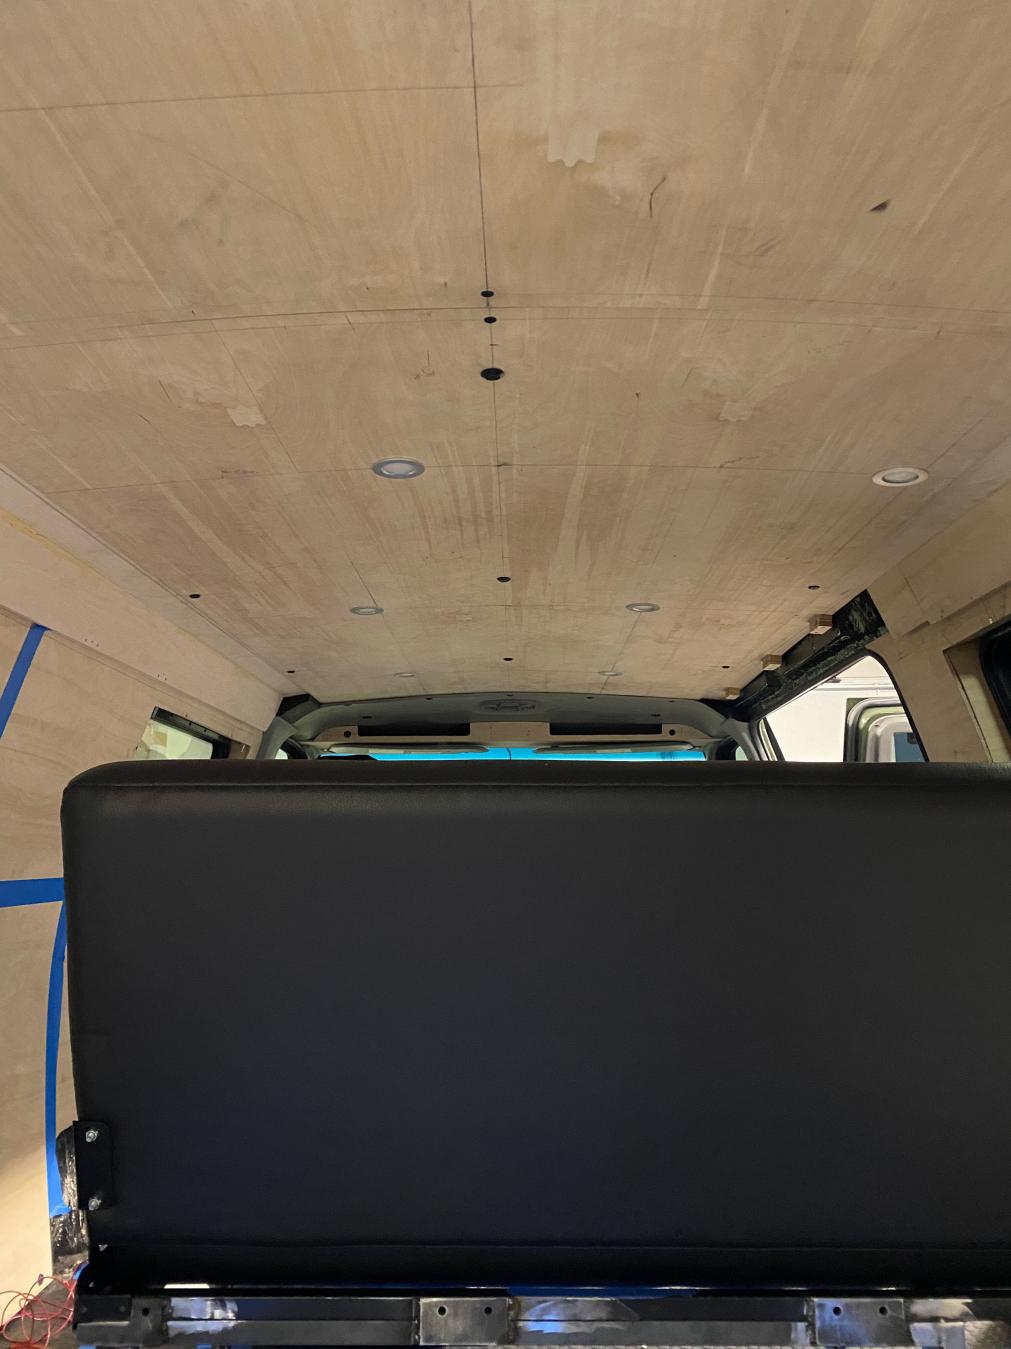
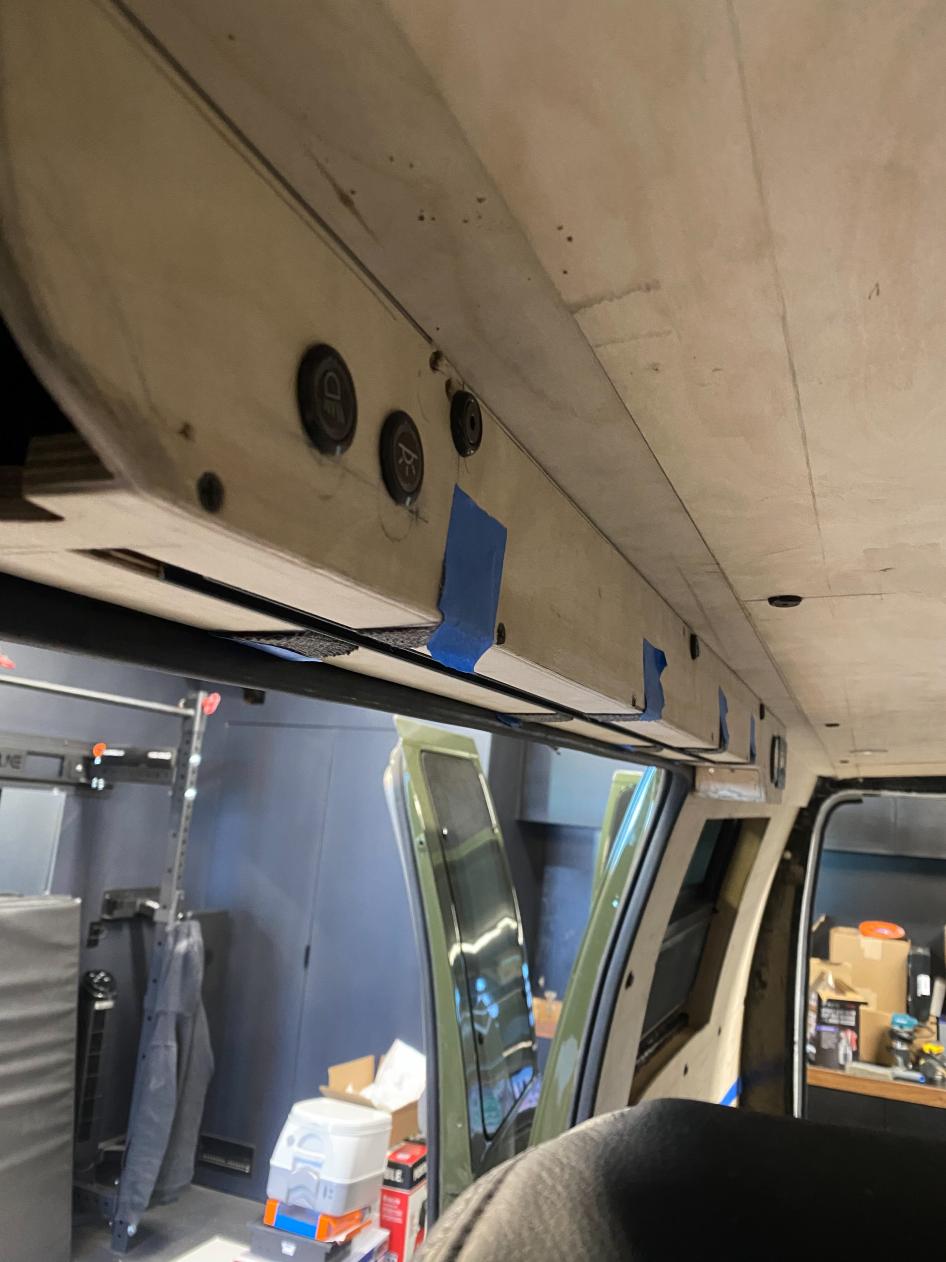
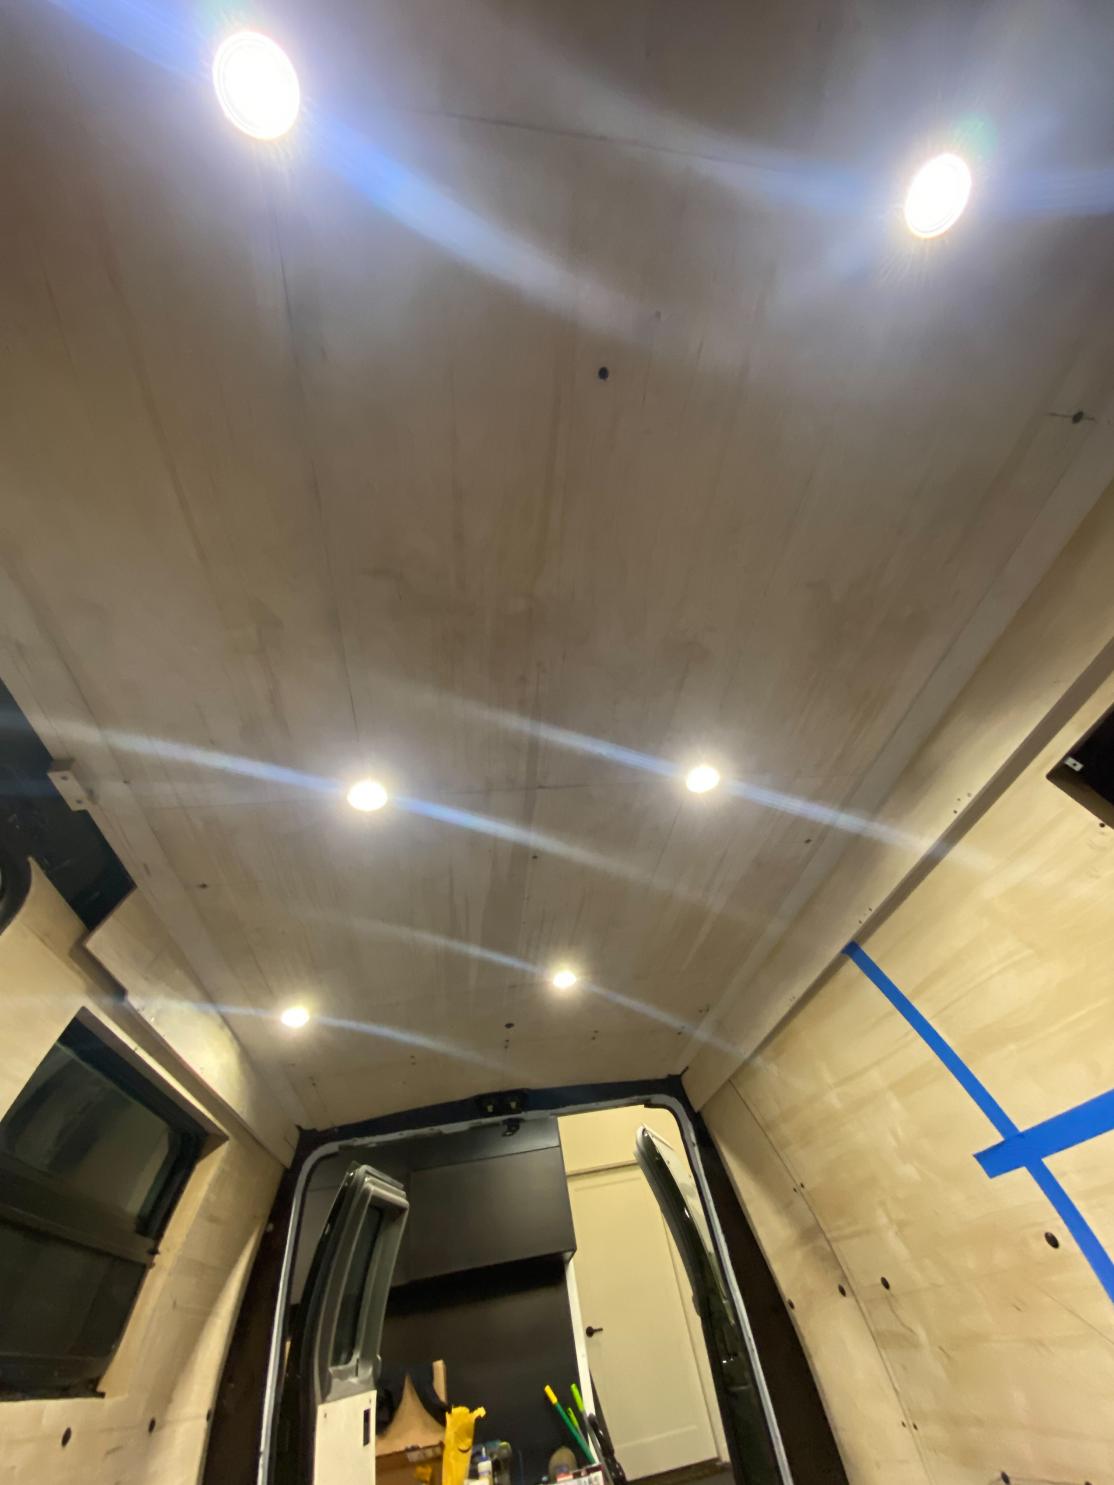
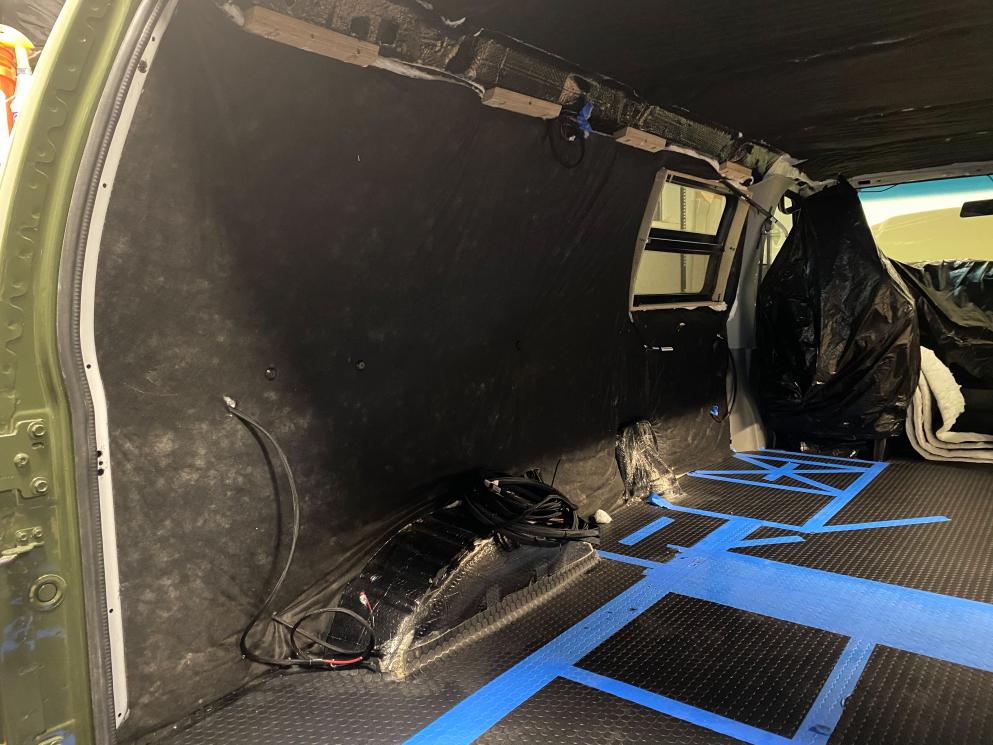
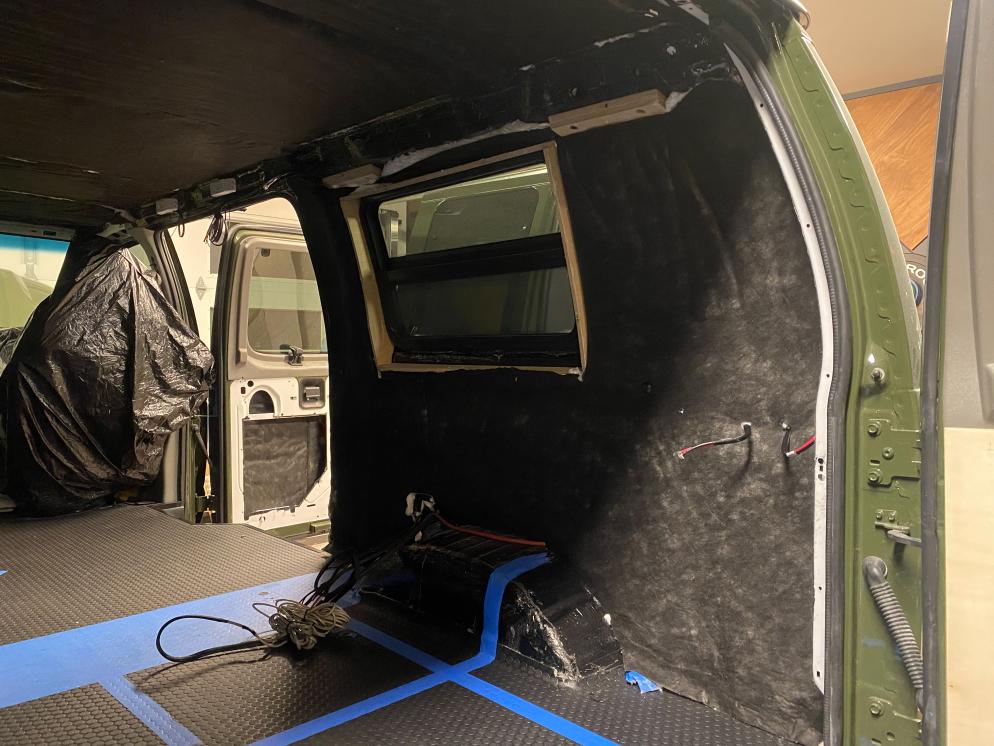
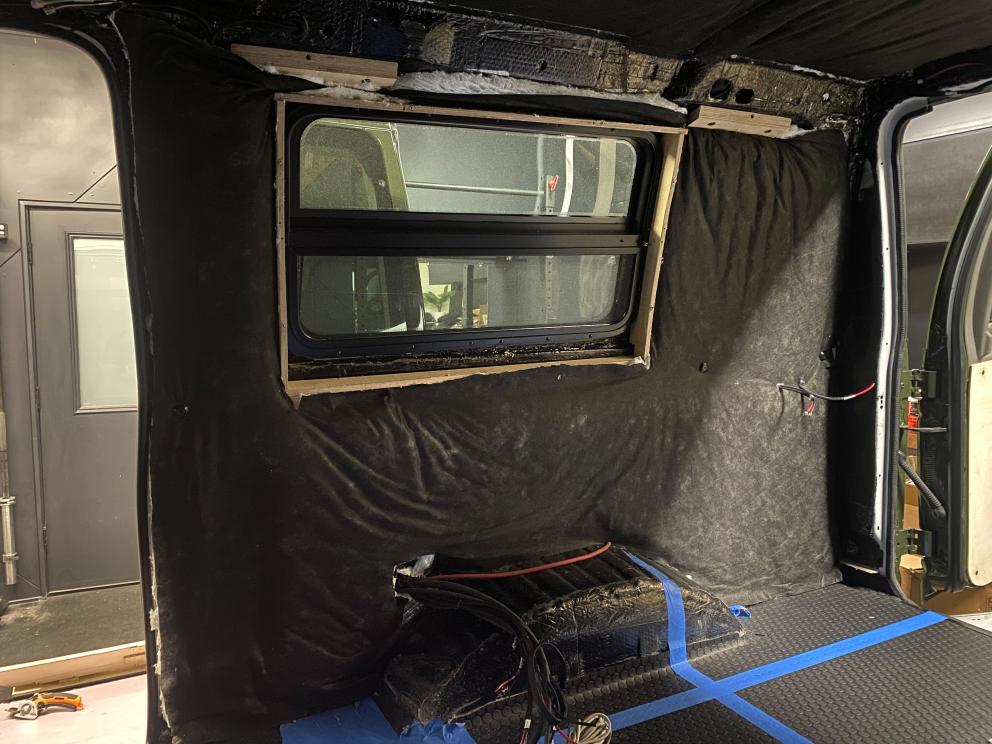
Panel Adjustments:
-Finally got around to getting all my inserts set for the ceiling panels as well as the ceiling light layout. We ended up using six lights on one circuit for the main lighting and then two lights acting as bed lights overhead night lights in the rear.
-After getting all ceiling/ trim boards inserted and tightened I realized I made some mistakes. Since everything wasn't fully tight when I scribed my lines for the trim boards and the rear panel things now were not fitting correctly. So after lots of debating whether or not it was worth it I decided that it was going to be something I would notice every time I was in the van. So I pulled it back apart and re-cut the passenger trim transition board and re-cut the rear panel. It was extra work, but I think it will be worth it in the end.
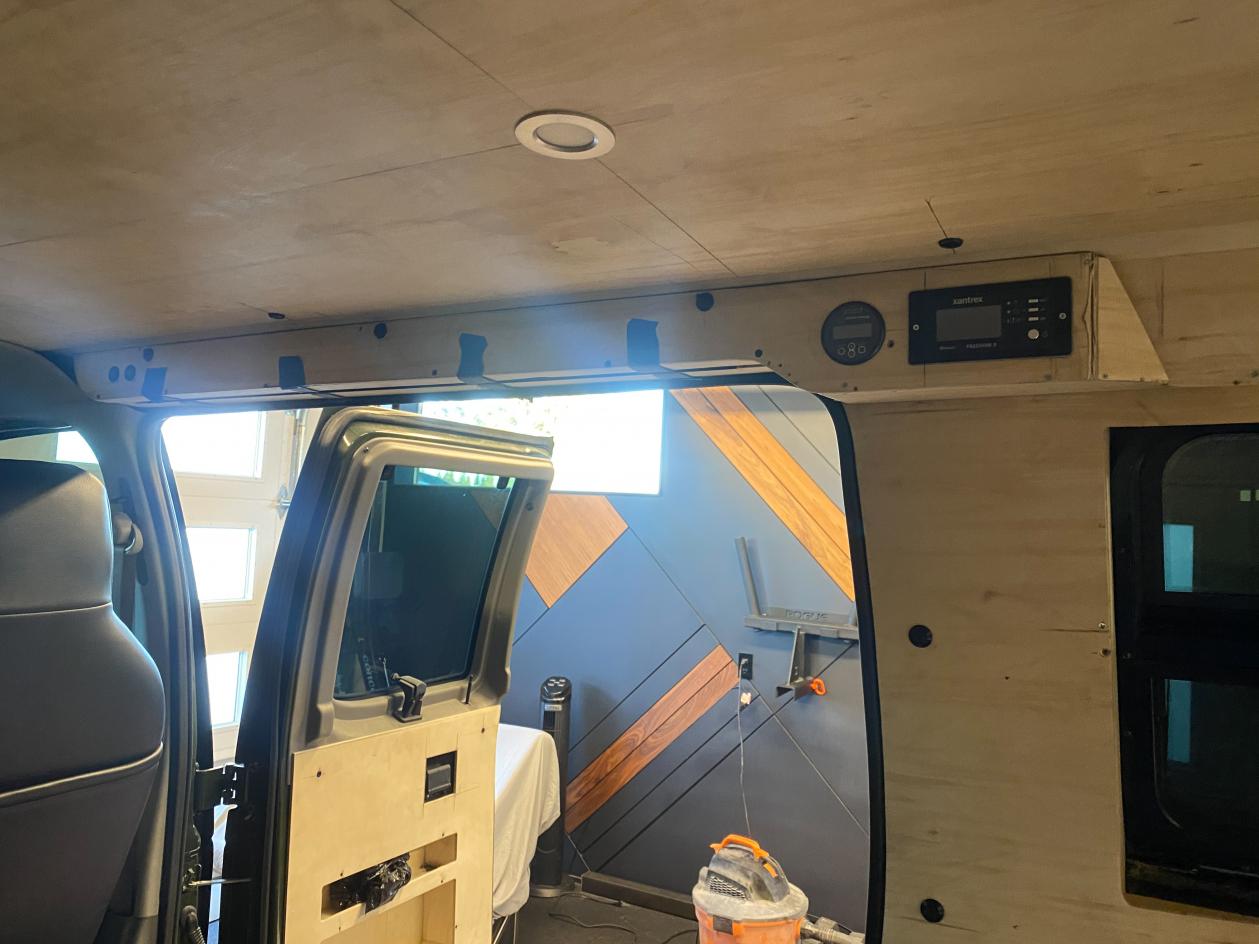
-Then I went back to what I have been calling my control center over the side doors. I drilled/ cut out the opening for the Victron BMV-712, Xantrex Freedom XC controller, and light switches. I also routed out the bottom edge for where the entry LED strip light will be.
-Then I went back to the rear of the ceiling transition panel and added in the light switch locations there as well.
__________________
Vandit - 2013 E250 Ground Up Build- Full Custom DIY Interior Build
- DIY U-Joint Off Road 6" 4x4 Conversion
|
|
|
|
|
05-12-2021, 11:53 AM
|
#69
|
|
Senior Member
Join Date: Feb 2020
Location: Bend, OR
Posts: 312
|
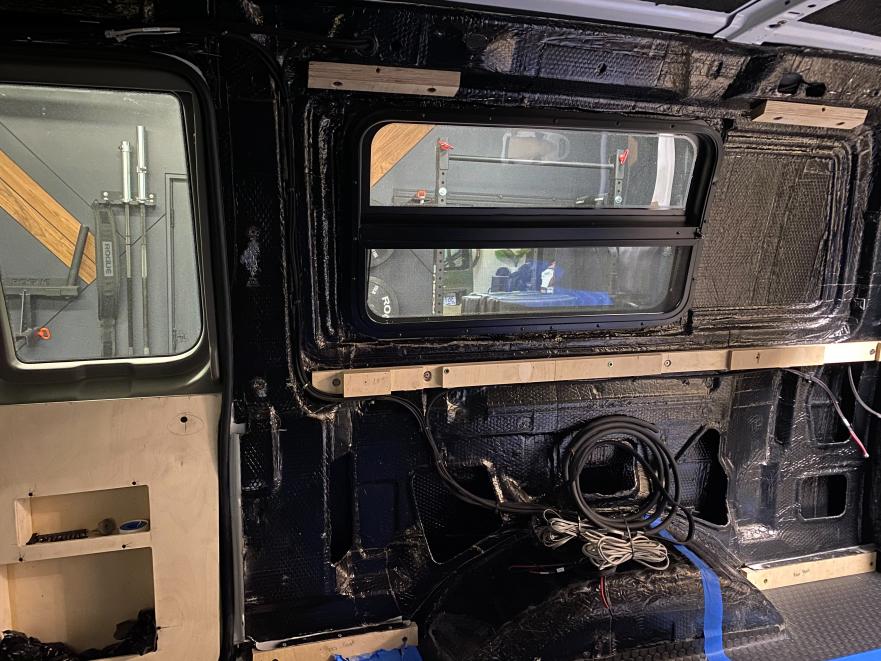
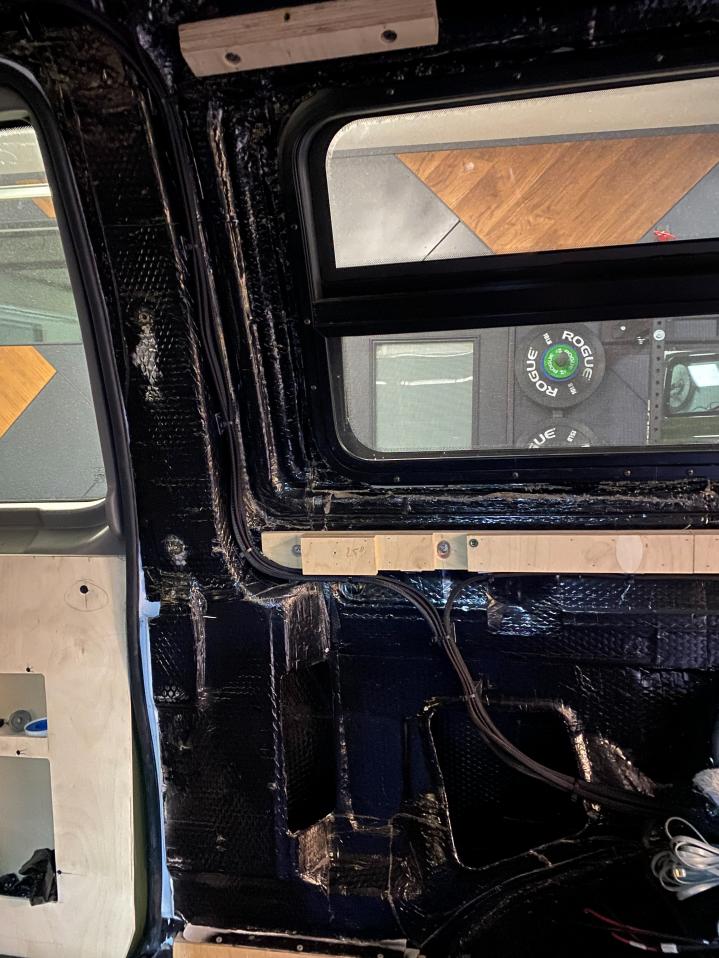
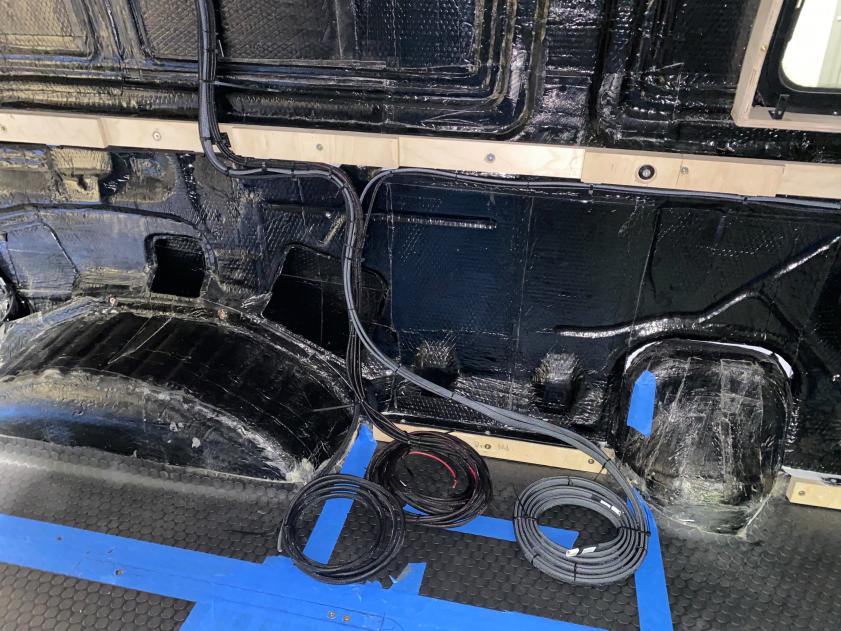
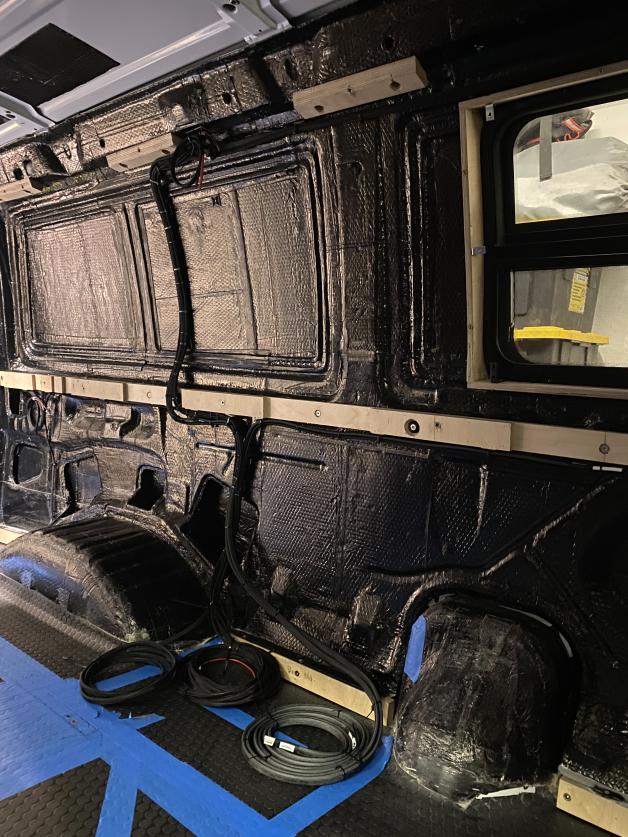
Electrical Rough-in:
-So after getting the panels mostly done I started on the task of electrical rough-ins. I started by wiring up the puck lights and doing a quick test to make sure they were working the way I wanted them to. I decided to keep all the wiring attached to the ceiling panel to make it easier for the removal and installation of the lights.
-Then I moved onto the passenger side electrical rough-ins. All the wire I am using is marine-grade tinned stranded copper wiring. I went ahead and pulled out the label maker and just got as OCD I could. All the wire is color-coded, pulled through expandable braided sleeves, heat shrinked, and labeled.
-I am also using some LED dimmer modules for almost all the lights which if it all works how it's supposed to should be pretty sweet. They use a momentary push button to control all the dimming and the on/off. If you push and hold it dims and if you quickly push it does the on-off. In addition to the dimming function, it has the ability to have multiple inputs, so I can have a 3-way switch and it will match all the other switches!
-After getting the passenger side done I moved on to the driver side repeating the same process.
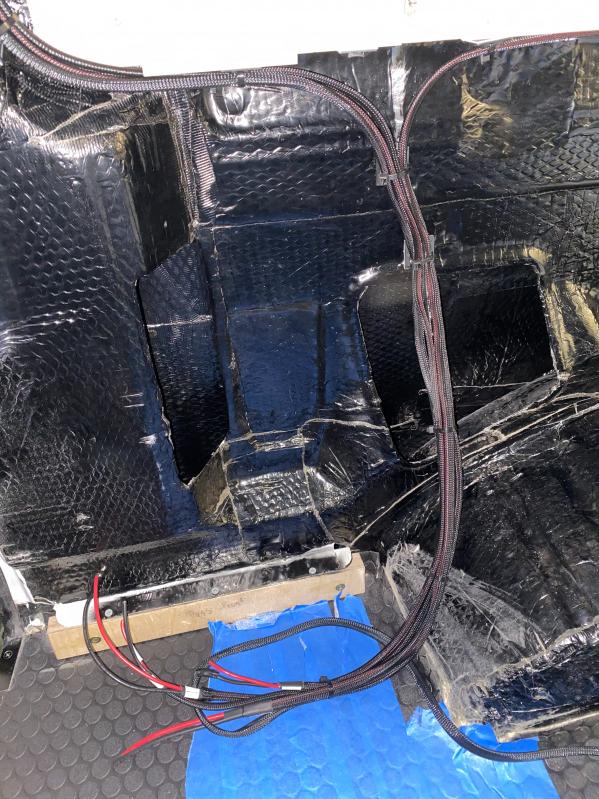
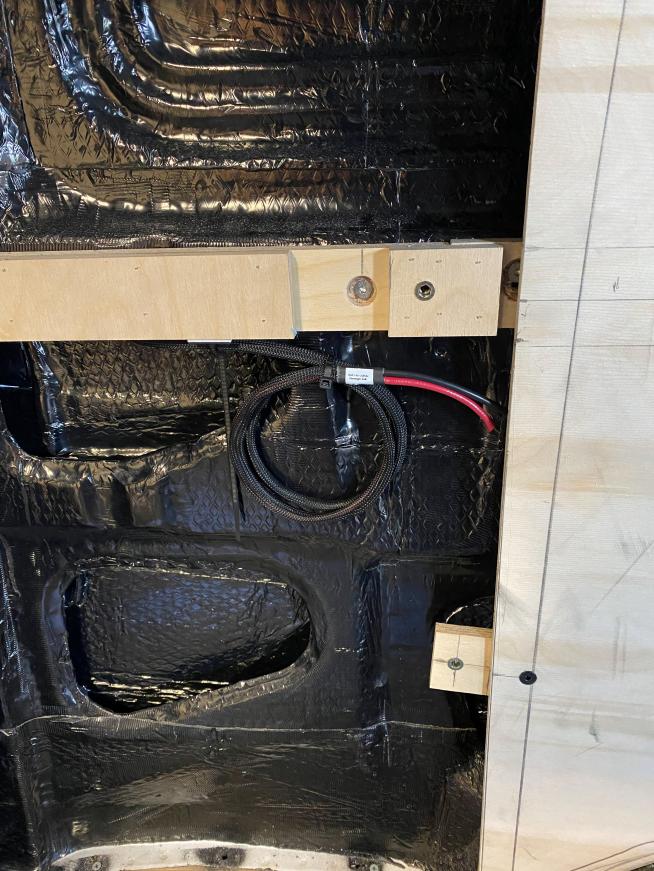
-After getting everything on the inside all cleaned up and good I picked up some larger wires from a local shop called Bend Battery to get my rough-in for my ground wire and my DC/DC wires. I drilled a few holes through the van body on the underside, painted them with an underbody and bed liner paint, and then inserted the wire pass-throughs. I then just spooled everything up and will come back to this stuff once I get through some other steps.
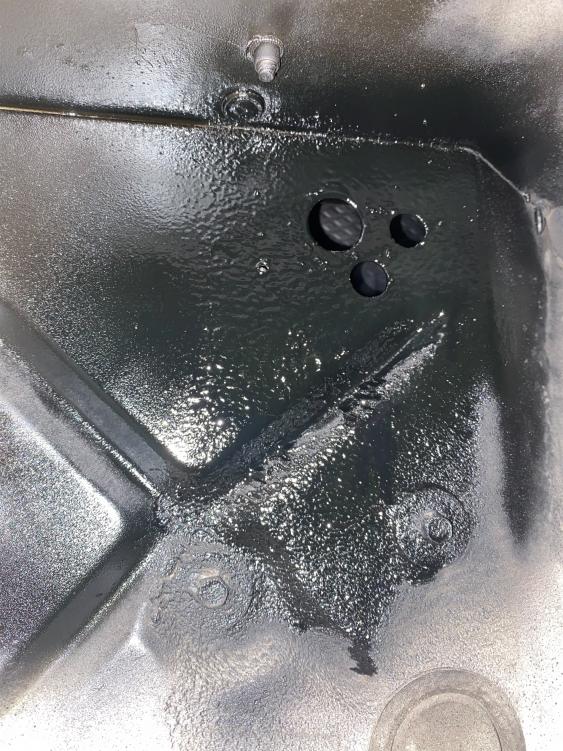
Holes Drilled and Painted
Forgot to get pictures of the actual passthroughs
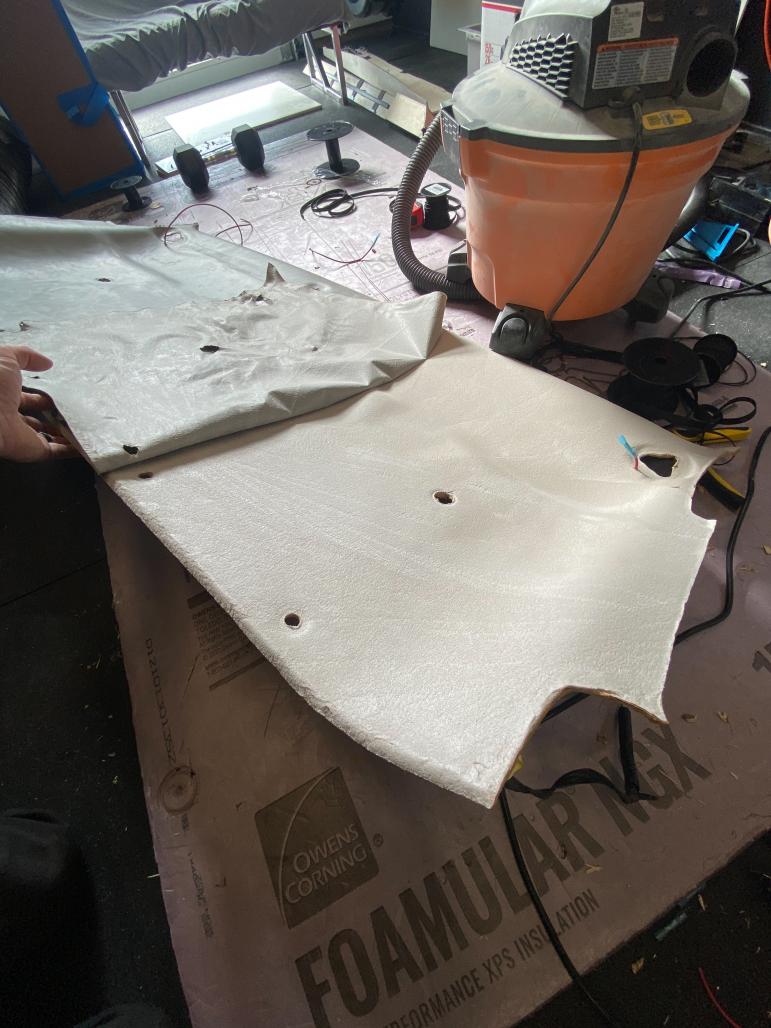
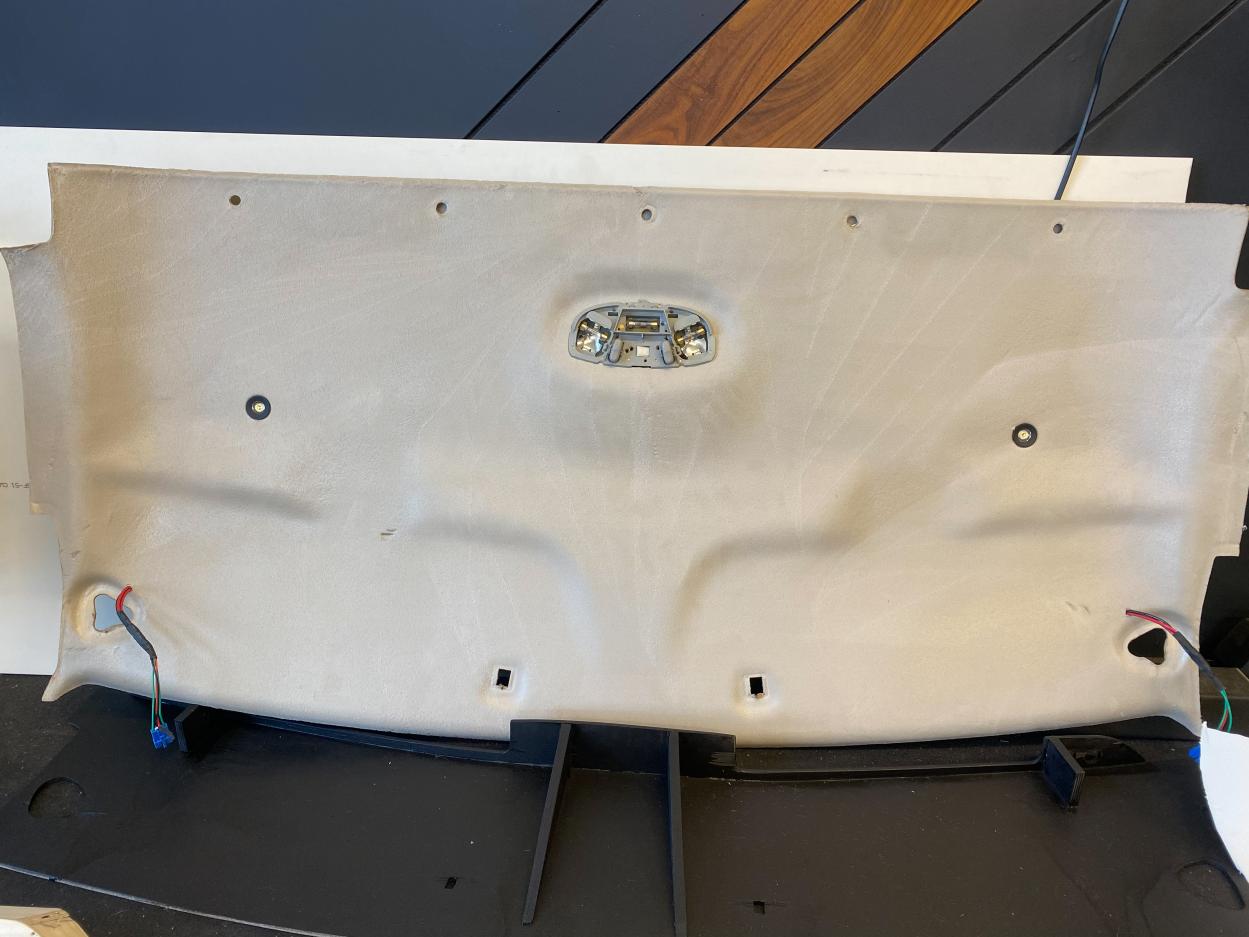
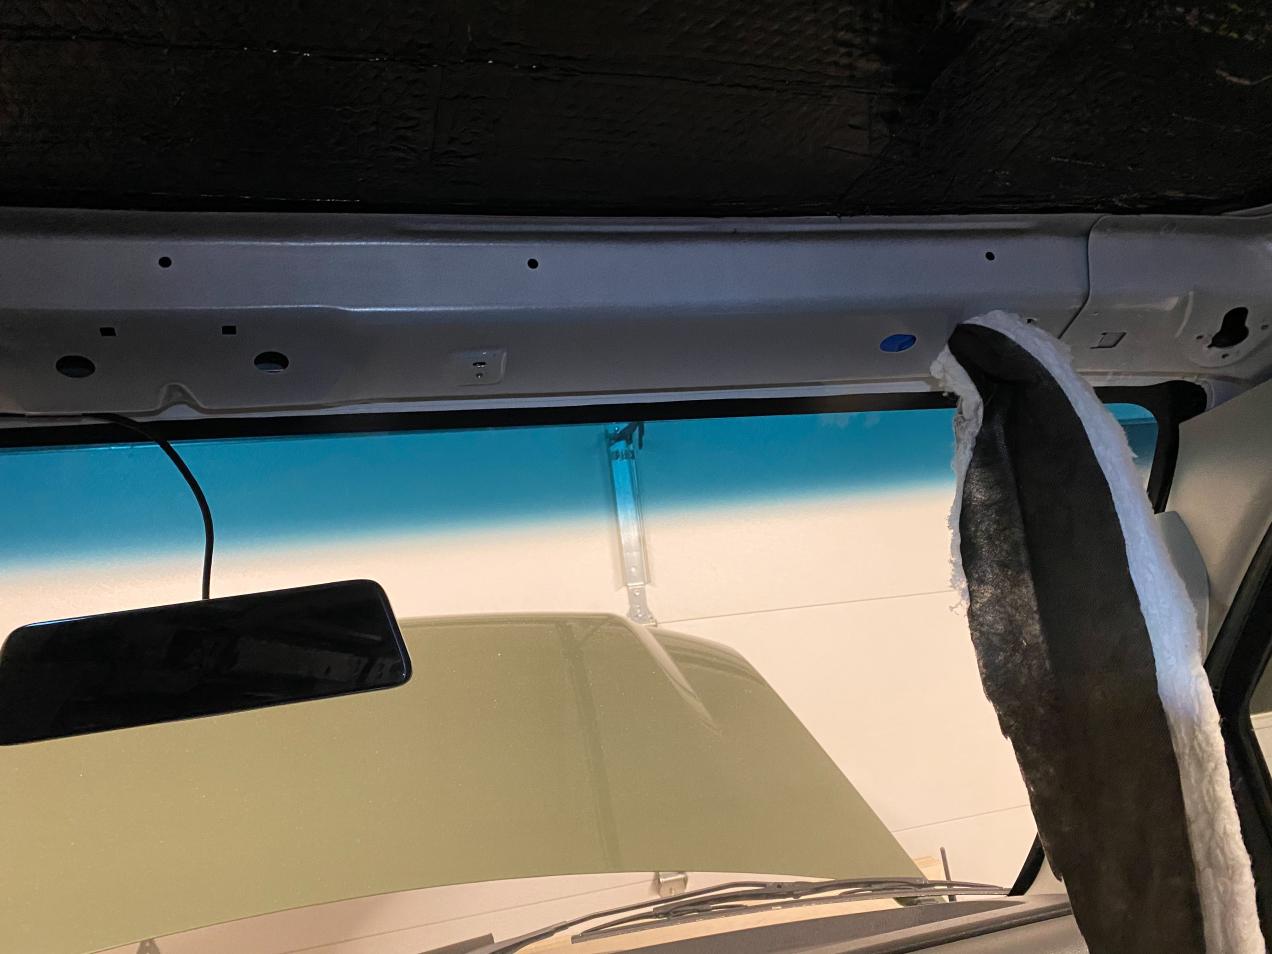
-My last bit of electrical rough-in was to wire the overhead lights and switches for the cab section. While I was doing the wiring for this I decided to go ahead and rip off the vinyl as I plan on reupholstering the headliner to match. So far the foam backer seems to be in really good shape, so I think I am going to just leave it and use it for my new fabric.
 Forgot to get shots of the wiring
That pretty much rounds out the electrical rough-in for now.
__________________
Vandit - 2013 E250 Ground Up Build- Full Custom DIY Interior Build
- DIY U-Joint Off Road 6" 4x4 Conversion
|
|
|
|
|
05-12-2021, 12:06 PM
|
#70
|
|
Senior Member
Join Date: Feb 2020
Location: Bend, OR
Posts: 312
|
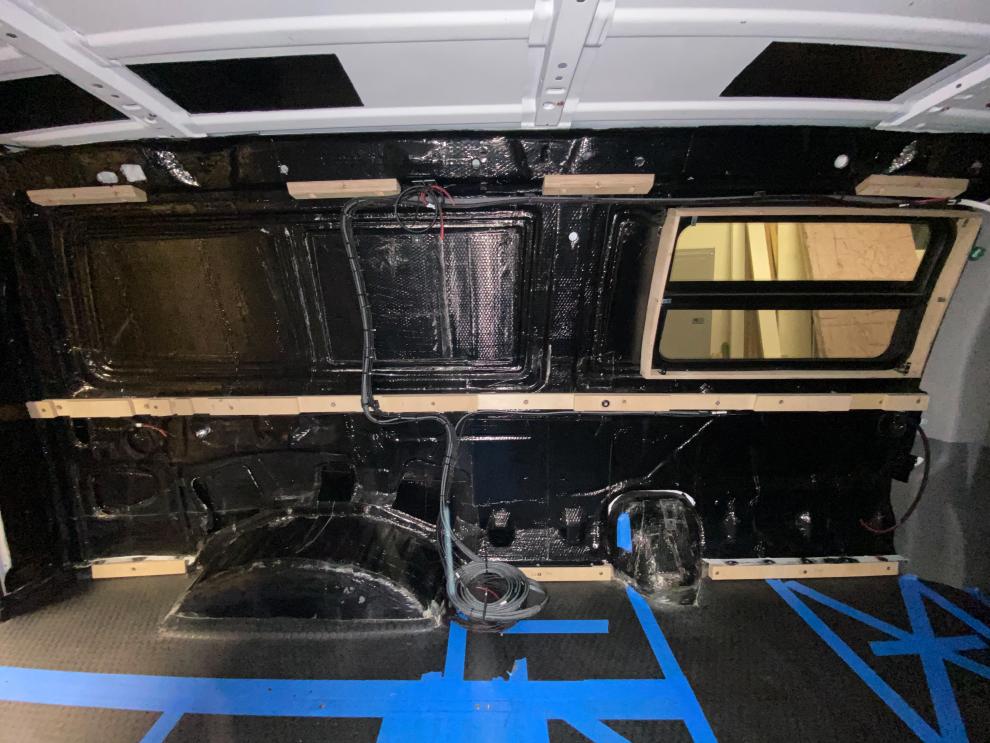
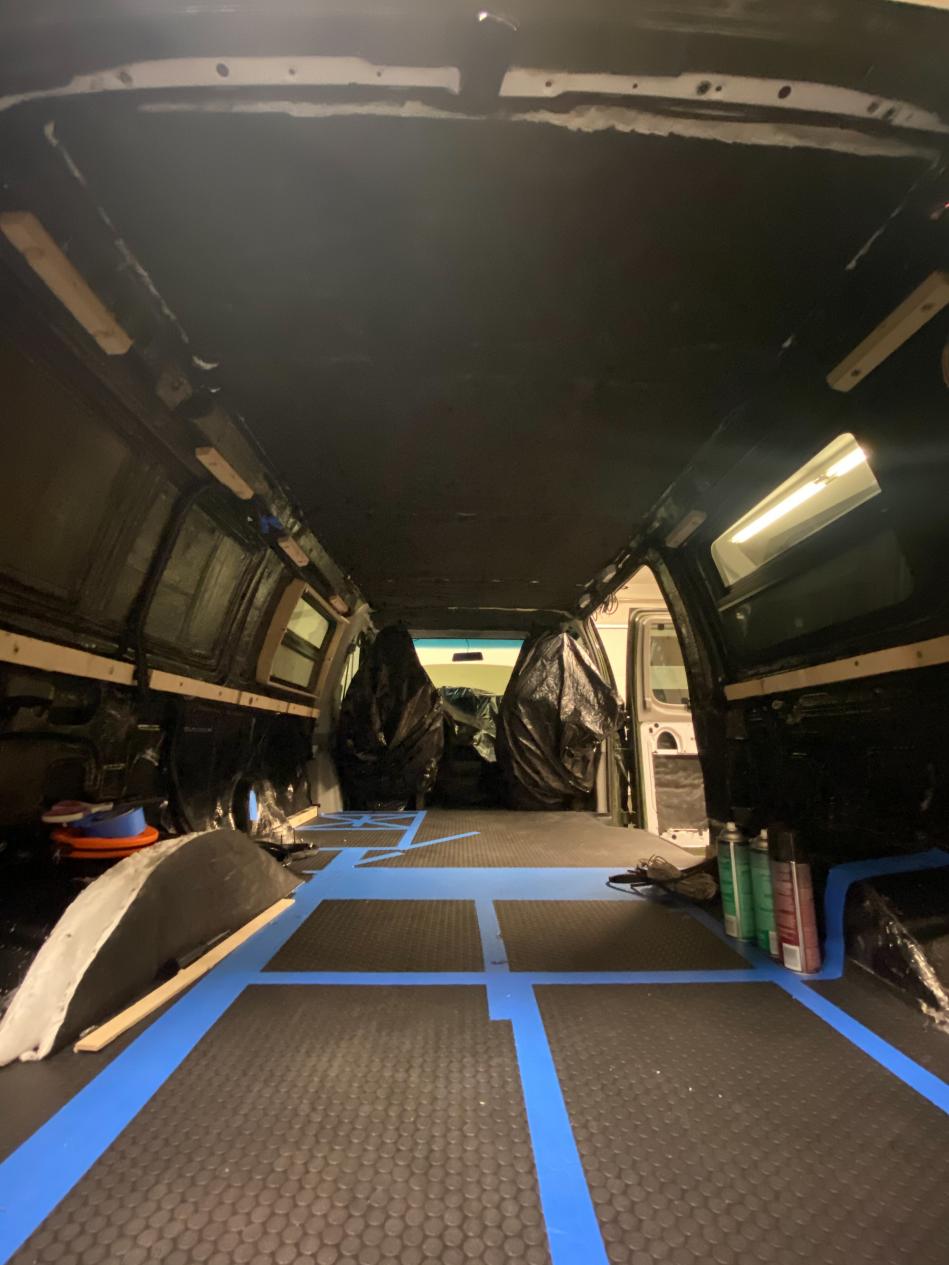
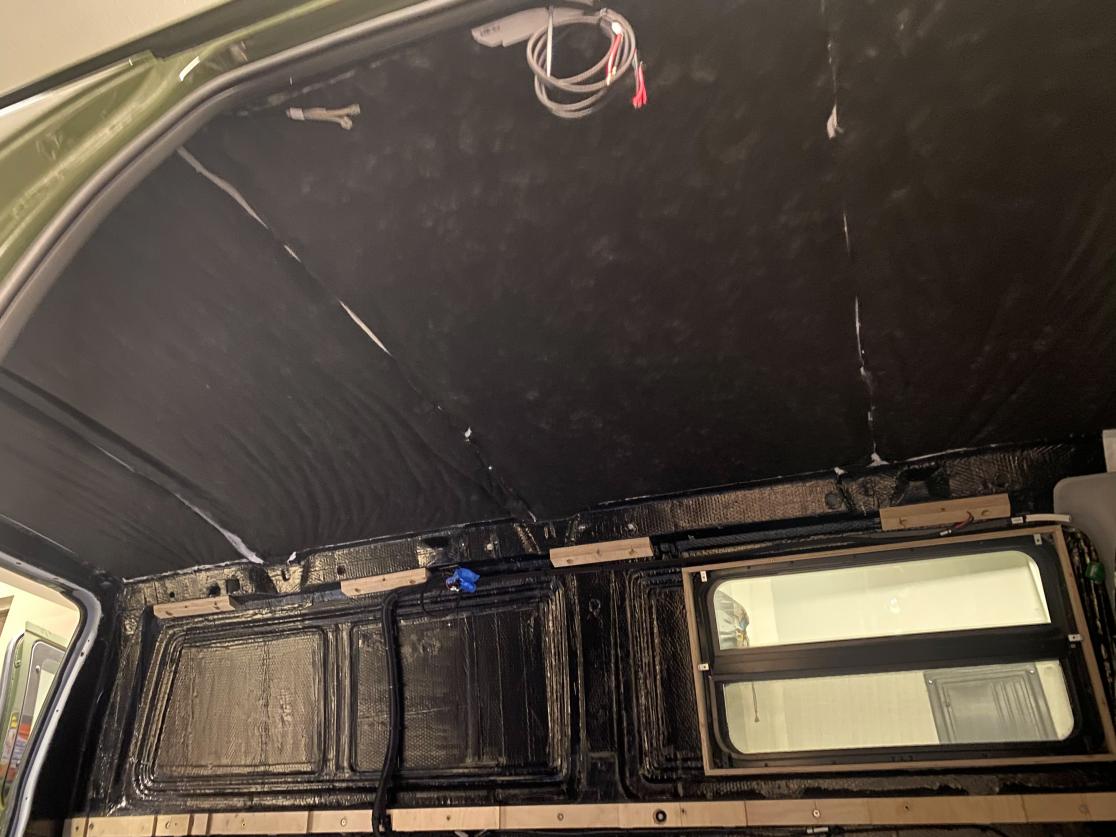
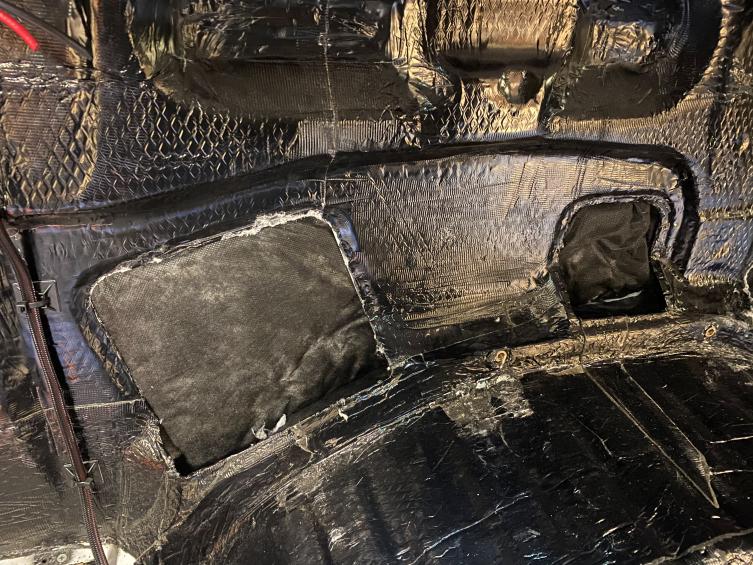
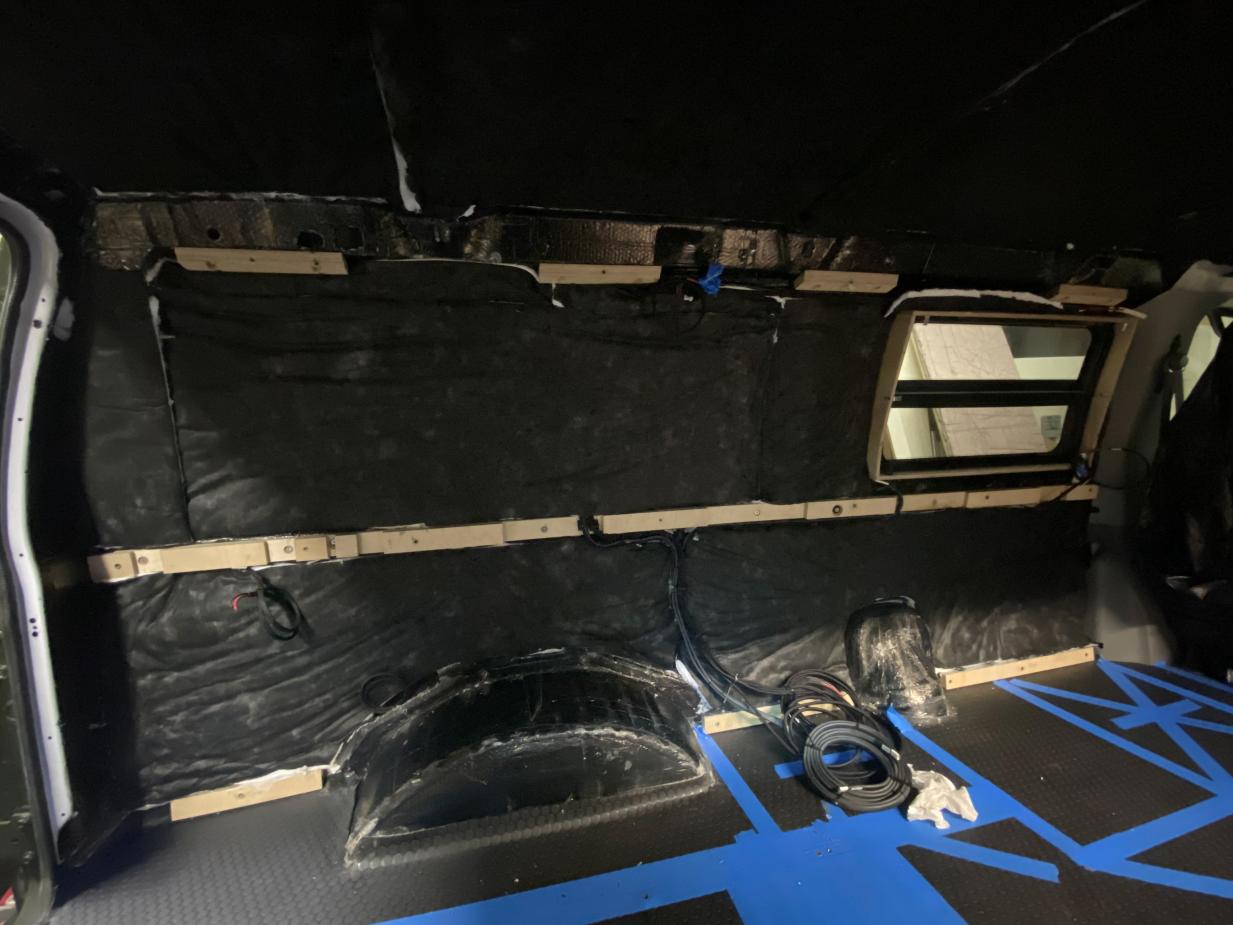
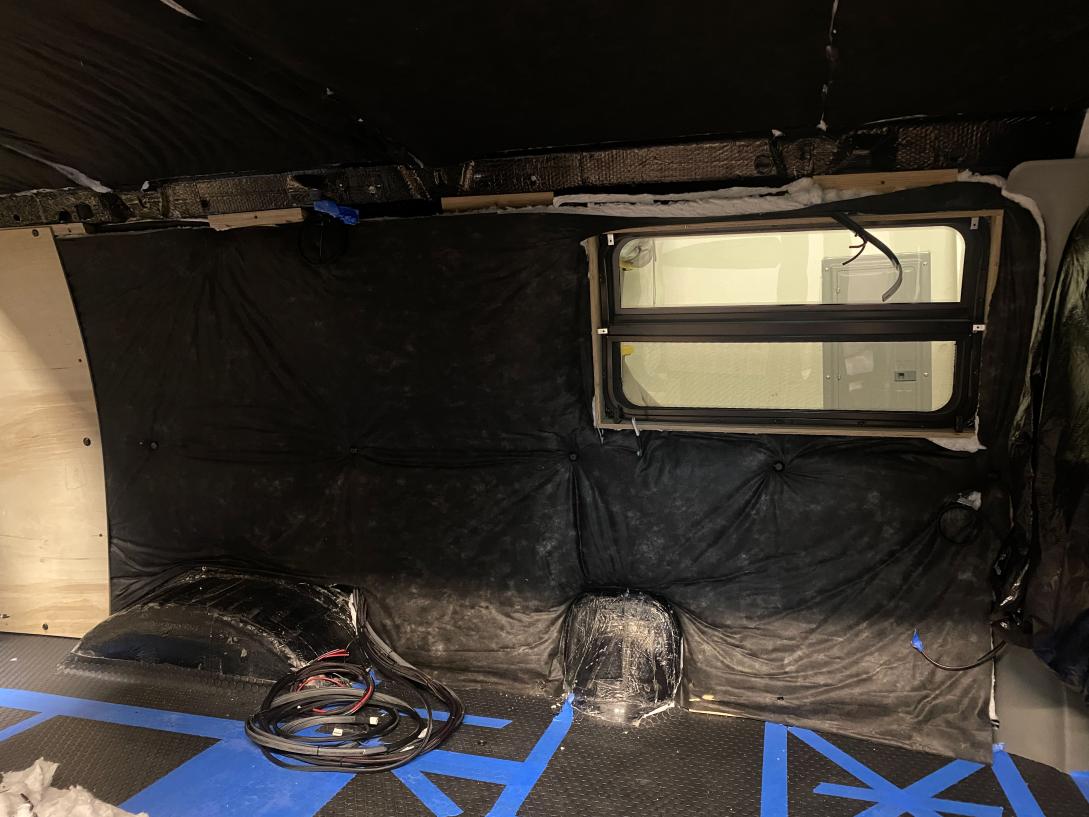
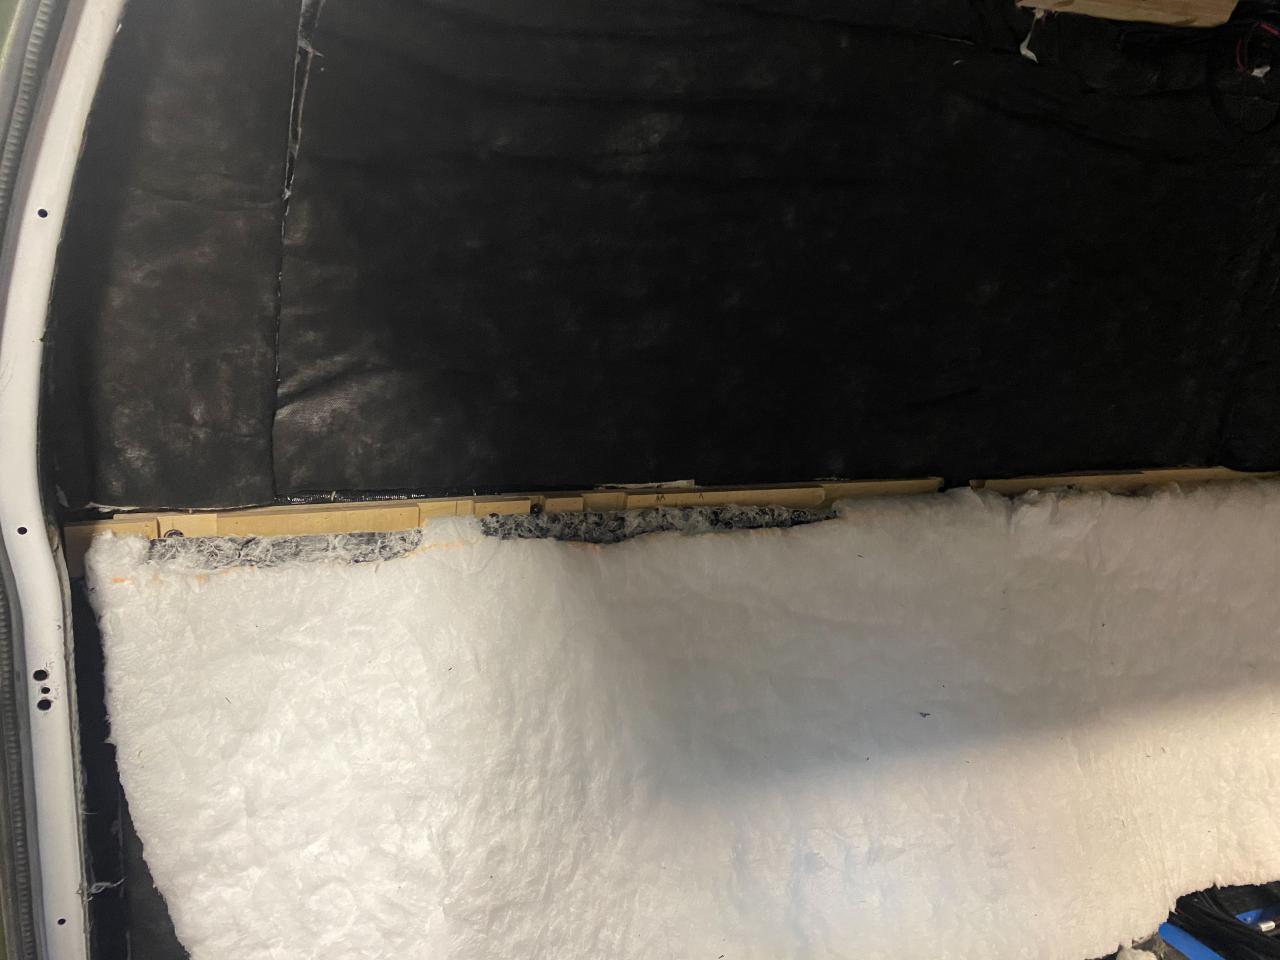
Insulation:
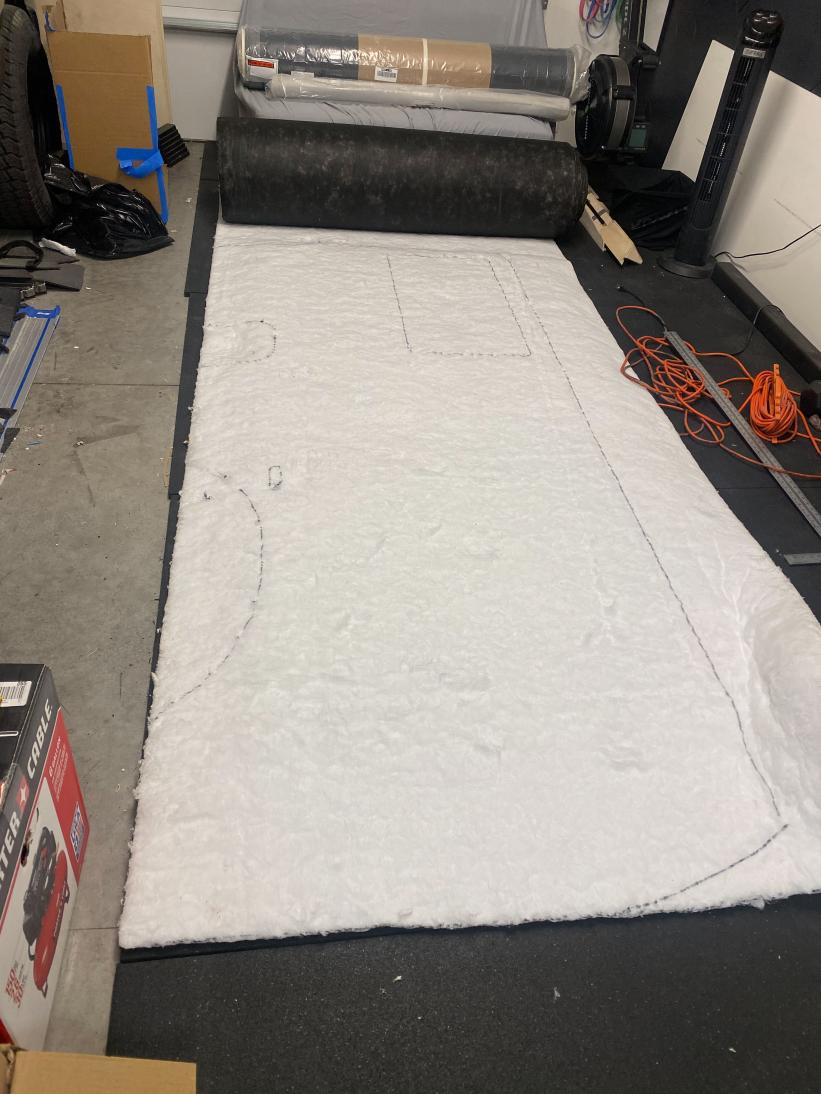
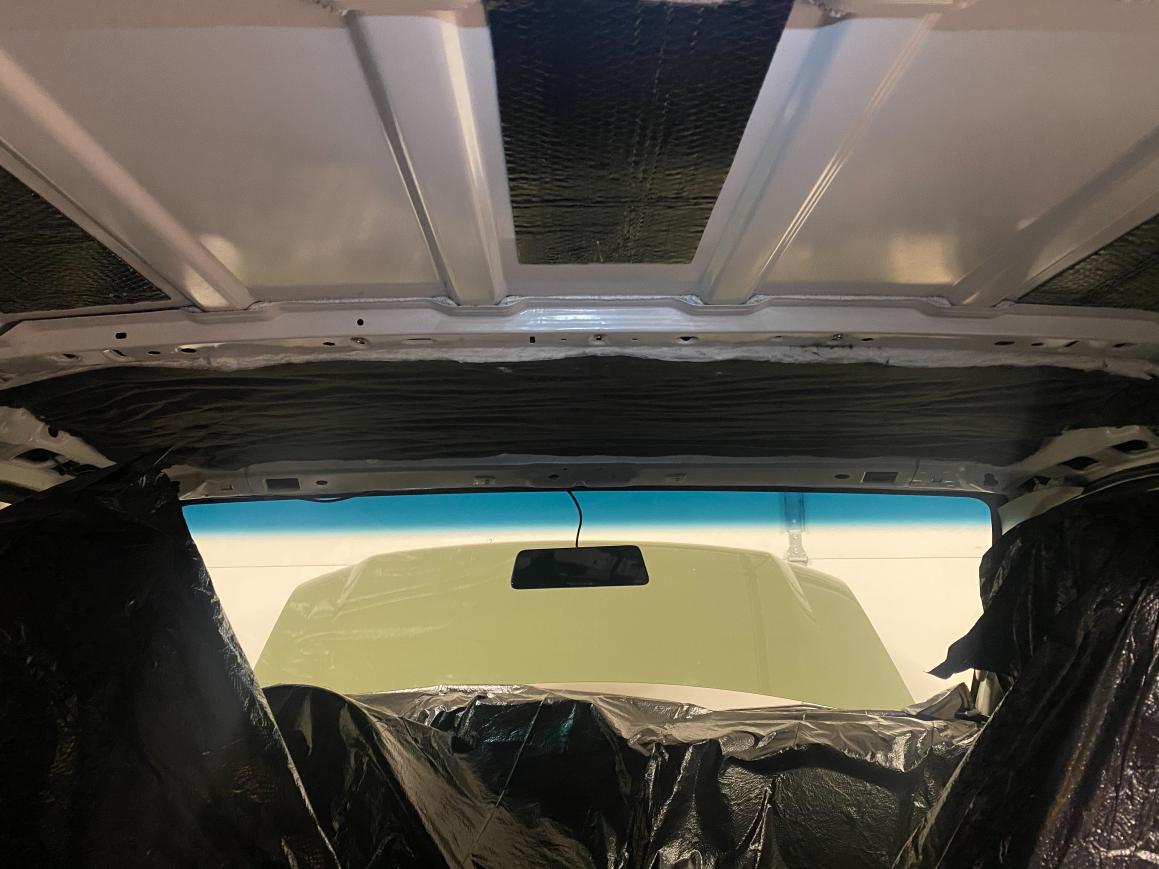
-After having the Thinsulate sitting in my garage for months it's nice to finally be able to get it in the van!
-I started by cutting strips on the Thinsulate and then using a fish tape pulled it through all the framing members around the van starting in the cab above the windshield. I repeated this process for all other small cavities and structural supports.
-Since I wasnt 100% sure I calculated for enough Thinsulate I started off by tracing out my wall panels just to make sure I had enough for at least a since layer on all the areas. Turned out I had calculated right and had plenty for almost 2-3 layers on all sections.
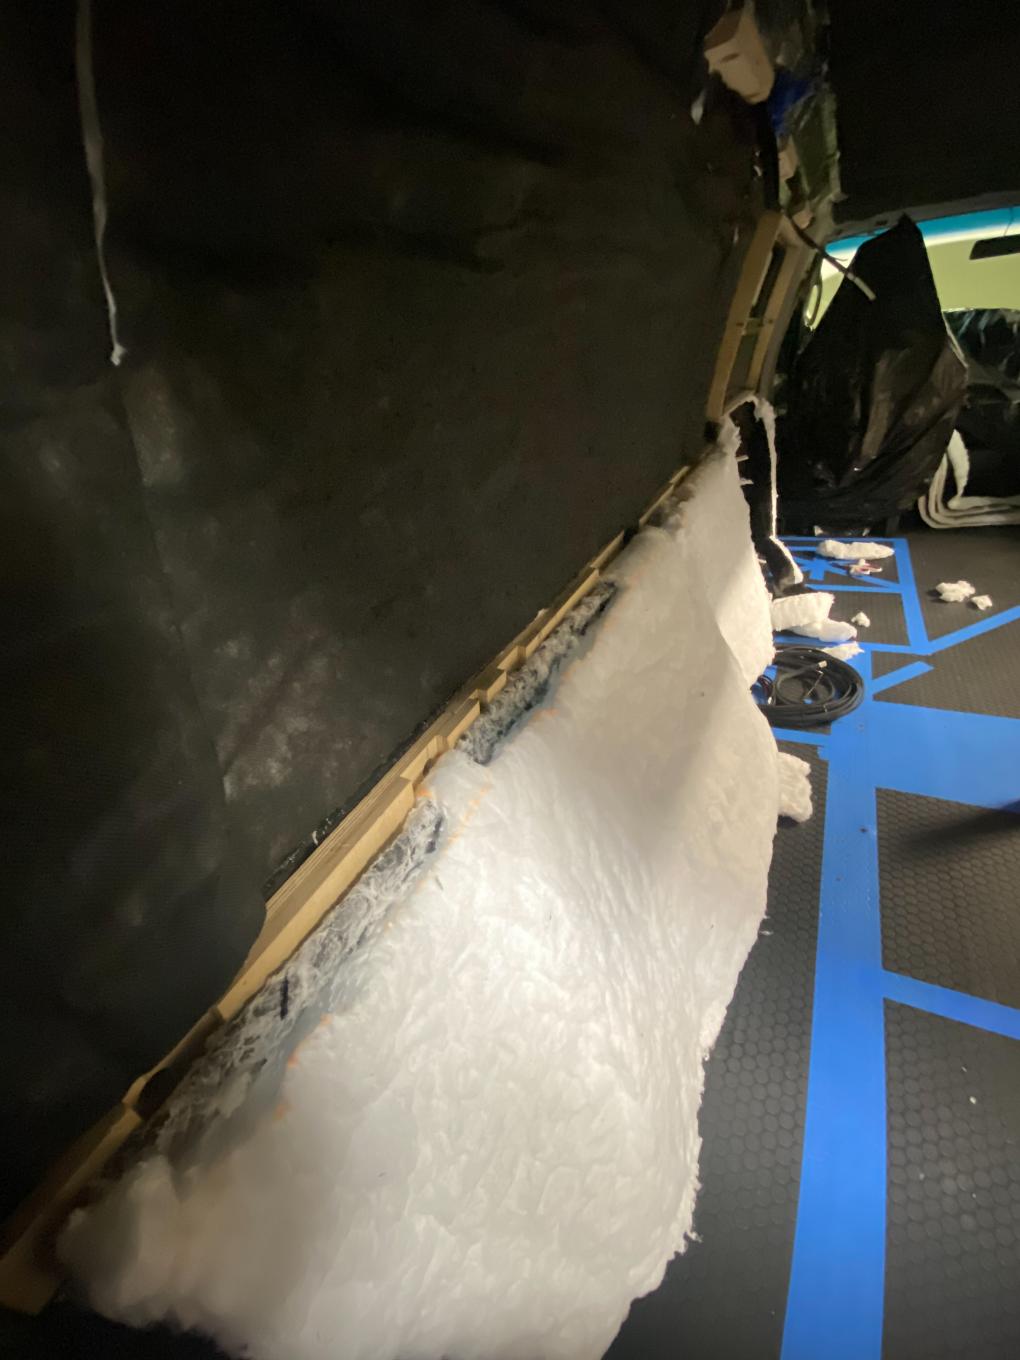
-Once I had my main sections figured I started on the cab ceiling. Cutting a panel to fit I used 3M 90 to glue it to the ceiling panel.
-I then moved backward from there on the rest of the ceiling. I first tried to do it as one big piece, but couldn't get it to work by myself, so I cut it into small pieces that just span between the ceiling cross ribs. In the areas where I crossed over a rib, I removed the actual Thinsulate from the black scrim just to make sure I didnt screw any of my panel fitment up.
-After I got the ceiling insulation done I went around and put as much insulation up through the cavities of the van as I could. I implemented fish tape, and pushrods to get it everywhere I could reach.
-Once I had a good base layer on all the van walls and openings I went to the doors. Using the same methods I secured Thinsulate everywhere I could reach.
-Since I couldn't reach the inside of the rear wall of the van very well I pulled the tail lights off and put insulation in from the outside on the back wall.
-Once I got all the doors done I went back into the van and started on the first layer of the driver side. I cut the insulation into a few wide strips to fill the void between the framing members.
-Once I had one layer all done I brought in the big insulation mat that I had previously traced out using the panel as my template and started doing a rough attachment. I pushed all my bolts through the scrim and into the inserts. This let me fold it in half so I could mark out where all my framing members were. Using a highlighter I was able to mark the locations where I had my double blocking on the middle support. Once I had it marked I cut out the Thinsulate so It was only the scrim that was left (similarly to how I did the ceiling). This made sure it was a tight and flush fit once the panel was re-installed. Once I had it all cut and prepped I used spray adhesive to attach the panel to the first layer of Thinsulate. This gave me a nice solid looking insulation package.
-I then repeated the same process for the passenger side of the van and then the insulation was basically done!
Additional pieces:
-When I pulled the door boxes out for the door insulation process I went ahead and did a rattle can spray-on bed liner to the insides of them. This should make them durable, easier to clean, and easy to touch up if need be.
-After getting the first round of insulation I decided to go back and check my panel fitment as well as add openings for my main wire pass-throughs.
__________________
Vandit - 2013 E250 Ground Up Build- Full Custom DIY Interior Build
- DIY U-Joint Off Road 6" 4x4 Conversion
|
|
|
|
|
|
 Posting Rules
|
You may not post new threads
You may not post replies
You may not post attachments
You may not edit your posts
HTML code is Off
|
|
|
|
 » Recent Threads
 |
|
|
|
|
|
|
|
|
|
|
|
|
|
|
|
|
|
|
|
|
|
|
|
|
|
|
|
|
|
|
|
|
|


 AWOL
AWOL Vandit

 Linear Mode