|
|
 11-11-2012, 10:05 AM
|
#991
|
|
Member
Join Date: Oct 2012
Posts: 33
|
What did you do to your SMB today?
Thanks!... Next step!! Lift it with 285/75R16 and AR outlaw II wheels!!
|

|

|
|
11-11-2012, 10:47 AM
|
#992
|
|
Senior Member
Join Date: Apr 2007
Location: Parker, CO
Posts: 7,644
|
Re: What did you do to your SMB today?
Quote:
|
Originally Posted by vanvan
After:
|
Looks like just in time too!
I drained the water for the winter since it finally got down to 29º and I kept forgetting.
__________________
it was good to be back
|
|
|
|
|
11-12-2012, 11:27 AM
|
#993
|
|
Senior Member
Join Date: Nov 2012
Location: Brentwood, CA
Posts: 1,051
|
Re: What did you do to your SMB today?
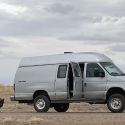
I made a pretty big dent in 'pre-trip' higher priority list before we set sail for a 6 day desert trip, in less than a week.
This 1995 SMB 4x4 is new to me, the previous owner was not very mechanical, and the various shops who installed the U-Joint Offroad 4x4 conversion didn't get a couple of small things right.
*Clearanced engine crossmember
*Relocated power steering oil cooler
*Fabricated adjustable linkage for transfer gearcase
*Relocated shifter boot
*Inspected front brakes
Cross member clearance: There was evidence of the engine mount crossmember giving the front axle a few 'love taps' We will be doing some moderate offroad in the desert, I want to make sure the 4" lifted E350 has all of the designed in 'flex' that the U-Joint guys intended. The U-Joint video shows much more material being cut away from the cross member than mine has. I whipped out my 4" Makita grinder w/.06 cut-off wheel, safety glasses, and went to town, increasing axle-to-cross member clearance from 2" to 4".
Move Power Steering cooler: After trimming the crossmember, there was no place to bolt the tiny little Ford P/S oil cooler. I made up a couple of 6" steel tabs, and welded them into position. Grind smooth and paint to match with a little 'rattle can' Rustoleum. In the process, I managed to catch one of my favorite NHRA sweatshirts on fire... I knew something smelled funny... I now know why the shop who did the front axle install (somewhere in Reno?) chose to trim so little material away 
Figure out the transfer gearcase shift mechanism: The previous owner warned me there was something wrong, he couldn't get 4wd low. The T-case was a rebuild Borg Warner unit, the shifter looks to be modified Ford. I was able to get 2wd high, and 4wd high, but not 4wd low. The shop in Boise couldn't figure it out, and got the PO on the road with the promise to 'fix it at a latter date' which never came (so the story goes). I really can't blame anyone here, my E350 is a bit of a Frankenstein's Monster, the conversion started by one shop, completed by another, PO didn't bring it back in to get it sorted out due to time constraints. Once I figured out why 4-low couldn't engage, I cut and extended the linkage rod, and relocated the pivot on the T-case lever so the 'gates' on the linkage now line up. It now 'feels' right, but I have to road test it to make sure. Even if it's not 100%, at least I now understand how it is supposed to work, and have some adjustment built into the linkage to work with (where Ford had no adjustment).
Front brake inspection: Pads show 5/16" thich, rotor runout <.005" Great!
__________________
1995 E350 7.3 Diesel, 4x4 high roof camper, UJOR 4" lift
|
|
|
|
|
11-12-2012, 05:33 PM
|
#994
|
|
Junior Member
Join Date: Aug 2010
Posts: 28
|
What did you do to your SMB today?
I didn't like having to check my water tank to see where the water level was. Most of the time, I needed a flashlight to be able to see where the level was. So, I put a light at the back of the tank. Here is a before picture:
I added a flat 6x6 led array to the panel behind the tank:
I added a door switch to turn it on when you open the door (in the lower right hand corner of the door frame)
|
|
|
|
|
11-12-2012, 07:04 PM
|
#995
|
|
Senior Member
Join Date: Feb 2012
Posts: 879
|
Re: What did you do to your SMB today?
Quote:
|
Originally Posted by DonSt
So, I put a light at the back of the tank.
I added a door switch to turn it on when you open the door.
|
Slick! My SMB has one long, loooong door on the front of the gaucho (it's not a "50" and the bed runs fore-and-aft) and I've been considering cutting it into at least two doors (because now you have to basically "clear the van!" in order to open that door). If/when I do that, I'd love to add the light and door switch.
|
|
|
|
|
11-14-2012, 10:45 AM
|
#996
|
|
Senior Member
Join Date: Nov 2012
Location: Brentwood, CA
Posts: 1,051
|
Re: What did you do to your SMB today?
* Repaired (2) shorted interior light circuits
* Repaired roof vent fan
After spending a couple of 2-hour sessions checking the Ford factory fuse blocks, looking for melted wires, cleaning up 'house battery' terminals, adding a better ground to both the body and frame rail, trying to figure out why I had no interior lights. I was about to give up and just 'bring it in' 
I am pretty good at troubleshooting simple circuits like the type in an RV, but I've never worked on anything with an inverter, furnace, etc.
The local RV place, that is good with electrical, is booked solid for two weeks... my trip is in a few days, so that's a non-starter.
My Gal convinces a buddy of ours to stop by, and give me some fresh ideas, you know, 'another set of eyes on the problem'. There's a few things in life I have found to be true 99% of the time. With electrical systems, you have to put on your 'logic' hat. Isolate and test. Take nothing for granted, make no assumptions. Dave knows almost nothing about automotive electrical, but is a very experienced computer systems programmer, just the right guy to bring 'logic' to bare on a problem like this.
We locate the 'house fuse panel' buried behind a panel, inside the MagnaTek inverter (I never thought to look there...) Two blown fuses. I replace the fuses one by one, they both blow again, quickly. We isolate the offending circuits. We find not one, but TWO light fixtures with internal shorts, and repair them. One circuit down, one to go...
While tugging on, separating, and identifying the various hard wired wires going into and out of the inverter, Dave notices some brittle wire insulation on a 12v wire. Further investigation, using my finger to follow the wire behind the interior panel, reveals 3/4" of missing pvc wire insulation, where the wire makes it's turn, disappearing behind the wall covering. Sure enough, a dead short to ground! I wrap it with convoluted plastic wire loom, black tape, and we are back in business. Both circuits now operating normal 
I replace the (obvious) broken fuse holder in the fan unit, and the main power wires to the unit, splicing in new wire with solder and shrink wrap. Still no joy. Hmmm... I trace power with my 12v probe, notice a cold solder joint at one of the switch connectors. I re-solder it, and the fan operates beautifully now!
__________________
1995 E350 7.3 Diesel, 4x4 high roof camper, UJOR 4" lift
|
|
|
|
|
11-14-2012, 11:08 AM
|
#997
|
|
Senior Member
Join Date: Aug 2010
Location: Taylor, Mississippi
Posts: 1,648
|
Re: What did you do to your SMB today?
Pretrip under-the-van inspection. Noticed that the pass.side bumpstop rubber block thingy is askew. Discovered it was about 2 threads from falling off. I don't know what happens when one falls off, but am glad I didn't get educated out on the road. The rest of the underside got a much closer inspection as a result.
__________________
'95 SMB E350 Quigley 7.3
https://www.taylorarts.com
... If you have to ask, you'll never understand...
"... torpedo'd, because we don't generally cotton to bullshit around here." -jage
"... do they ooch apart in the night?" -Dia
|
|
|
|
|
11-14-2012, 11:16 AM
|
#998
|
|
Senior Member
Join Date: Dec 2011
Location: Washougal, Wa
Posts: 1,047
|
Re: What did you do to your SMB today?
Quote:
|
Originally Posted by TomsBeast
* Repaired (2) shorted interior light circuits
|
Impressive troubleshooting and repair work. Do you have any pictures of your vehicle? Please give us more info on your "Frankenrig".
__________________
John
Gnarvan 1992 E350 Clubwagon
Advanced 4WD Systems Conversion
Sotar Legend 12.5' X 22" Cataraft
2003 BMW R1150GS-Adventure
2013 BMW R1200GS-Adventure
|
|
|
|
|
11-14-2012, 03:37 PM
|
#999
|
|
Junior Member
Join Date: Sep 2012
Posts: 15
|
Re: What did you do to your SMB today?
Added Bushwhackers to my van
|
|
|
|
|
11-16-2012, 12:32 PM
|
#1000
|
|
Senior Member
Join Date: Nov 2012
Location: Brentwood, CA
Posts: 1,051
|
Re: What did you do to your SMB today?
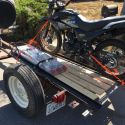
* Fabricated a behind-the-front-bumper trailer hitch
* Fabricated spare tire holder for a 33"x 12.50 offroad tire/wheel combo
* Mounted rack to hold Yamaha generator
If you have ever had a front mounted trailer hitch, you know just how handy they can be for 'pushing' a trailer into a tight spot, and used as an attachment point for motorcycle/bicycle racks, winches, spare tire mount, etc.
My Ford van's under rear body factory spare tire carrier is fine, until you want to carry a matching offroad spare tire/wheel on your 4x4 conversion. You can stuff a large tire/wheel up there, but you loose most of your ground clearance in the bargain, which simply will not work for me. Some could get away with using the smaller factory spare, unless your van has a locker differential like mine does. Driving very far with mis-matched rear tire diameters will destroy a locker faster than you can eat lunch.
Aluminess bumpers are great, Runel, too, but neither of those options are in our budget in the foreseeable future. I will eventually build my own dual swing away carriers for the back, re-purposing a heavy duty Runel rear bumper from my 1988 F350. For now, mounting the spare tire and the generator up front will work best for me. I will eventually want to carry a second spare tire for desert trips anyhow, so the effort won't have been wasted.
This is some pretty heavy fabrication work, making me sore this week, the bumper had to come on and off half-dozen times. I used up (6) 4" cutoff wheels, a 4" grinding wheel, two pair of gloves, and a fair amount of MIG welding wire in the process.
I re-purposed an old class 3 'Ideal' brand trailer hitch from another project, that was in good shape. Competition 4x4 supplied the wheel plate drilled for 8 on 170mm pattern that my 4x4 conversion uses, and the telescoping adjustable tube-in-a-tube spare tire mount kit. Harbor Freight supplied the rack.
I hope the front mounted stuff doesn't block the radiator so much as to make it run hot 
I'll post up some pictures after my trip.
__________________
1995 E350 7.3 Diesel, 4x4 high roof camper, UJOR 4" lift
|
|
|
|
|
|
 Posting Rules
|
You may not post new threads
You may not post replies
You may not post attachments
You may not edit your posts
HTML code is Off
|
|
|
|
 » Recent Threads
 |
|
|
|
|
|
|
|
|
|
|
|
|
|
|
|
|
|
|
|
|
|
|
|
|
|
|
|
|
|
|
|
|
|


 Linear Mode